This integration deployment guide will help you quickly and seamlessly connect UKG Ready with HighMatch.
Summary of the Integration Flow
- The integration is either triggered manually by a recruiter or hiring manager.
- The candidate will complete the assessment via the invitation email they received, which was either automatically sent during the application process or sent when an assessment was manually ordered by a recruiter or hiring manager.
- HighMatch will update the assessment status on UKG Ready when the assessment is sent, in progress, and completed.
- When the candidate has completed the assessment, HighMatch will post the results and a link to a detailed HighMatch assessment report on the candidate’s profile.
Summary of Steps
There are 11 steps to configure the integration before you can request and receive back candidate assessment results from within UKG Ready.
Steps 1-9 cover how to enable the integration.
Step 1: Add the Option to Create a Service Account
Step 2: Create a Service Account
Step 3: Configuring your Security Profile
Step 3: Configuring your UKG Pro Account
Step 4: Create and Record the API key
Step 5: Gather your Company Short Name and Company ID
Step 6: Add Custom Fields to the Applicant Record & Requisition
Step 7: Add New Hiring Stages
Step 8: Prepare a Test Job, Test Candidate, and Application
Step 9: Provide HighMatch with all Details for Configuration
Steps 10-11 cover how to use the integration.
Step 10: Ordering and Sending Assessments Manually
Step 11: Reviewing the Assessment Results and Report
Please reach out to HighMatch’s Success team at support@highmatch.com if you wish to enable the integration to connect UKG Ready with HighMatch, or if you have any questions regarding the HighMatch integration, assessments, and assessment reports.
Process Details
Step 1: Add the Option to Create a Service Account
Service Account Overview
In the past, partners have used an employee account to have API access. However, due to some security hardening, these types of UI accounts will be required to change their passwords on a 90-day cycle. To solve this, Service Accounts were implemented. Service Accounts cannot log into the User Interface employee account, can only utilize the UKG Ready APIs, and have passwords that never expire.
To start, you will need to add the option to create a Service Account. If you have this enabled, you may skip this step and move on to Step 2.
- Log into your UKG Ready account.
- Go to Settings > Global Setup > Company Setup.
- Select the Edit Tabs, find Service Accounts and drag it to one of the Sections under your Login Config tabs.
- Click Save.
Step 2: Create a Service Account
Now that the option to create service accounts has been added, under Company Setup:
- Go to the Login Config tab.
- You will now see a Service Accounts section. Click Add Service Account and fill out the necessary information, including username, password, security profile, and account groups.
- Note: Security Profile relates to the information the account has access to, while Account Groups relate to the employees you have access to.

- Click Save.
Step 3: Configuring your Security Profile
Make sure the following permissions exist in the related security profile.
- Go to HR > Recruitment.
- Search for security in the search box to find the Security Profile information.
- Adjust settings per the screenshots below:

- Go to Modules > Rest API Resources.
- Adjust settings per the screenshots below:

- Go to Report > Reports.
- Adjust settings per the screenshots below:

- Click Save if you made any changes.
Step 4: Create and Record the API key
Now you will need to create an API key that you will need to record in your records:
- Go to Settings > Global Setup > Company Setup > Login Config tab.
- Look for the API key section at the bottom of the screen
- Click the hamburger menu icon in the right corner to expand the settings.
- Create and record the API key in your records.
Step 5: Gather your Company Short Name and Company ID
Now you will need to create an Company Short Name and Company ID that you will need to record in your records:
- Go to Settings > Global Setup > Company Setup > Company Info tab
- Find and make note of the Company Short Name in your records.
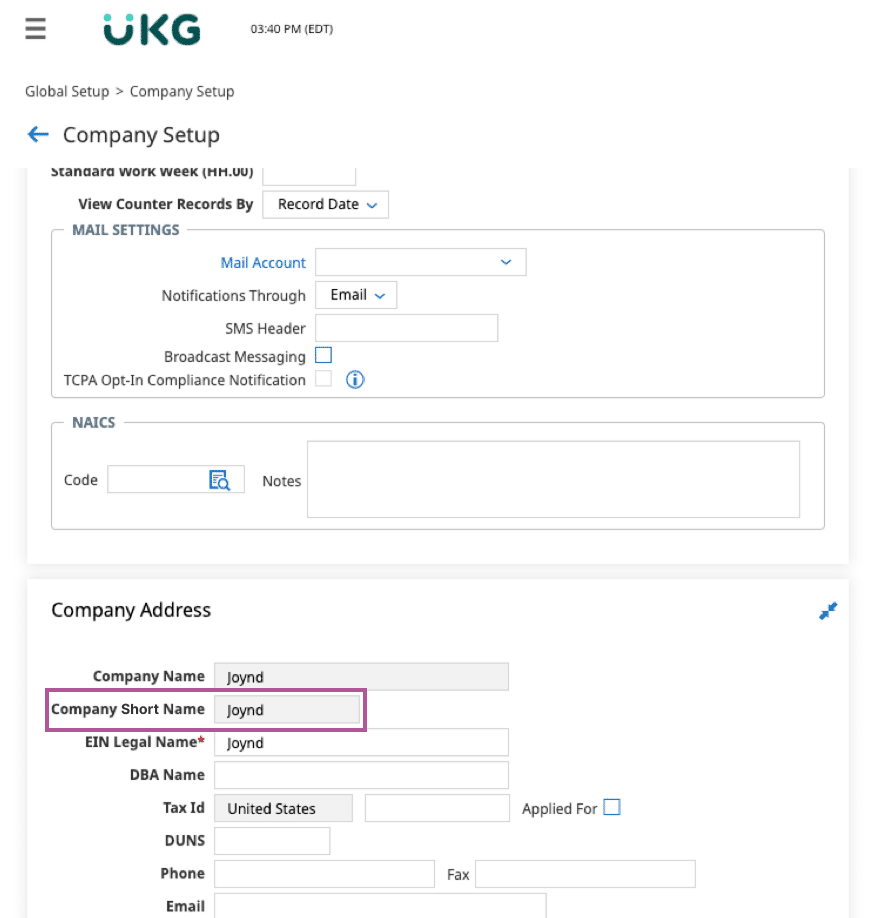
- Find and make note of the Company ID in your records.
- Find and make note of the UKG Ready domain (copy from the browser after you log into your UKG Ready recruiting module).
- Note: You will need the first part URL, highlighted in the screenshot below:

- Click on the address bar and ensure that the URL is highlighted, then copy the value.
- Ensure that ALL of the information above is in a readily accessible document so that you can provide it to HighMatch in Step 9.
Step 6: Add Custom Fields to the Applicant Record & Requisition
Now you will need to add Custom Fields to the Applicant Record & Requisition:
Applicant Record:
- Go to Settings > HR Setup > Applicant Tracking/Recruitment > Custom Fields > Applicant Custom.
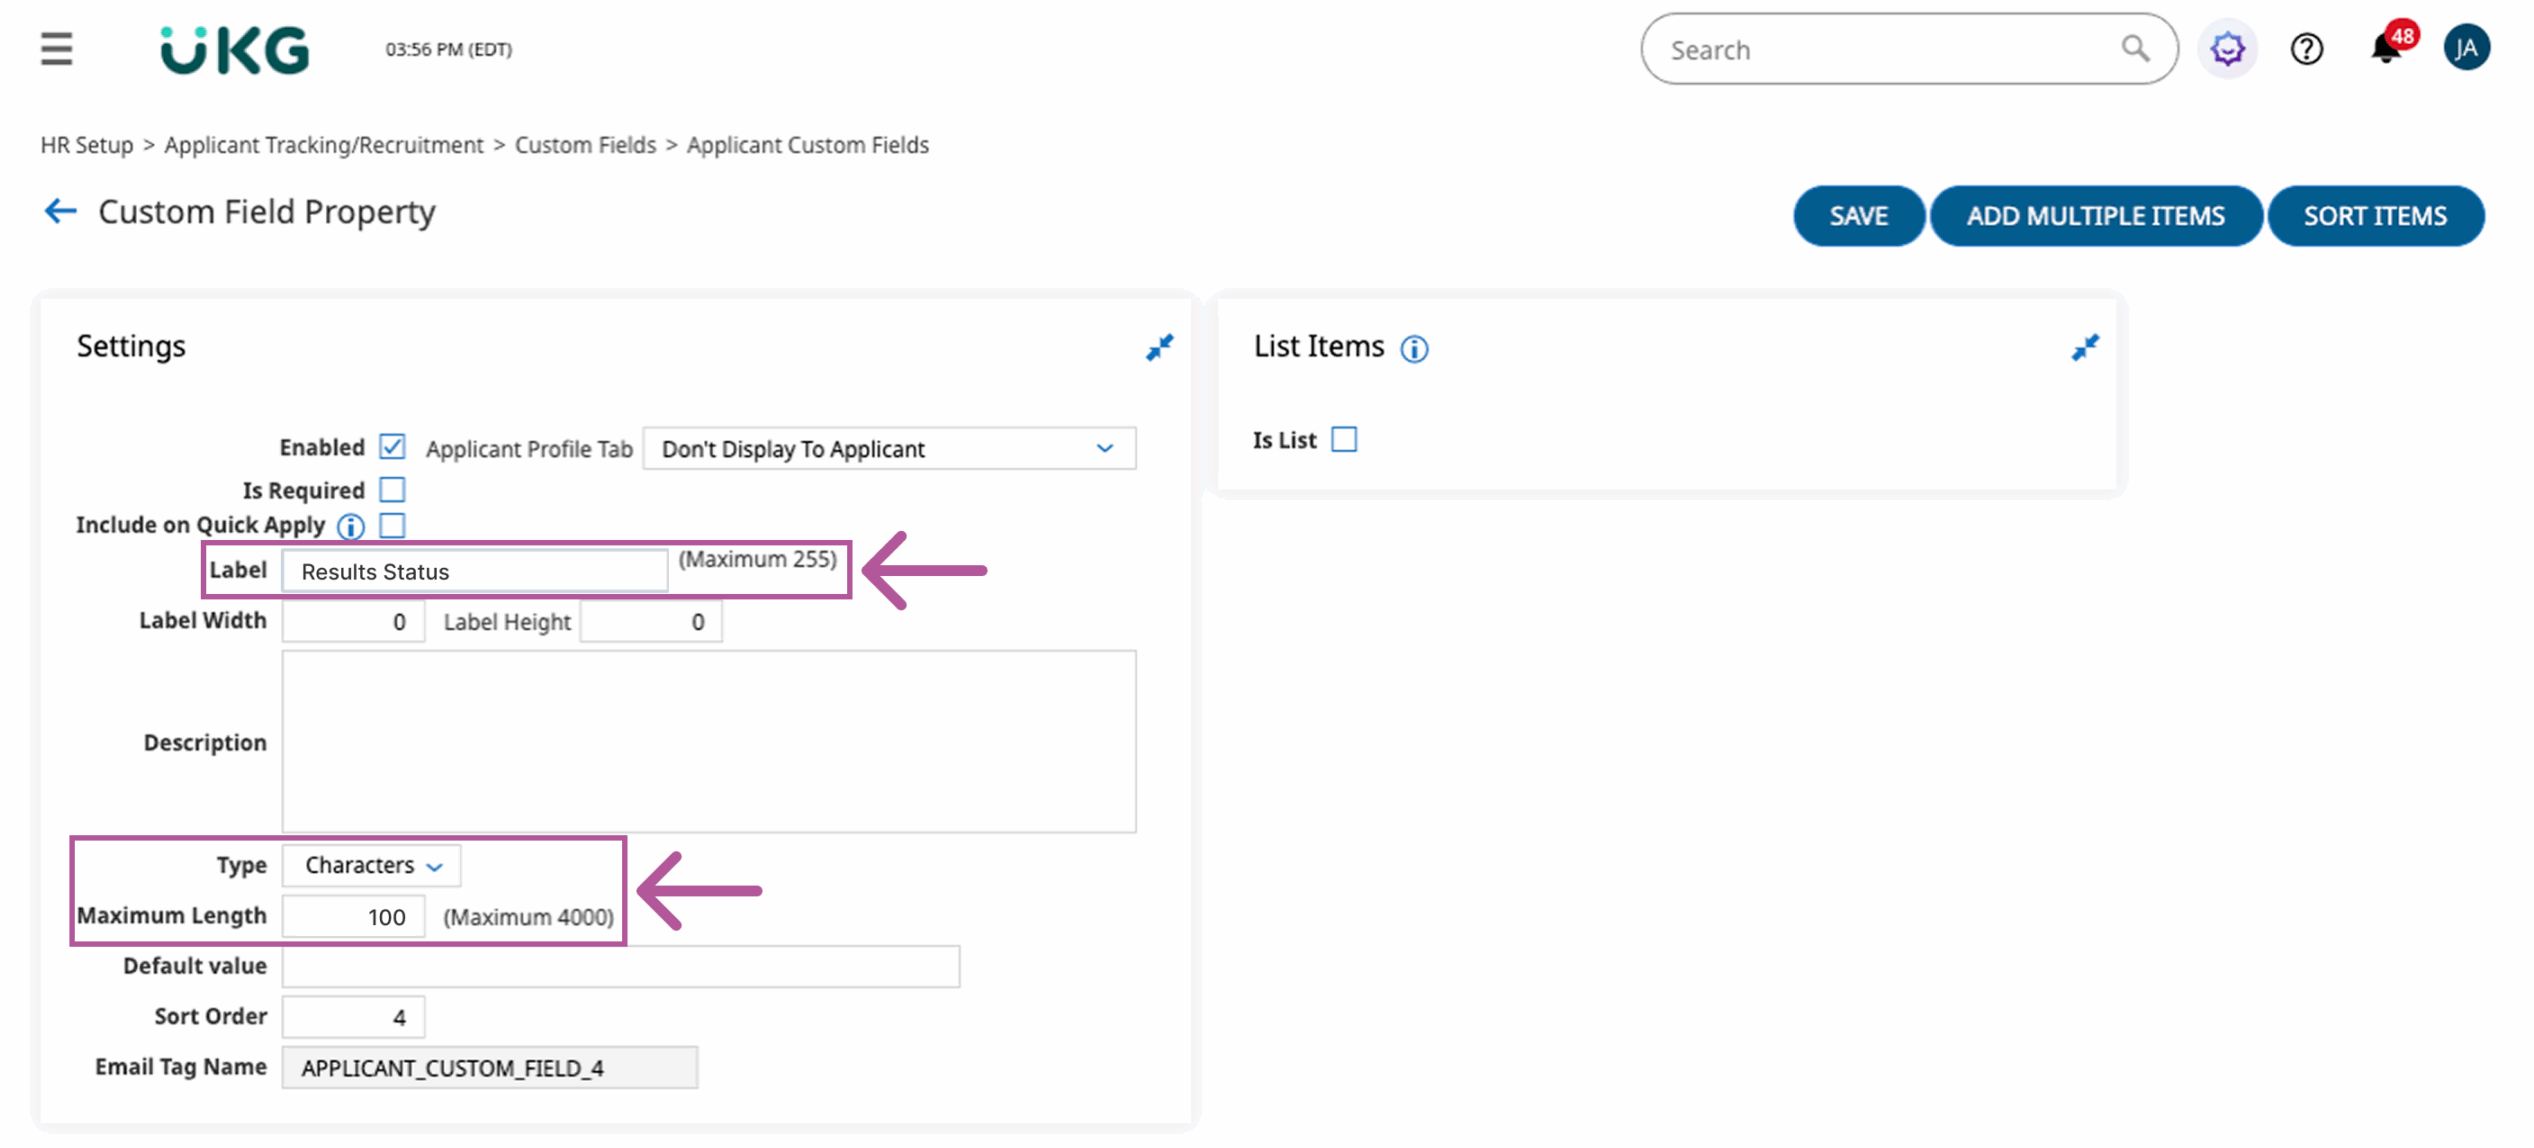
- Create two fields for the Results Status and the Report as follows:
- The Result Status field is used for the completed status, but could also be used for a pass/fail value. Please set it as follows:
- Label: Results Status
- Type: Characters
- Maximum Length: 100
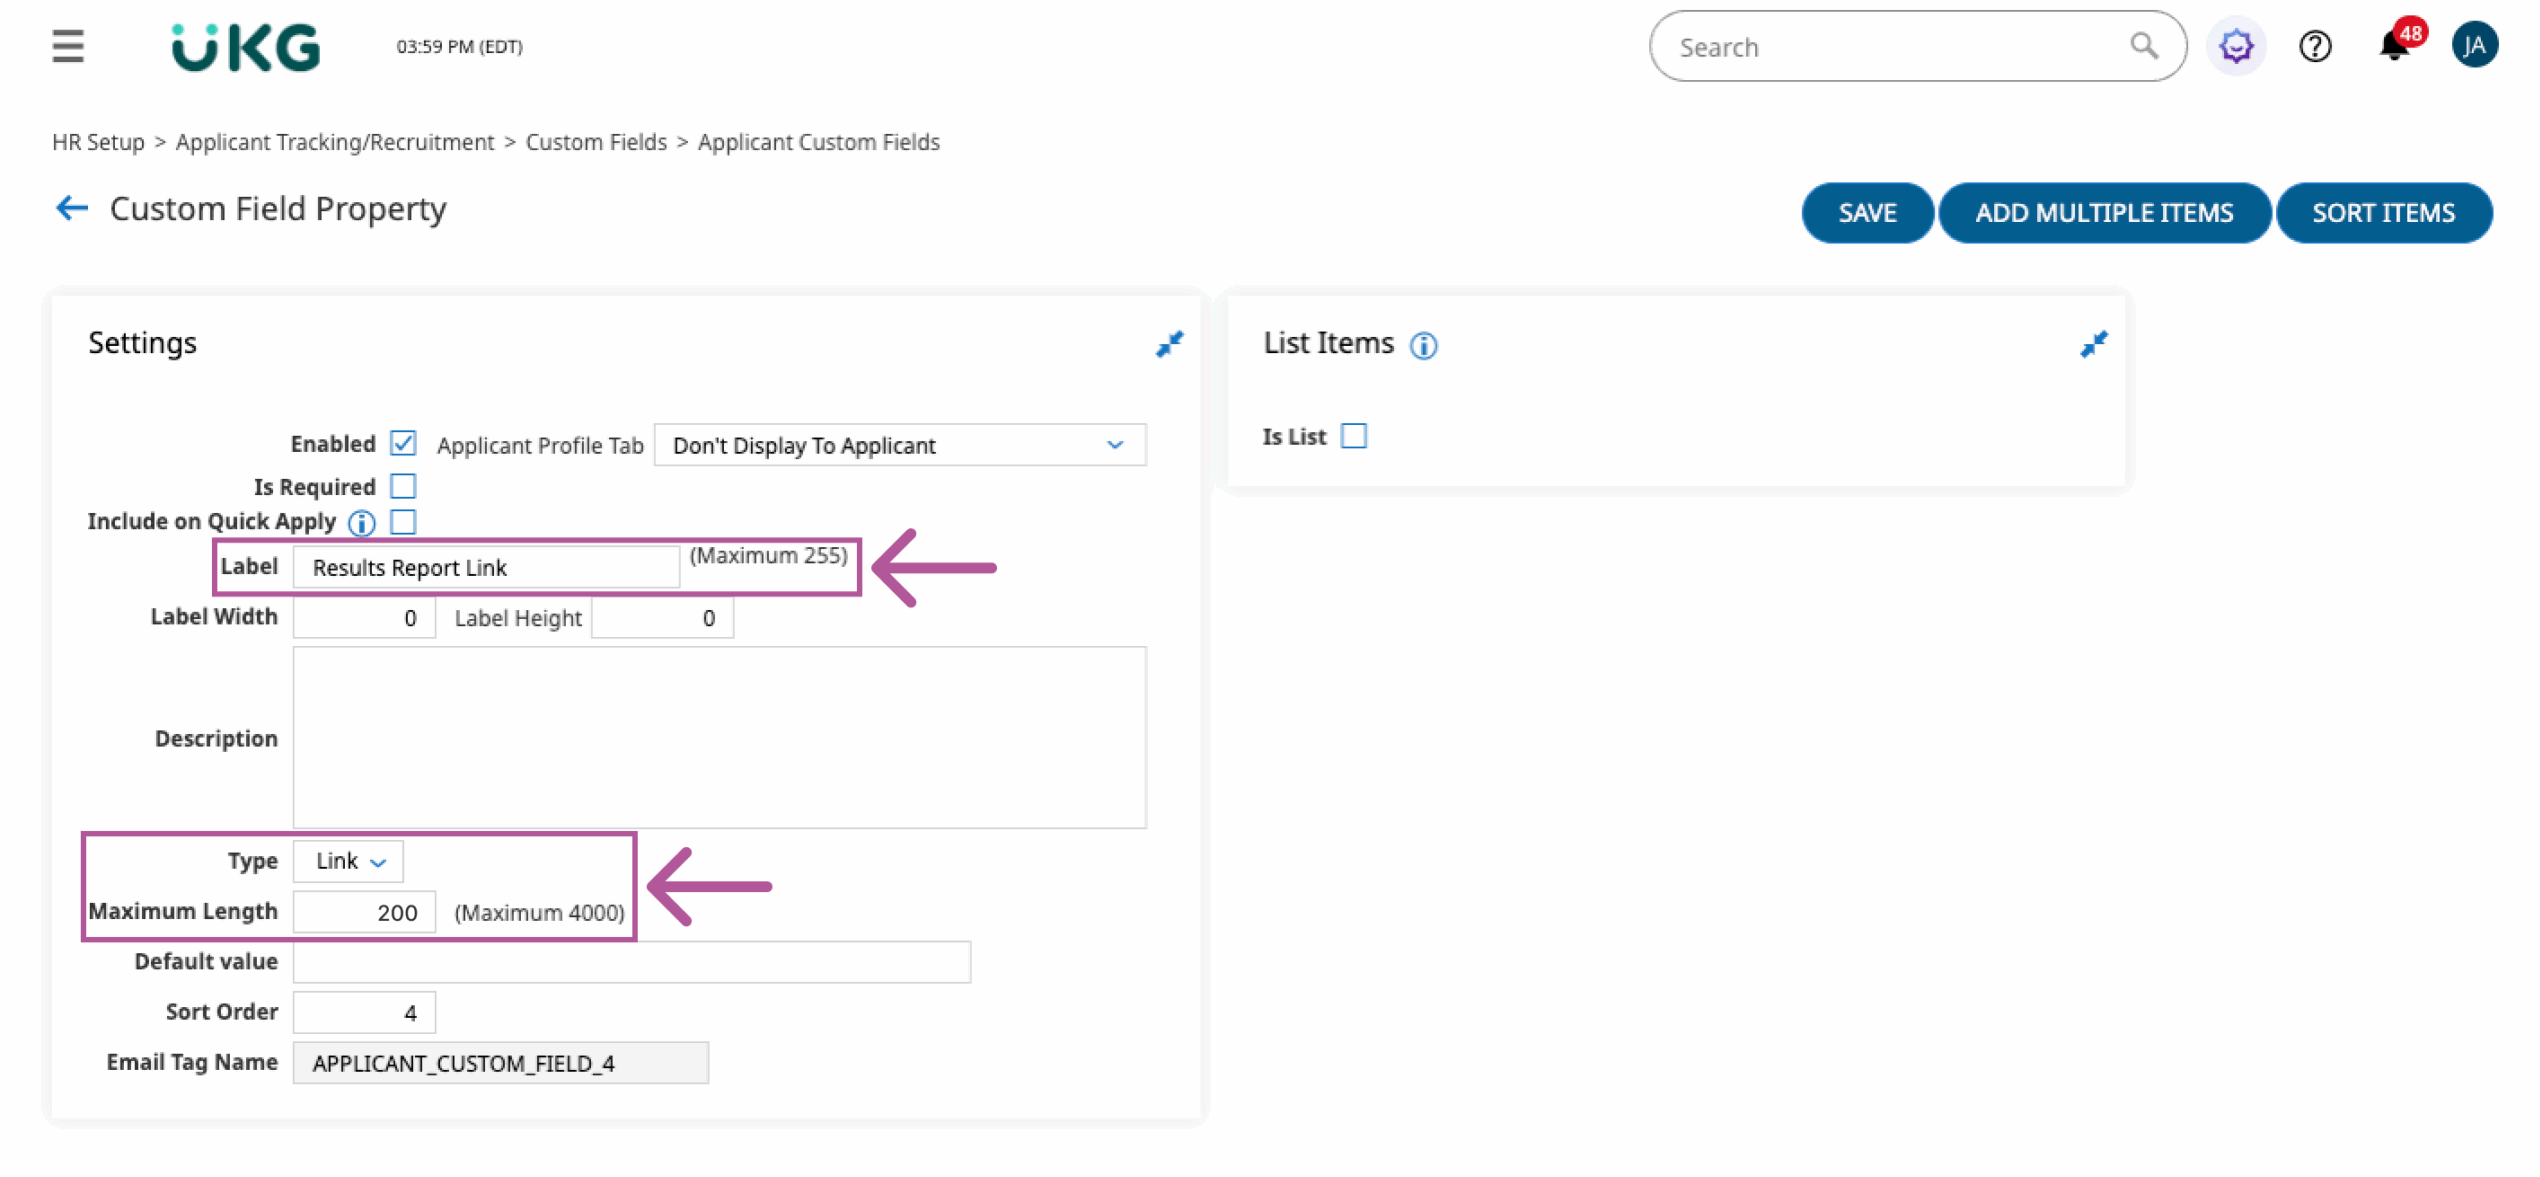
- The Report Link field is used for the report URL. Please set it as follows:
- Label: Results Report Link
- Type: Link
- Maximum Length: 200
- Once the custom fields have been configured, you can view them in Custom Field Definitions. Make note of the custom field tag names (index ID) to provide to HighMatch. You will need the API field names.
Requisition:
- Go to Settings > HR Setup > Applicant Tracking/Recruitment > Custom Fields > Job Requisition > Custom fields.
- Please use the same process as adding the Applicant Records custom fields.
- Create a list-type field called “Package ID” to add assessment names and assessment ID.
- Click Add New Field and type “Package ID”
- The entry will appear in the List Items section.
- Add your assessment names and assessment IDs as list items and click Save.
- Note: HighMatch will provide you with this information. It is important to ensure the assessment name matches the assessment name provided by HighMatch.
- Create a list-type field called “Package ID” to add assessment names and assessment ID.
- Once the custom field has been configured, you can view it in the Custom Field Definitions. Note the custom field tag name (index ID) for HighMatch.
- Note: The field name that we require is found here: Recruitment > Job Requisition > choose … > Add/Remove Custom Columns > Manage Custom Columns > Columns tab > search for custom > identify the Package ID field > the index will be the number at the end of the field name – i.e., jobreq.Customfield1.
Step 7: Add New Hiring Stages
Now you will need to add new hiring stages when you can add the assessment’s status:
- Go to Settings > HR Setup > Applicant Tracking/Recruitment > Hiring Stages > ADD NEW.
- Add four Stages – Each Stage can be named however you choose, so long as they are easily identifiable for the integration. Here are some examples:
- Start Assessment
- Assessment Requested
- Assessment Complete
- Assessment Error
- Add a column “Stage id” to view the Stage ID.
- Make note of each Stage’s stage name and ID. Copy and save ALL of the information above to a readily accessible location/document so that you can provide it to HighMatch in Step 9.
- Add four Stages – Each Stage can be named however you choose, so long as they are easily identifiable for the integration. Here are some examples:
Step 8: Prepare a Test Job, Test Candidate, and Application
In UKG Ready, create a new test job that contains the newly created hiring stages created above. Create a test candidate (or use an existing one) and use this record to apply for the test job. We will use this job, candidate, and application to order the assessments.
Step 9: Provide HighMatch with all Details for Configuration
Once these steps 1-8 are completed, please reach out to HighMatch with the following information:
Credential Related:
- UKG API Key
- UKG User Name
- UKG User Password
- UKG Company Short Name
- UKG Company ID
- UKG Domain
Stage Related:
- UKG Requested Stage Name and ID
- UKG In Progress Stage Name and ID
- UKG Completed Stage Name and ID
- UKG Error Stage Name and ID
Custom Field Related:
- Applicant result status custom field Name and Index ID
- Applicant result report custom field Name and Index ID
Package Related:
- UKG Package ID Field Index Number
- UKG Package Name Custom Field Name
Now your setup is complete and it is now time to schedule a meeting with your HighMatch Success Manager to being integration testing. We will help guide you through Steps 10-11 during your meeting.
Step 10: Ordering and Sending Assessments Manually
Option 1: Assessment Orders can be initiated by:
- Recruitment > Candidate > Job Applications.
- Find and click on the desired Job Application.
- Click the Update Hiring Stage button.
- Set the Hiring Stage to the “Start” stage for the Screen (as defined under ‘Add New Hiring Stages’).
- Click Save.
Option 2: Assessment Orders can also be initiated by:
- Recruitment > Candidate > Applicants > Hiring Stages.
- Click on the desired Applicant.
- Click the expand side menu arrow icon.
- Click Hiring Stages.
- Click Start Assessment.
- The Hiring Stage Modification box will appear > Enter the date for this Hiring Stage.
- Click OK.
Step 11: Reviewing the Assessment Results and Report
To review a candidate’s assessment results, go to:
- Recruitment > Candidates > Applicants.
- Find the desired Applicant and click on the View Applicant icon.
- The applicant fields created in Step 6 will now appear in Custom Fields.
- Click the hyperlink to open a new tab linking to the assessment report. Here you can view HighMatch’s detailed explanation of the assessment’s results.
Your integration is set up and ready to use! Please reach out to HighMatch’s Success team at support@highmatch.com if you have any questions or feedback regarding the HighMatch integration, assessments and assessment reports.