This integration deployment guide will help you quickly and seamlessly connect and use the HighMatch integration on Workday using the recruiter-initiated method.
Summary of the Integration Flow
- A recruiter or hiring manager can manually trigger an assessment order, which will send an assessment invitation to the candidate.
- HighMatch will display the assessment status and update the candidate’s profile if the assessment was successfully sent to the candidate or not.
- When the candidate has completed the assessment, HighMatch will post the results and a link to a detailed HighMatch assessment report on the candidate’s profile.
Summary of Steps
There are 13 steps used for configuring and testing the integration before you can request and receive HighMatch assessment results live in production from within Workday. Please begin with:
Step 1: Schedule a Call with your HighMatch Success Manager
After you meet with your HighMatch Success Manager in Step 1, you will complete Steps 2-10 in your Workday instance to configure and enable the integration.
Step 2: Create an Integration System User (ISU)
Step 3: Security Configuration
Step 4: Configure Assessment Statuses
Step 5: Create Assessment Tests in Workday
Step 6: Configure Integration System
Step 7: Add Assessment Step to your Job Application Business Process
Step 8: Add HighMatch Integration to your Assess Candidate Business Process
Step 9: Create a Custom Report
Step 10: Provide HighMatch with all Details for Configuration
Steps 11-13 covers how to test and use the integration.
Step 11: Test the Configurations
Step 12: Sending the Candidate an Assessment
Step 13: View the Candidate’s Assessment Results & Report
Important note: Steps 2-13 is meant to provide a potential overview of the Workday (Recruiter-Initiated Method) enabling process. These steps may not be done in this particular order, and the order could change depending on your Workday specialist. Details and requirements in each step may also change depending on your Workday setup and specific requirements.
Process Details
Step 1: Schedule a Call with your HighMatch Success Manager
To begin using the HighMatch integration with Workday’s recruiter-initiated method, please contact your HighMatch Success Manager at support@highmatch.com and request a Requirements Discovery call.
During this call, we will discuss the implementation schedule and review at a high level the following steps that need to be completed. We recommend that your Workday specialist be present for the call and that you provide them with this guide, as they can help you enable and use the integration according to our instructions.
During the call, we will also discuss the mechanism for sending assessment invitations to candidates. Email invitations can be sent by either Workday or HighMatch. By default, HighMatch will send email and text assessment invitations to candidates. If you prefer Workday to send assessment invitations to candidates, please let your HighMatch Success Manager know.
Step 2: Create an Integration System User (ISU)
Workday Web Service access is managed through an integration of users and security domain assignments. The Create Integration System User menu allows you to create an integration user.
You will need to create an API/ISU username and password with the proper permissions. Start by:
- Choose an integration system username and password for this integration login, and select the Do Not Allow UI Sessions box. (We recommend ISU_HighMatch for the username).
- NOTE: HighMatch and Workday require this login to authenticate the integration.
- Since HighMatch is authenticated with this username and password, it is required that a Workday administrator access the Maintain Password Rules menu and add the integration system username to the System Users exempt from password expiration field.
Step 3: Security Configuration
We recommend working with your Security Administrator to set up the Integration System Security Group for the new Integration System User. Security configuration settings vary by company and its security preferences.
The integration user will need to be able to GET and PUT Assessment Data, as well as GET and PUT:
- Candidate Data: Assessment Results
- Candidate Data: Attachments
- Integration Event
Step 4: Configure Assessment Statuses
Once a candidate is sent an assessment invitation via a manual trigger by a recruiter or hiring manager, the assessment status will be displayed in the Screening > Assessments section on the candidate’s profile. HighMatch will have predefined assessment statuses configured in Workday. These include:
- Initiate
- The candidate has been sent the assessment.
- Reference ID: Initiate
- In Progress
- The order has been placed without error.
- Reference ID: In_Progress
- Completed
- The candidate has completed the assessment.
- Reference ID: Completed
- Error
- There was an error in sending the invitation to the candidate.
- Reference ID: Error
NOTE: Make sure your reference IDs match those listed above, or there may be errors when sending status updates back to Workday. If you already have the above Assessment Statuses in your tenant, but the Reference IDs differ from the above, let your HighMatch success manager know, and we can map them to your IDs.
Step 5: Create Assessment Tests in Workday
You must have predefined assessment tests configured in Workday to send assessments and receive results for specific tests. Use the task Maintain Recruiting Assessment Tests to access and create your HighMatch tests.
Once your Assessment Tests are created, you can assign them to a job requisition or use them in a business process.
Your HighMatch success manager will provide you with a Reference ID for each assessment test that you need to add to your tenant. To confirm, go to the Maintain Recruiting Assessment Tests task menu:
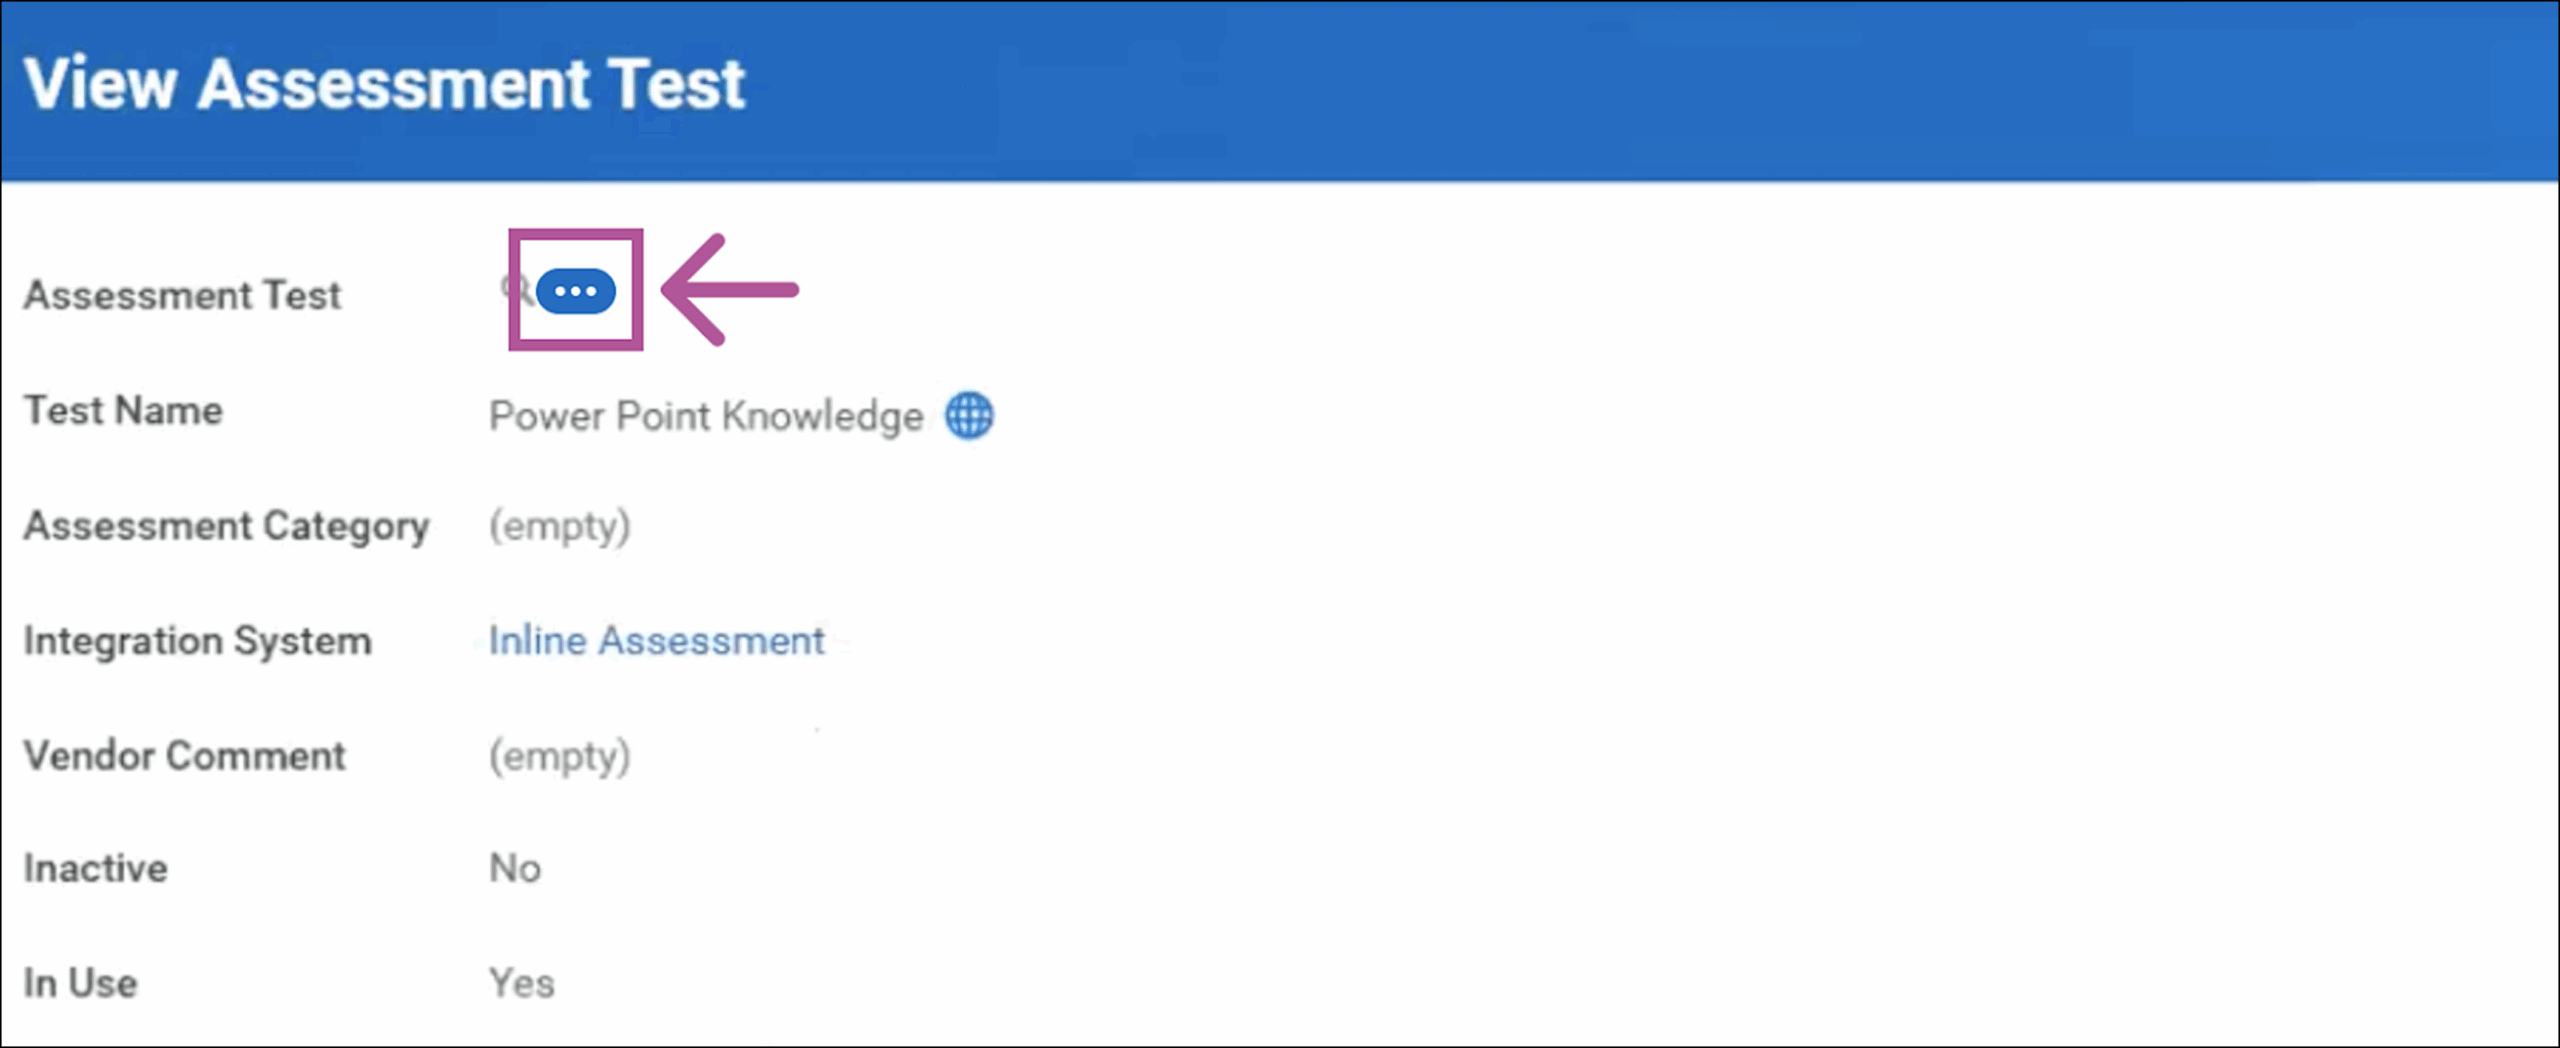
- You can add a new assessment or view the desired assessment to confirm the Reference ID.
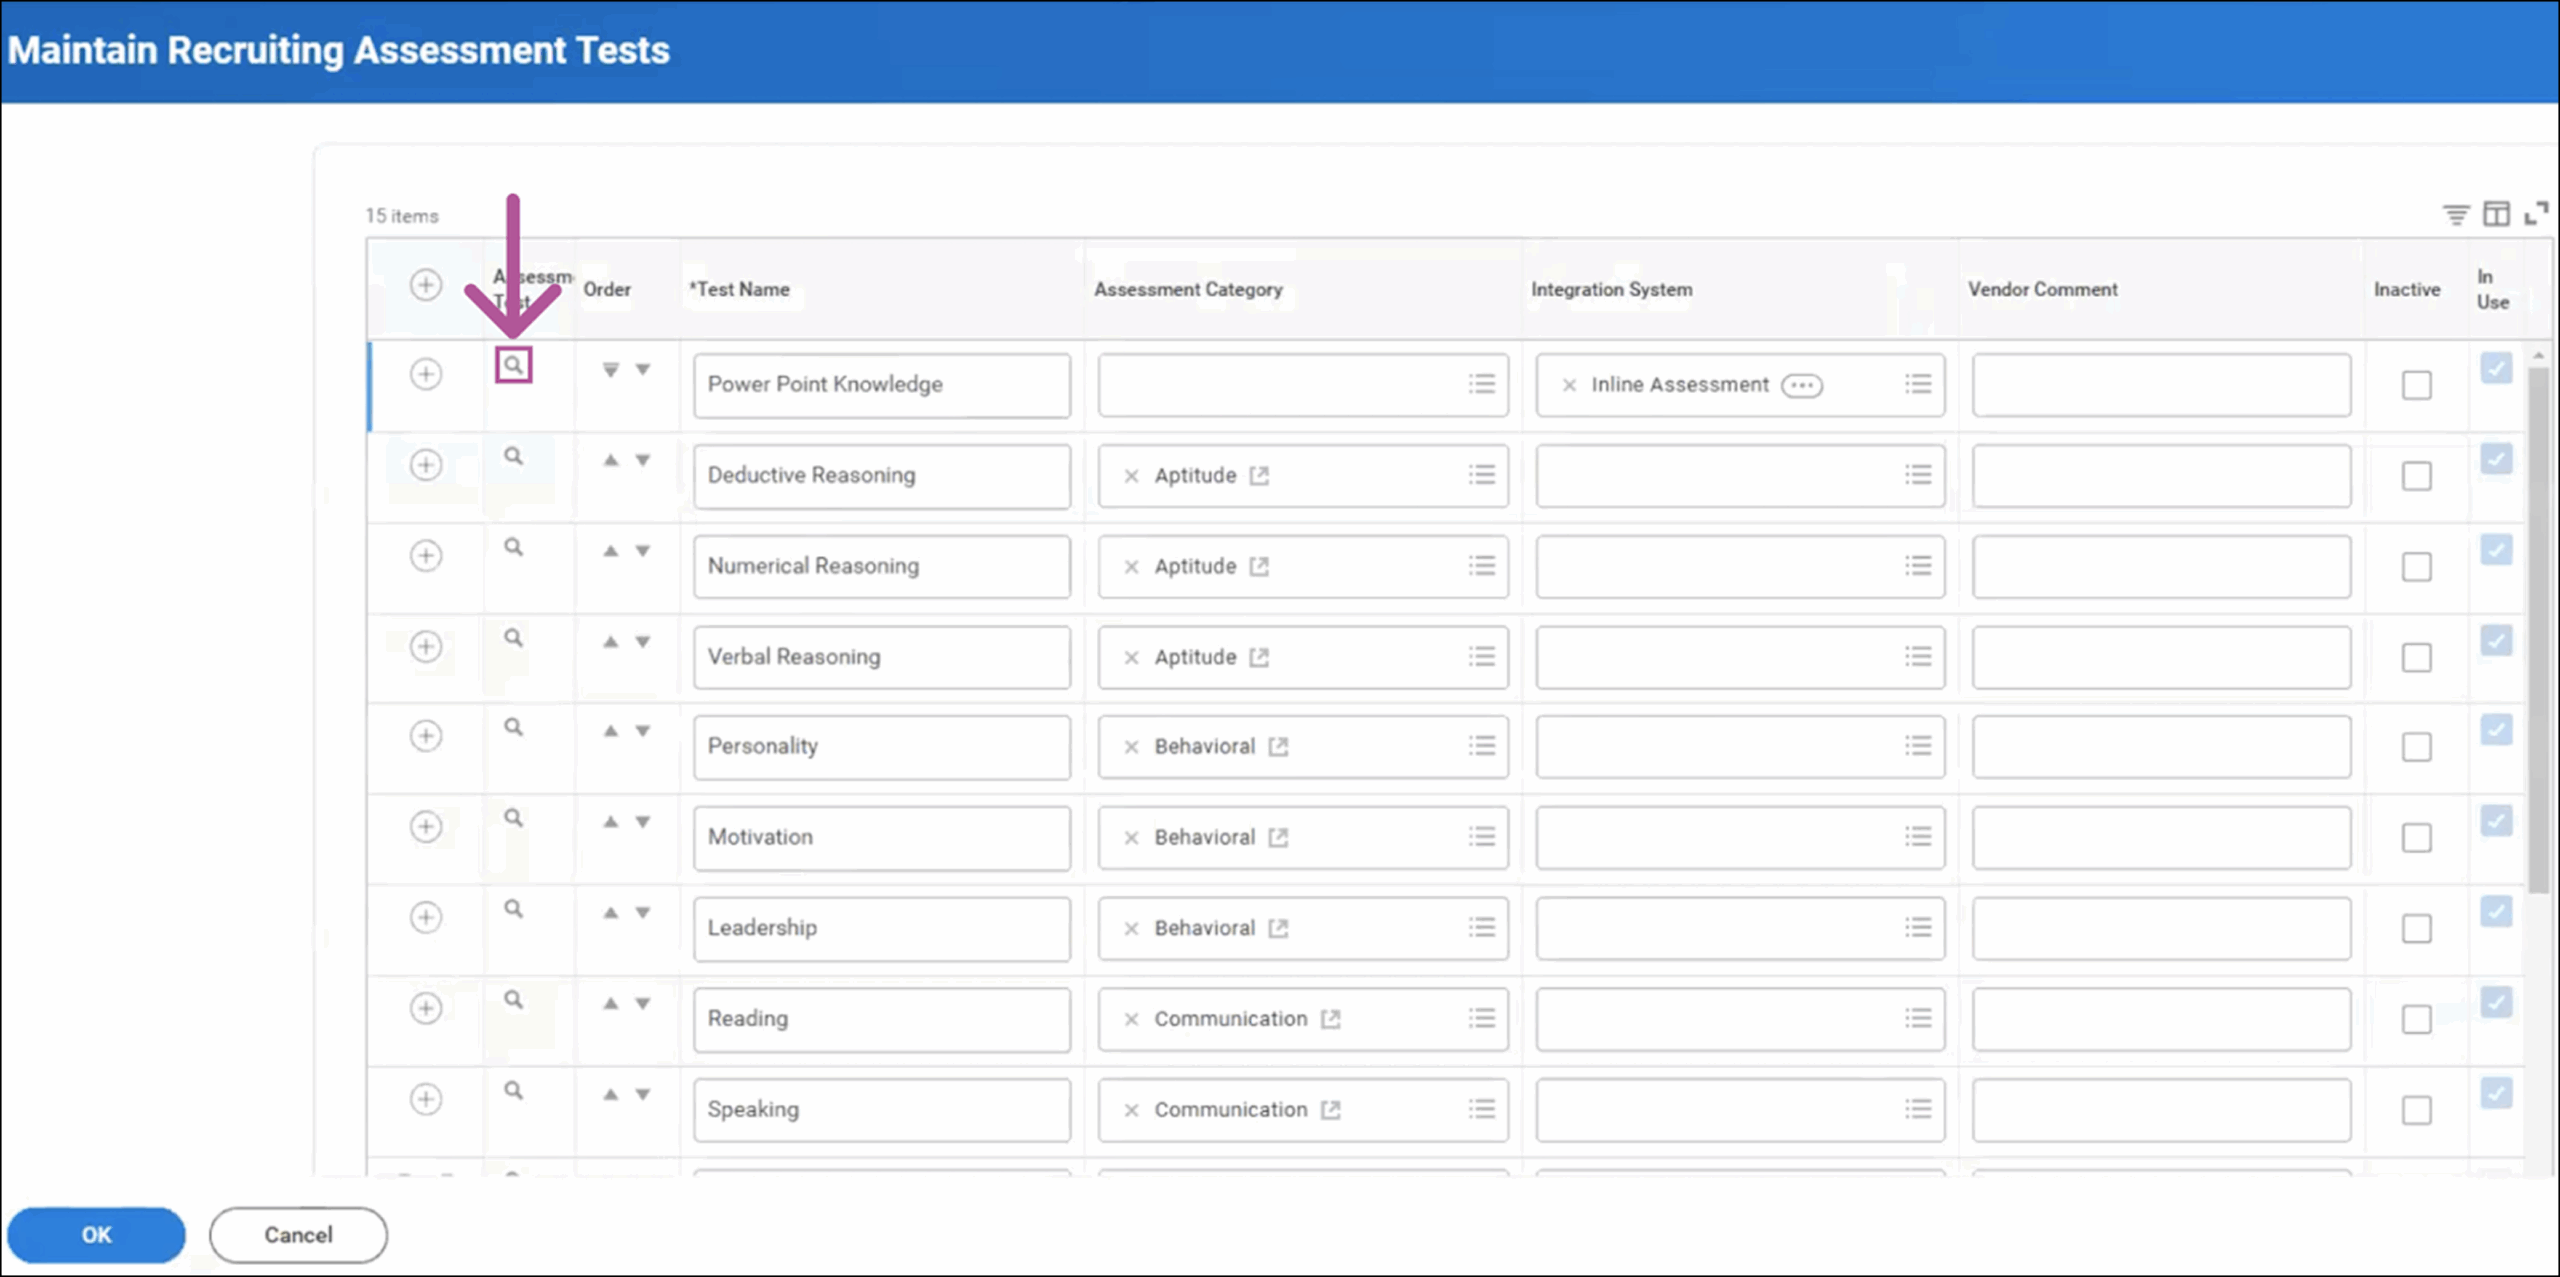
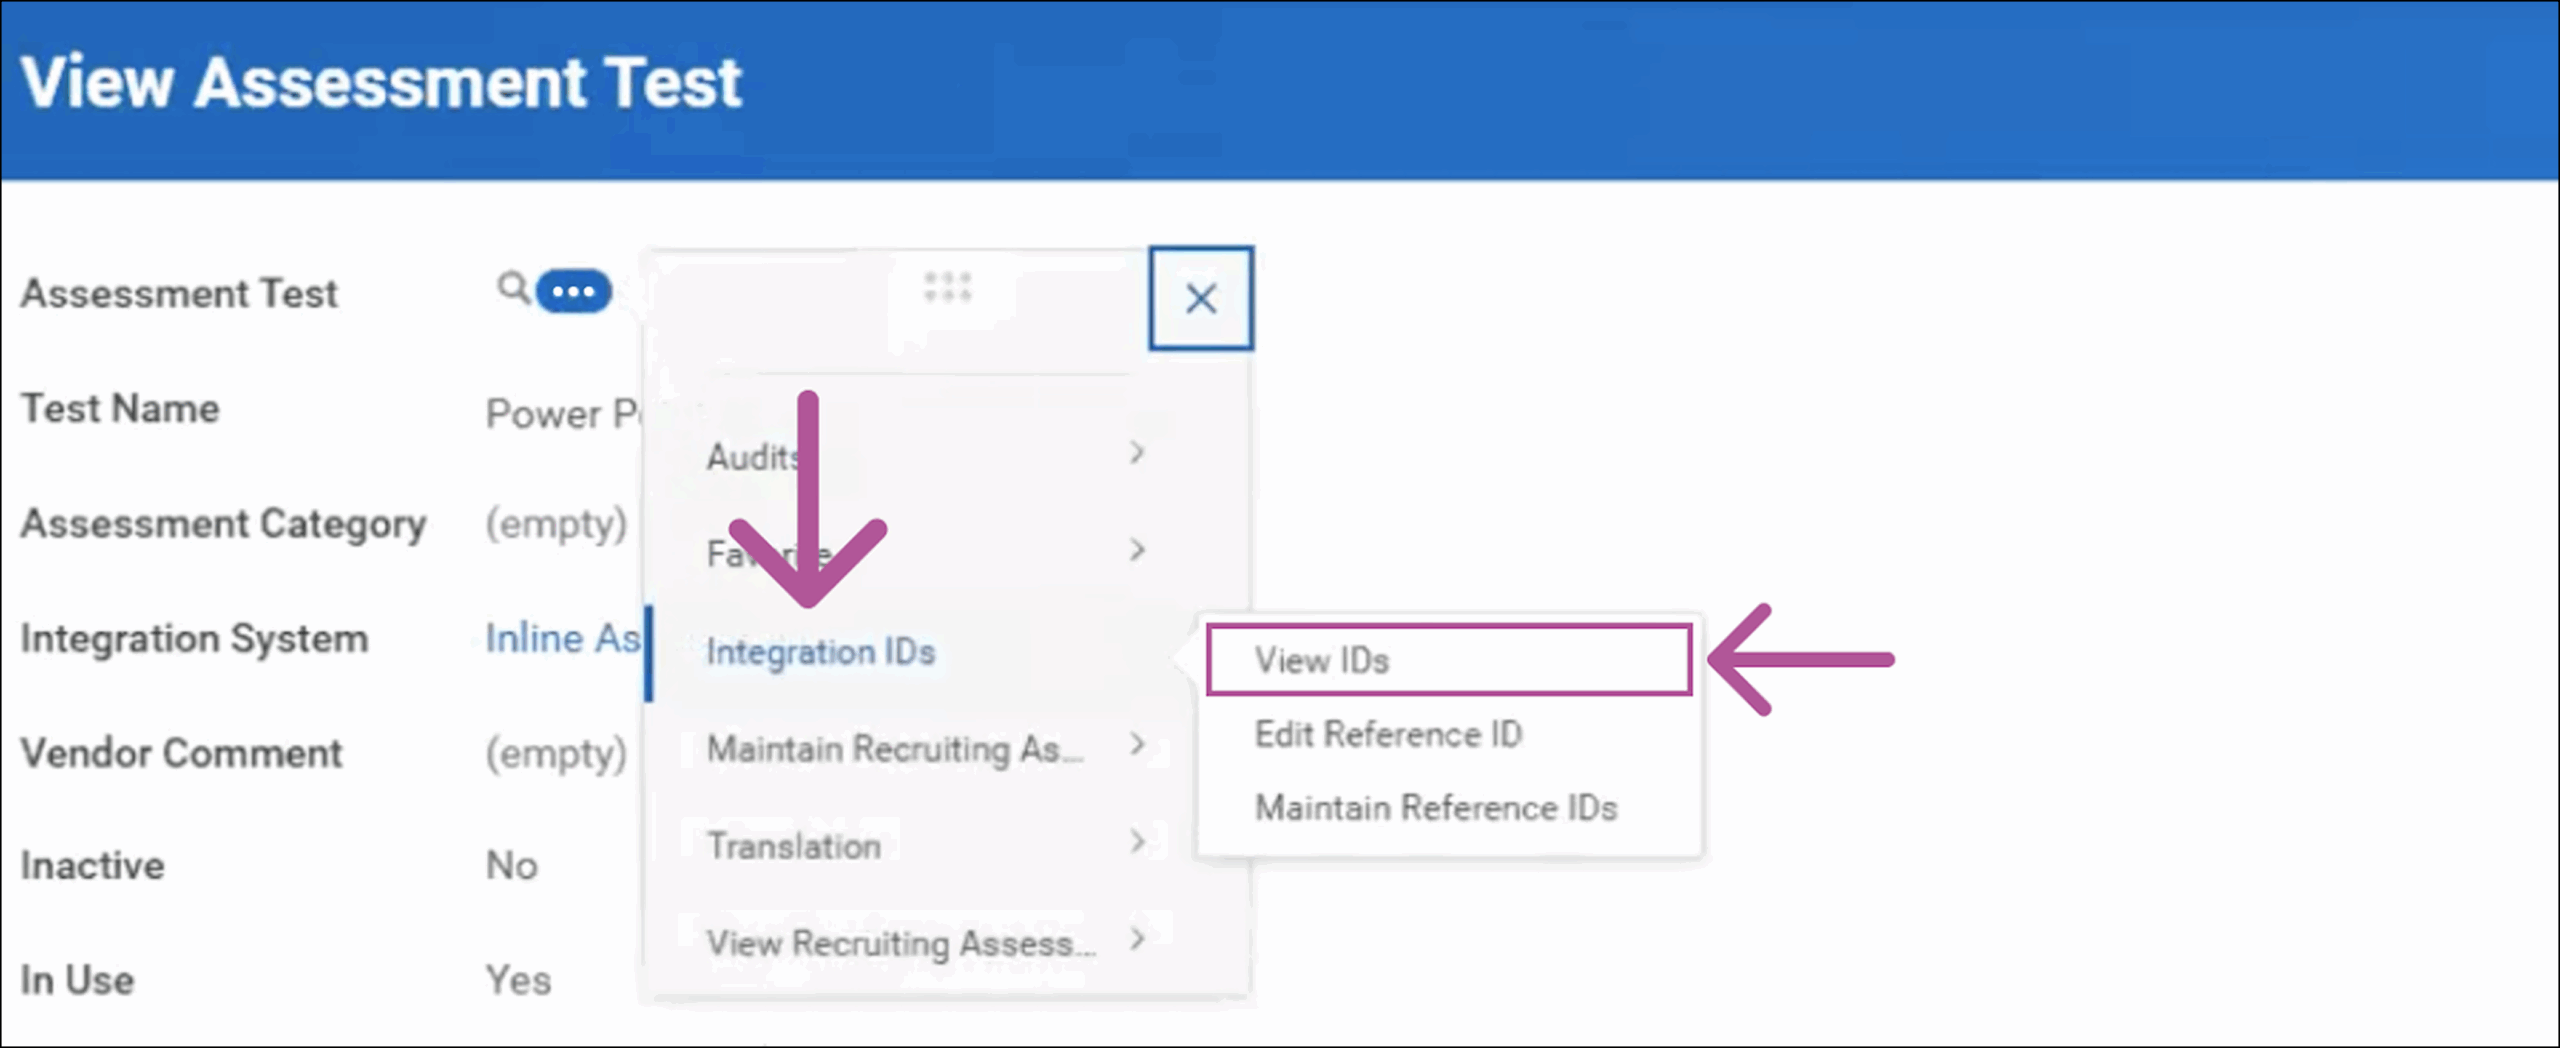
- Click the Related Actions dropdown menu > Integration IDs > Click View IDs.
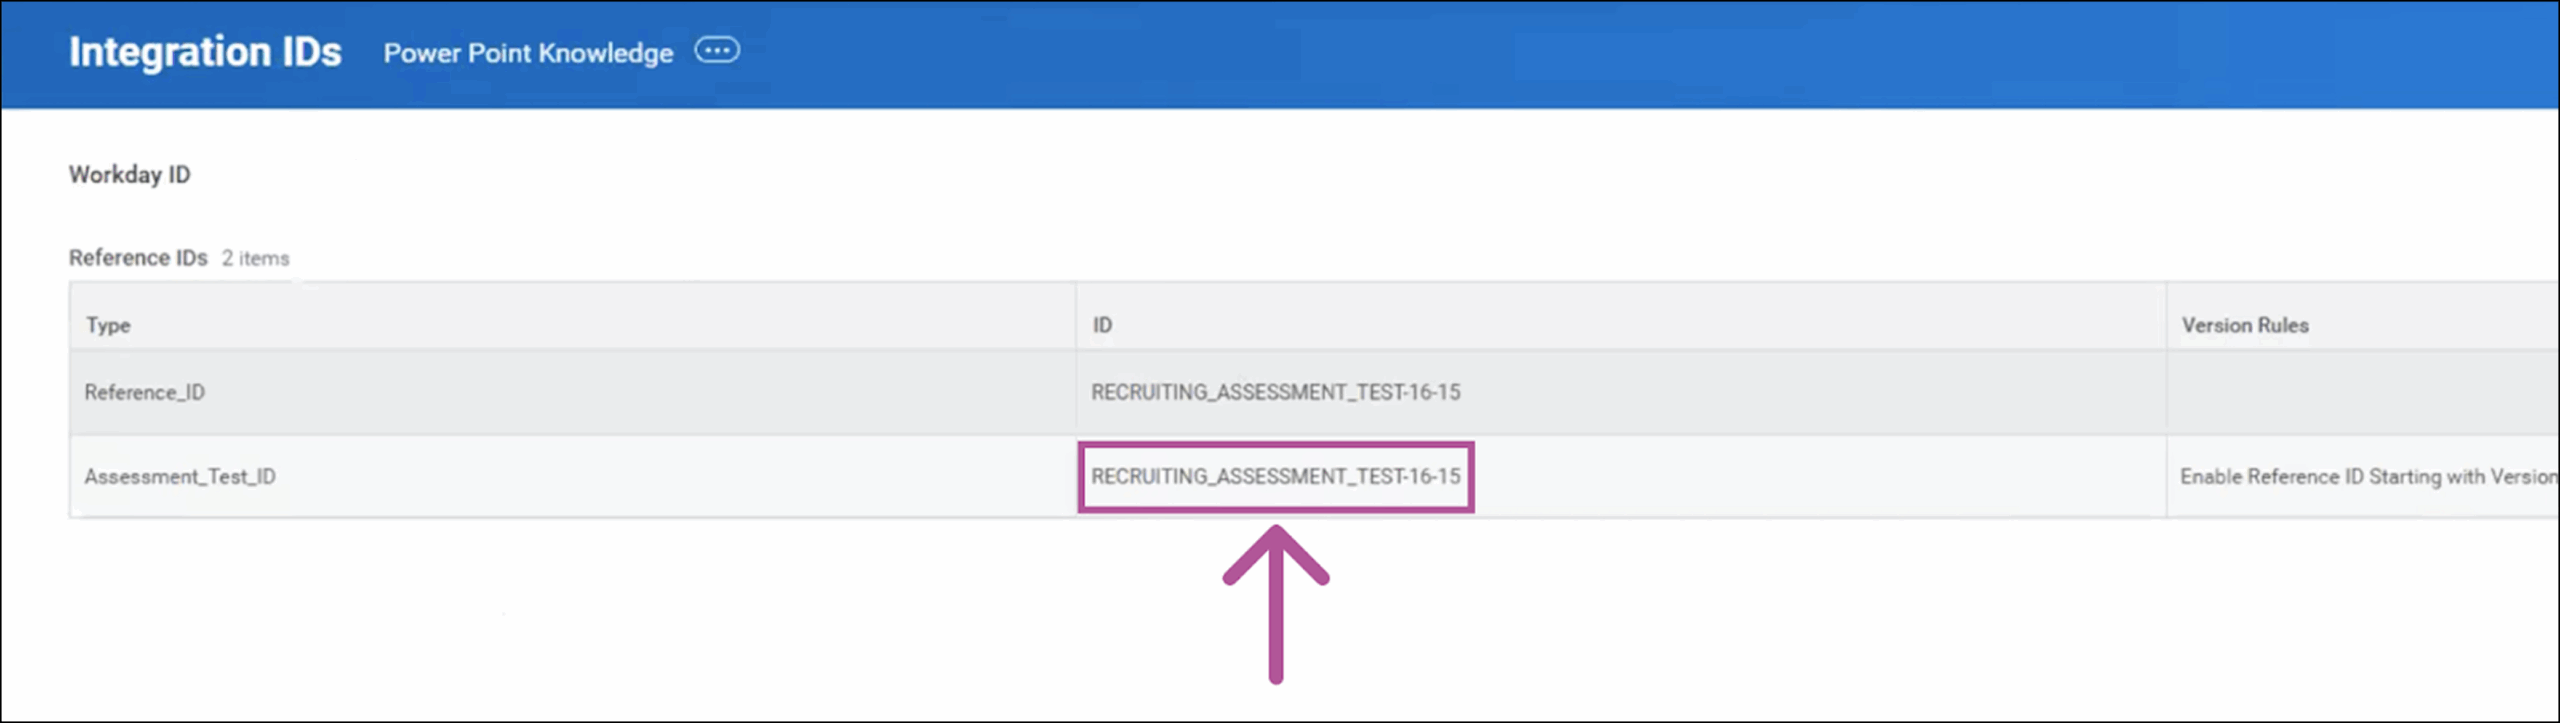
- Confirm the Reference ID for the assessment test matches the IDs provided by HighMatch.
- If the Reference ID does not match what was provided to you by your HighMatch success manager, you can correct this issue by clicking the Related Actions dropdown menu > Integration IDs > Edit Reference ID and editing the Reference ID.
Step 6: Configure Integration System
To configure your Integration System, you’ll need to input all related attributes. Your HighMatch Success Manager will provide you with this information. Begin by searching for the integration (Shortcut – intsys:INT_HighMatch):
- Click the Related Actions dropdown menu near the top of the menu > Integration System > Click Configure Integration Attributes.

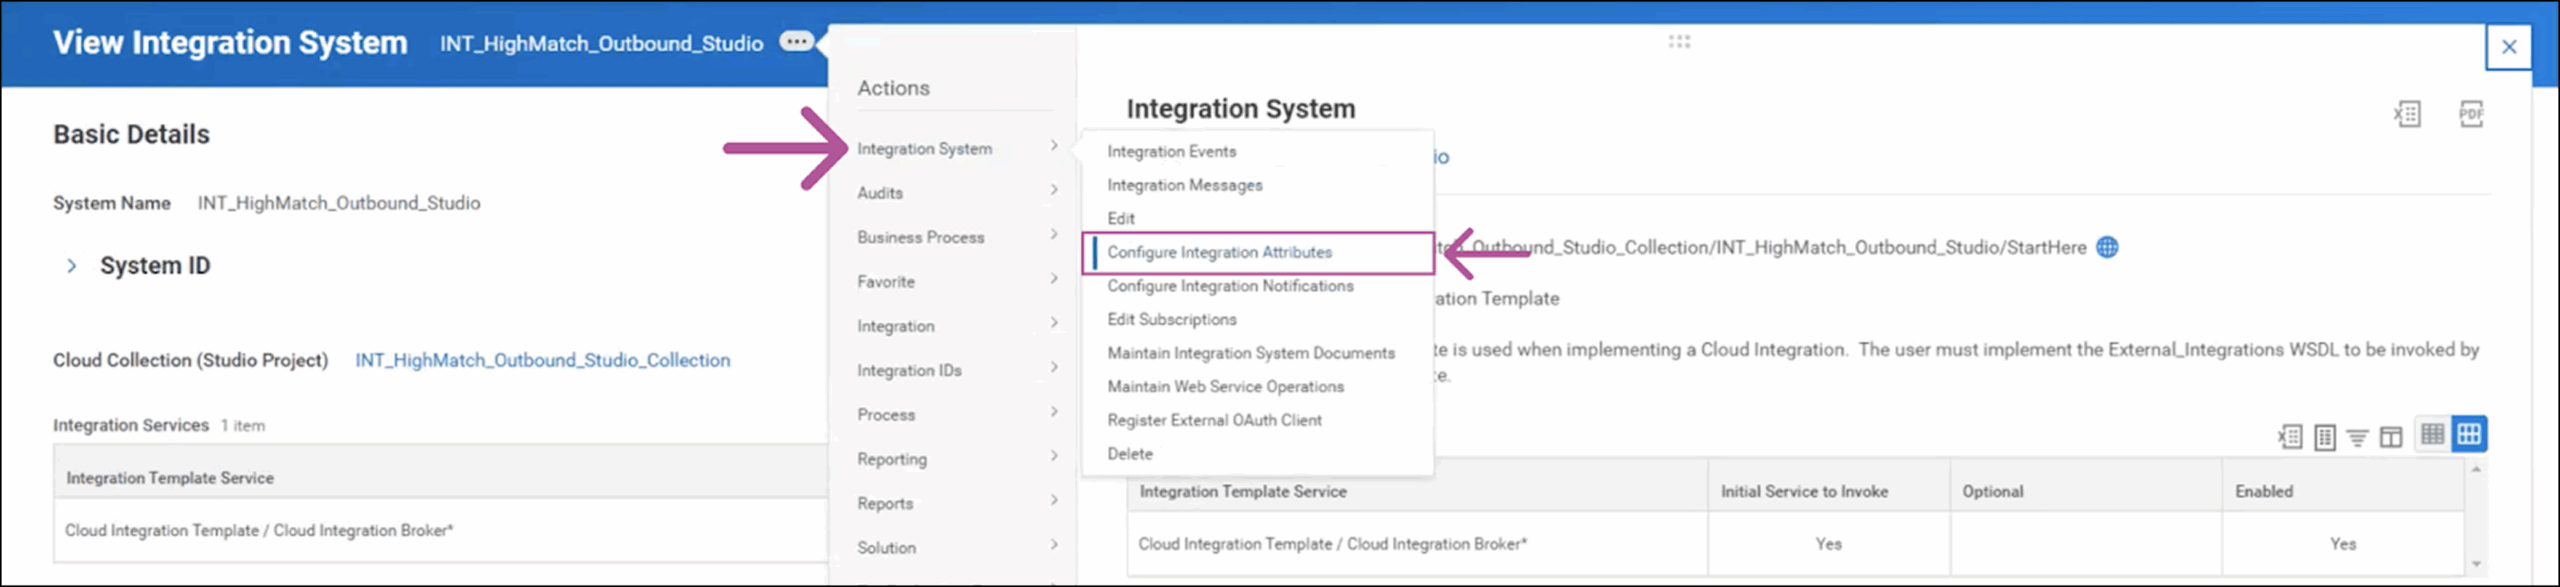
- In the Configure Integration Attributes menu, you’ll need to enter your URL, Client ID, ISU Username and ISU Password in the Value attributes by clicking the + icon for each value to add a new row and entering your information.
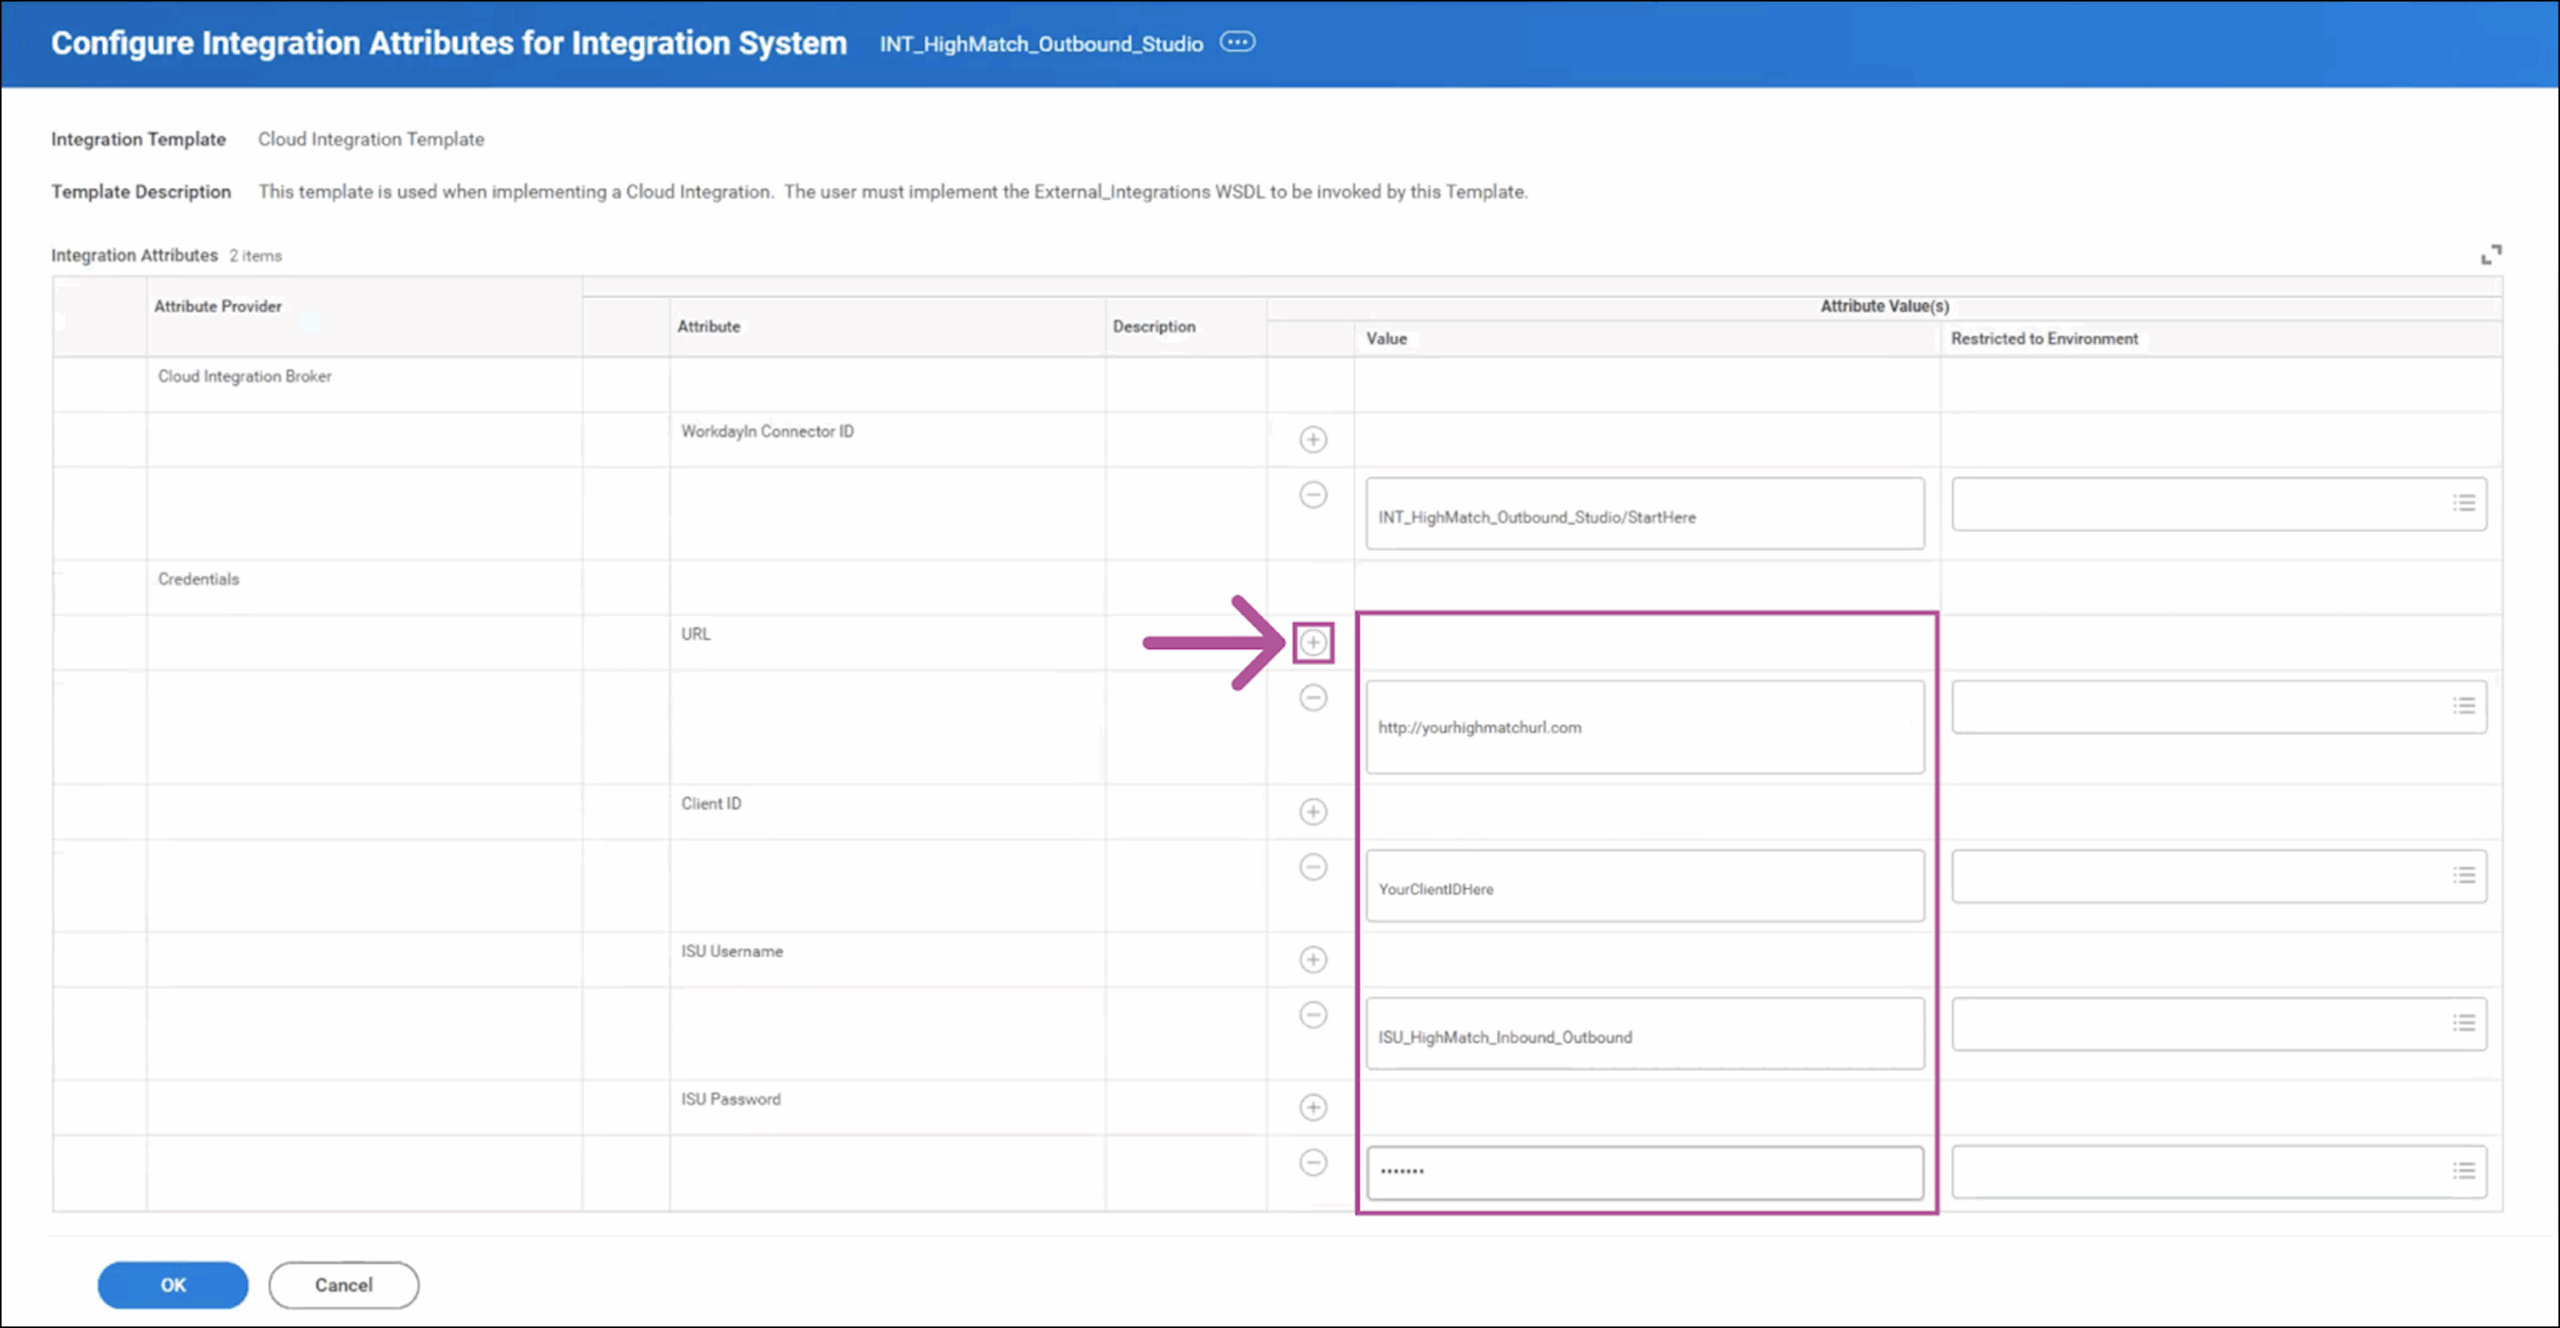
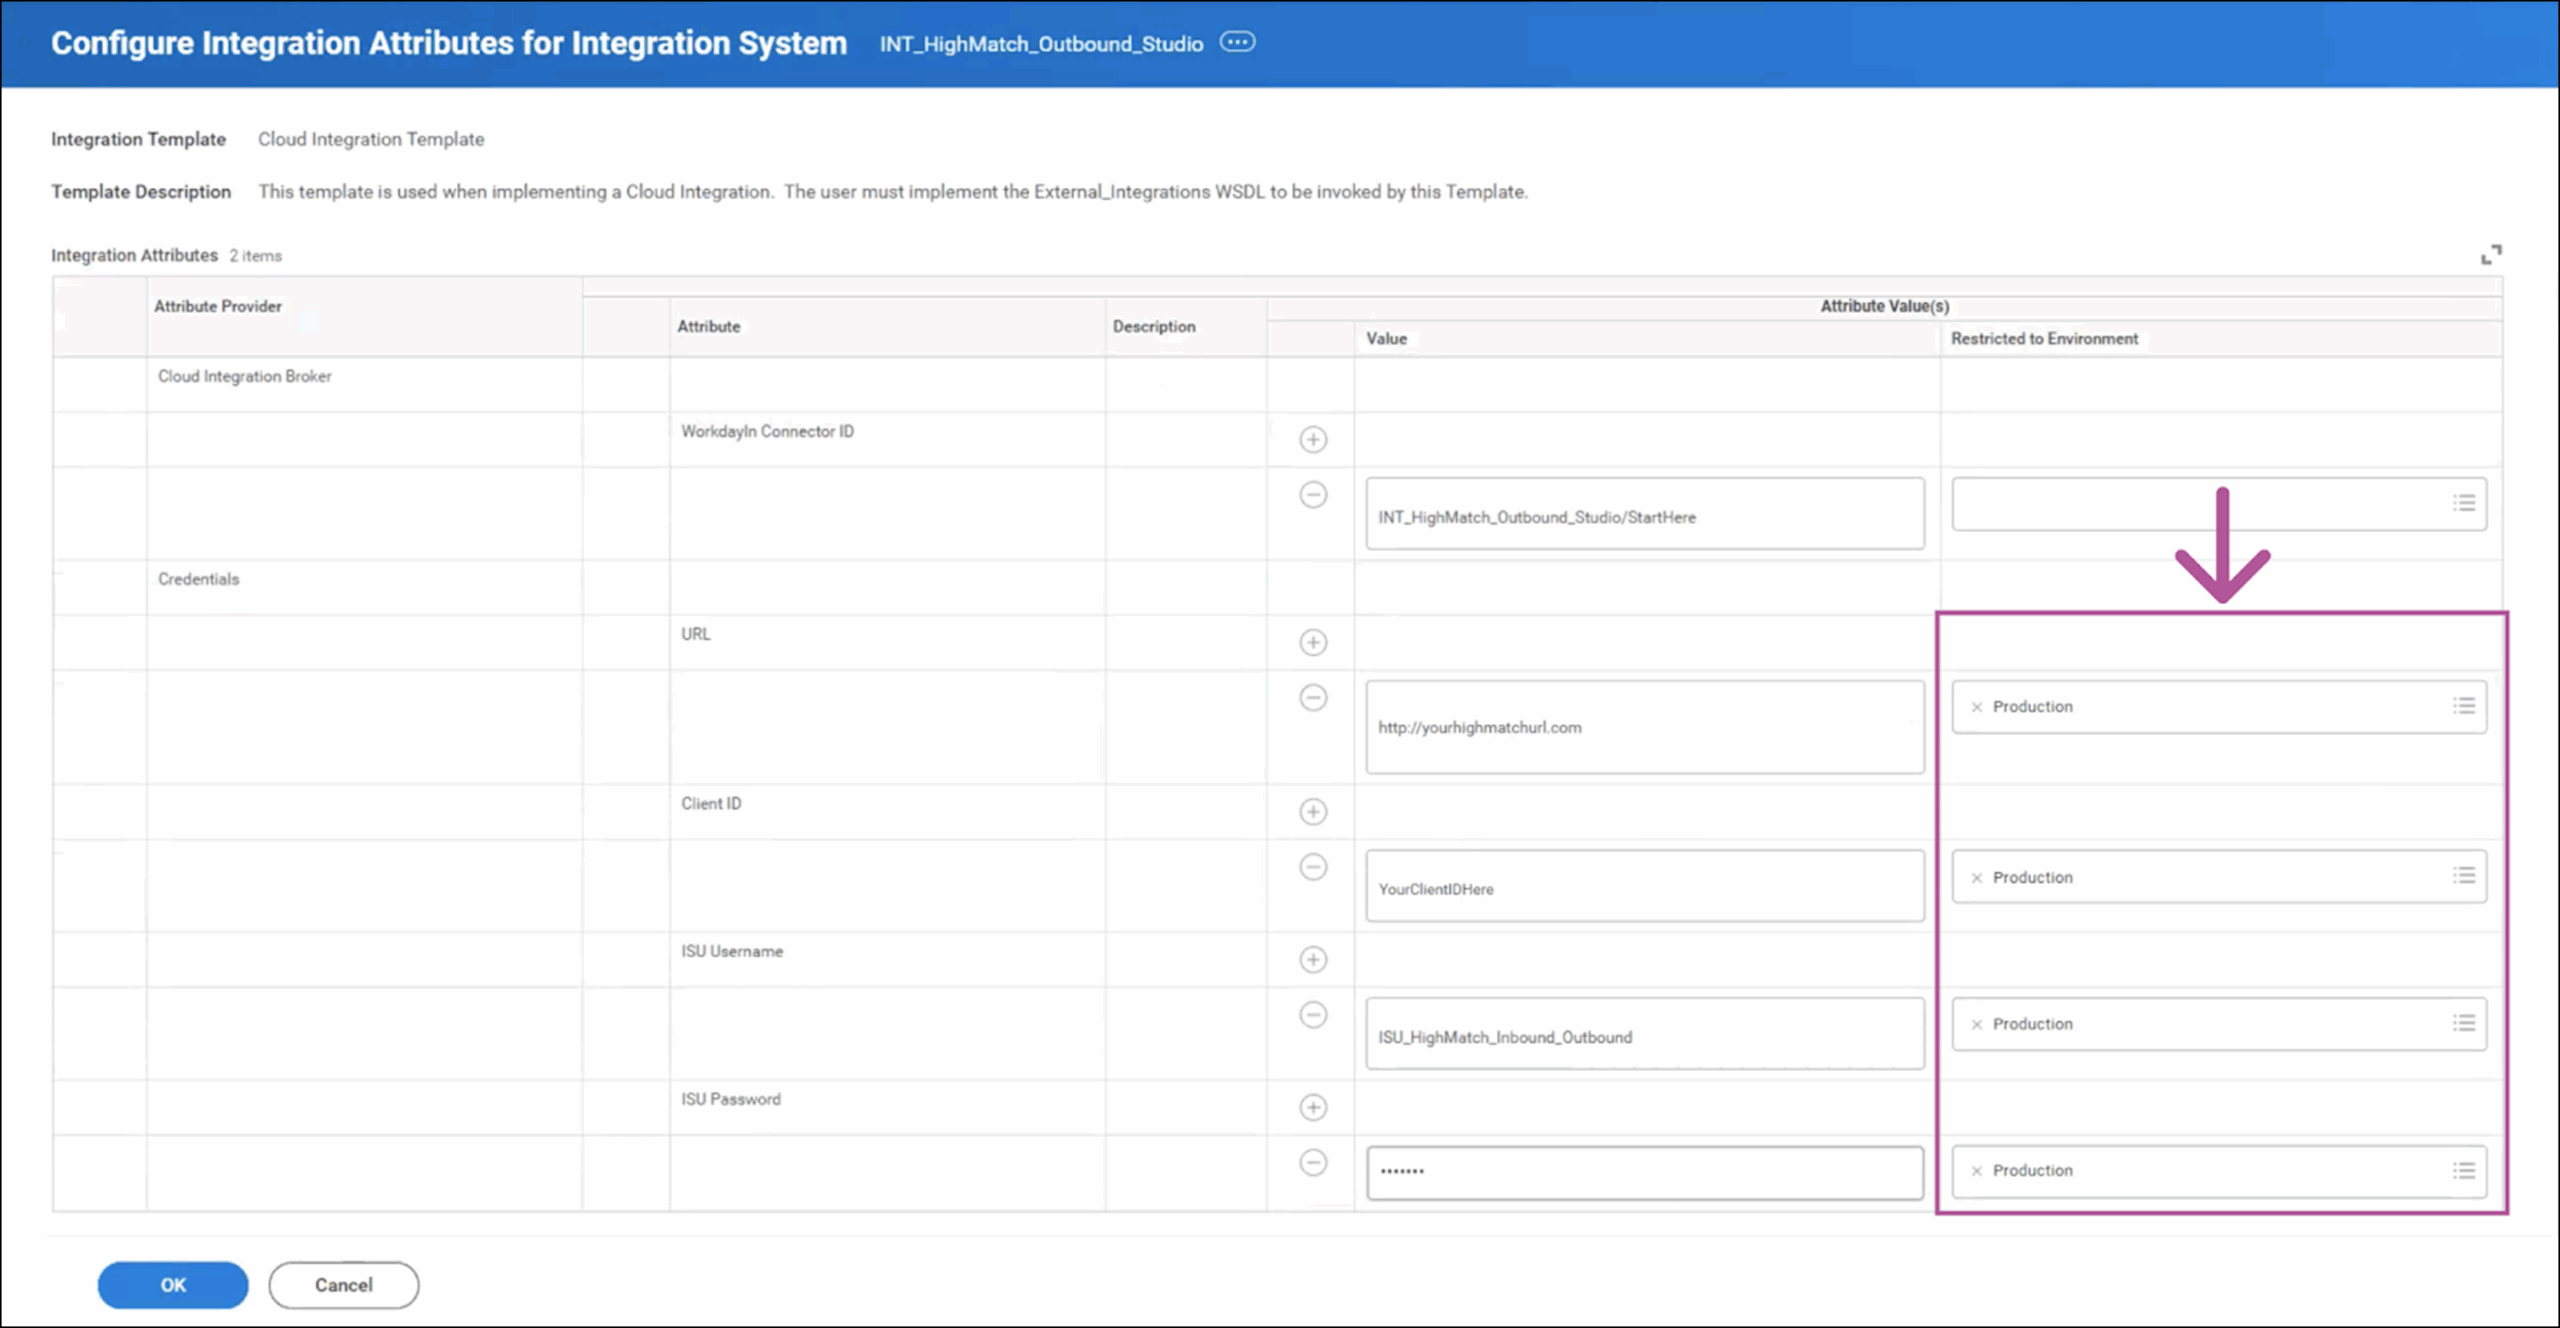
- NOTE: Once you’re finished with testing and ready for production, you’ll need to set the URL, Client ID, ISU Username and ISU Password attributes to Production in the Restricted to Environment fields.
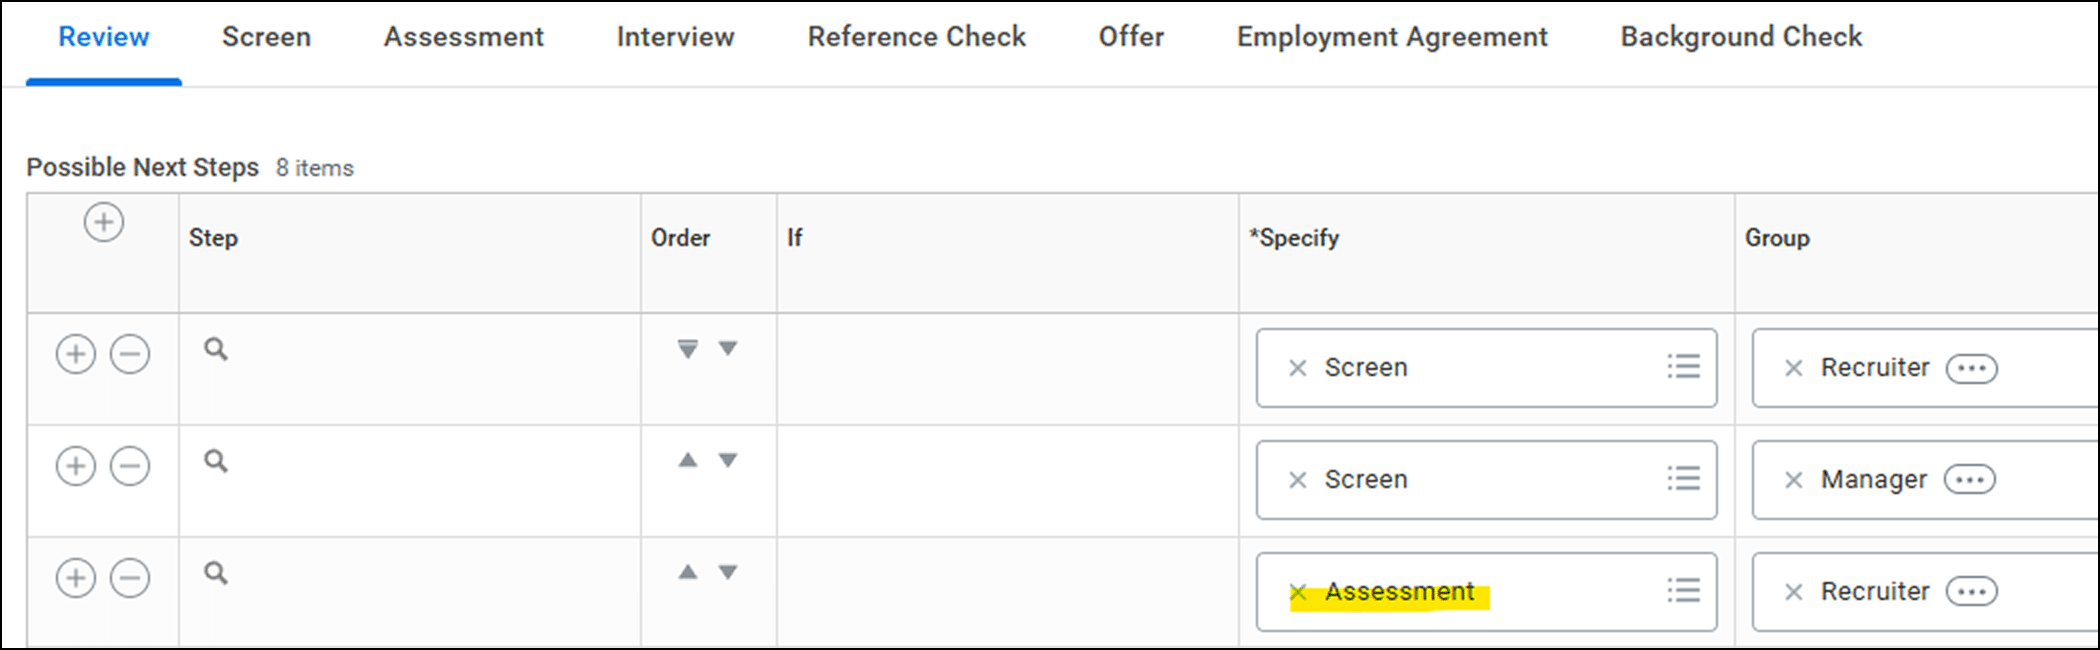
Step 7: Add Assessment Step to your Job Application Business Process
You will need to add an Assessment step to your Job Application Business Process to trigger the assessment request. If you already have an assessment business process step, you can skip this section.
Step 8: Add HighMatch Integration to your Assess Candidate Business Process
After the Assessment has been added to your Job Application Business Process, you will need to add an integration step to your Assess Candidate Business Process.
NOTE: This step needs to be after the initiation step, but BEFORE the Assess Candidate step. See below:
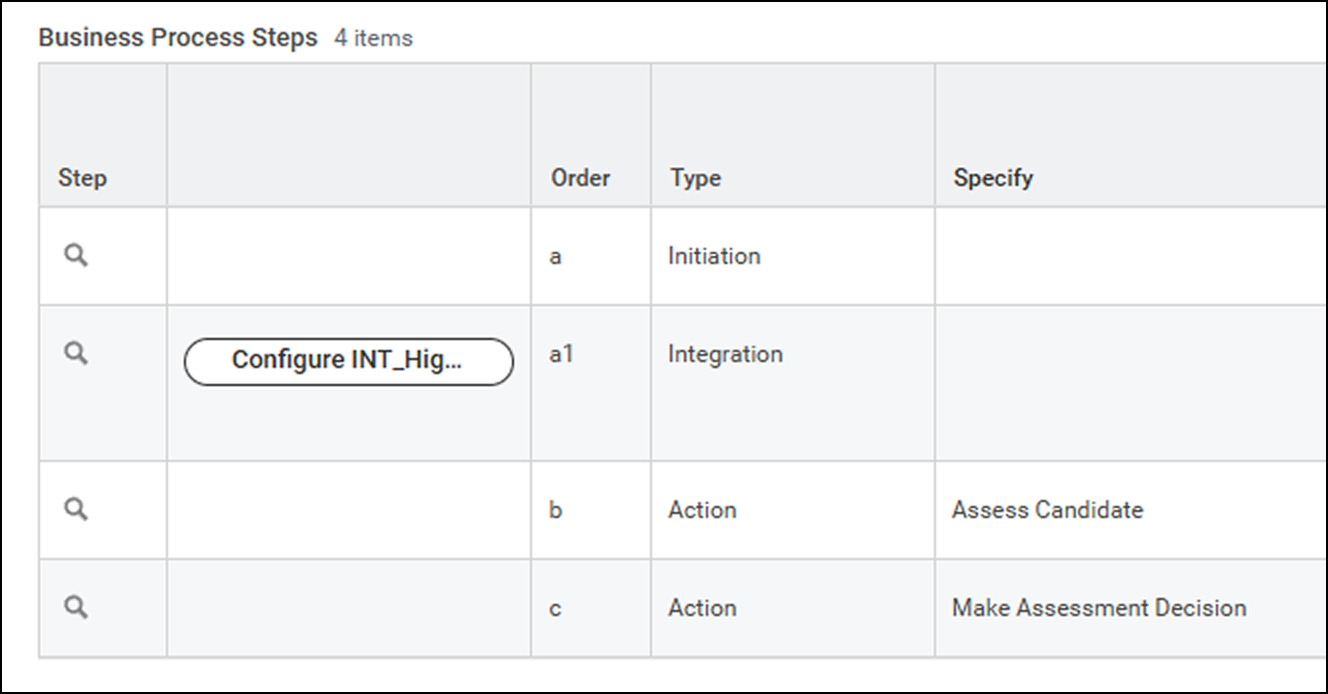
If you have multiple companies or multiple Assess Candidate Business Processes, you will need to do this for all of them that will be using HighMatch.
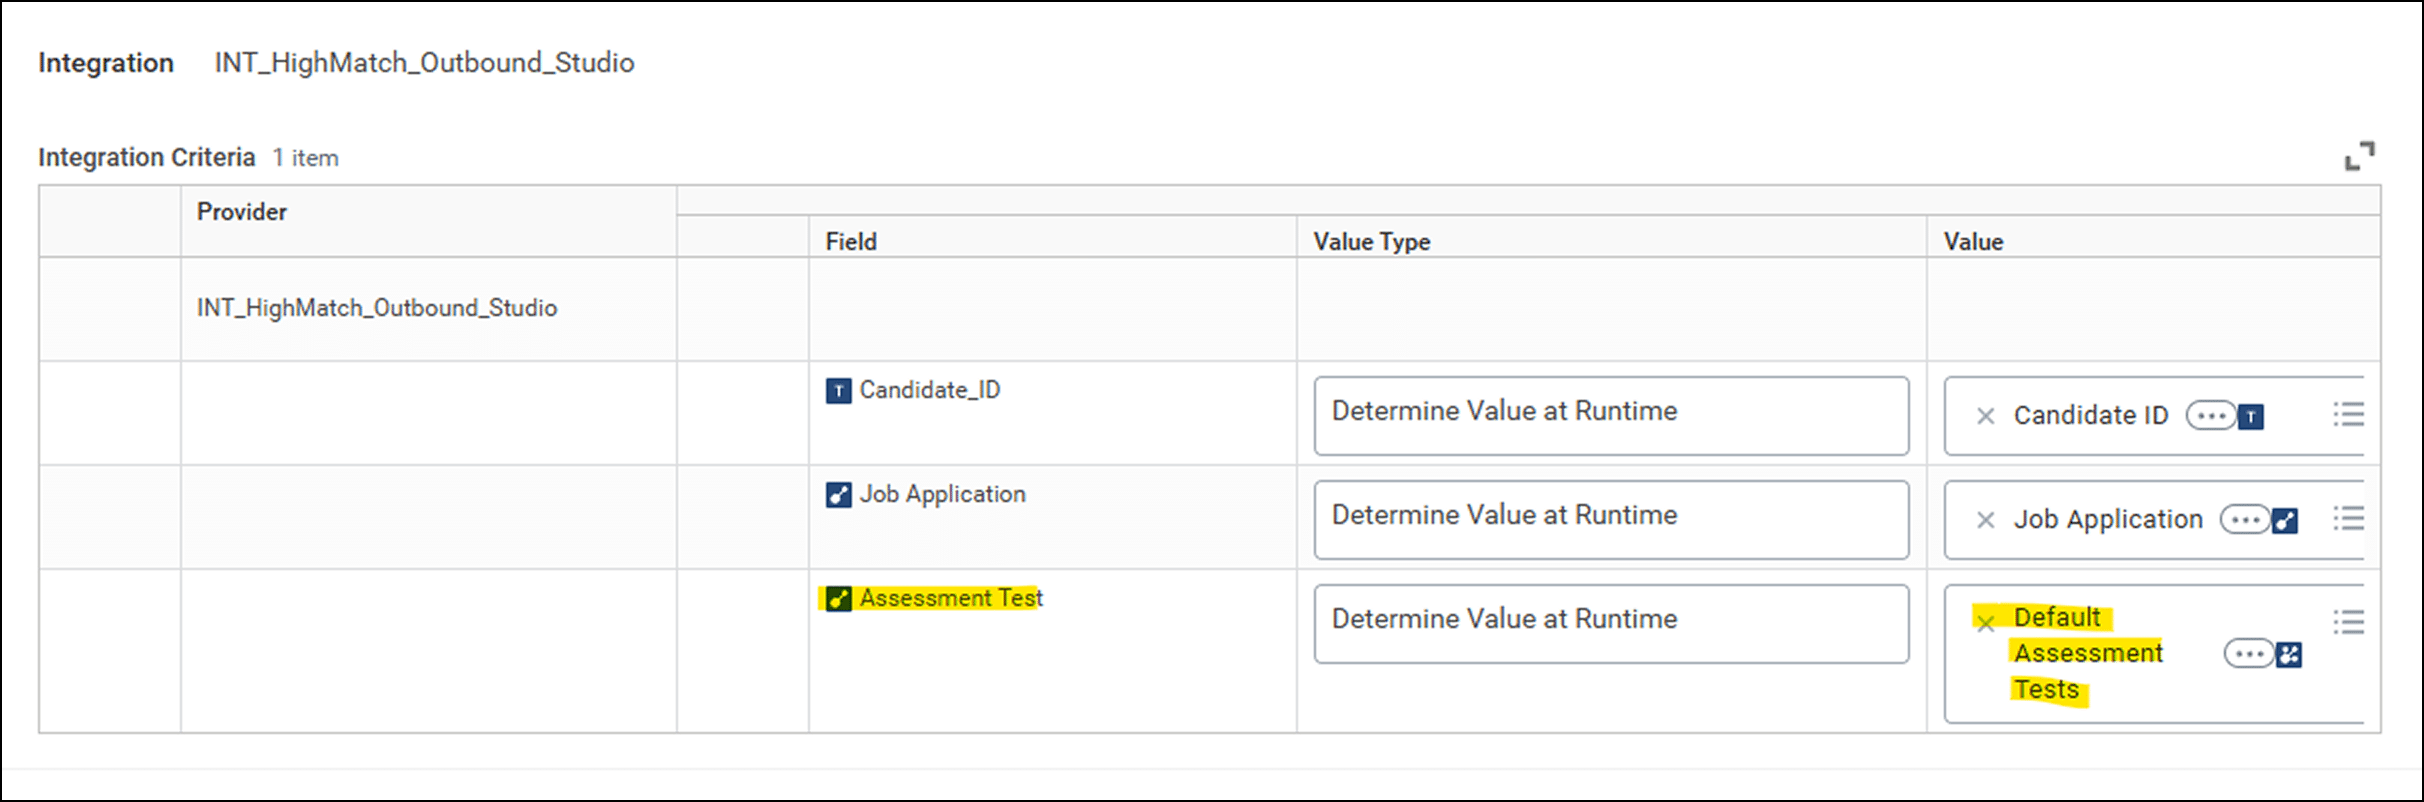
Once the Integration has been added, you will need to configure the prompts.
NOTE: You can choose a defaulted option or you can create a calculated field to add to the prompt for the Assessment Test if you have more than one option available.
Determine at Runtime Example:
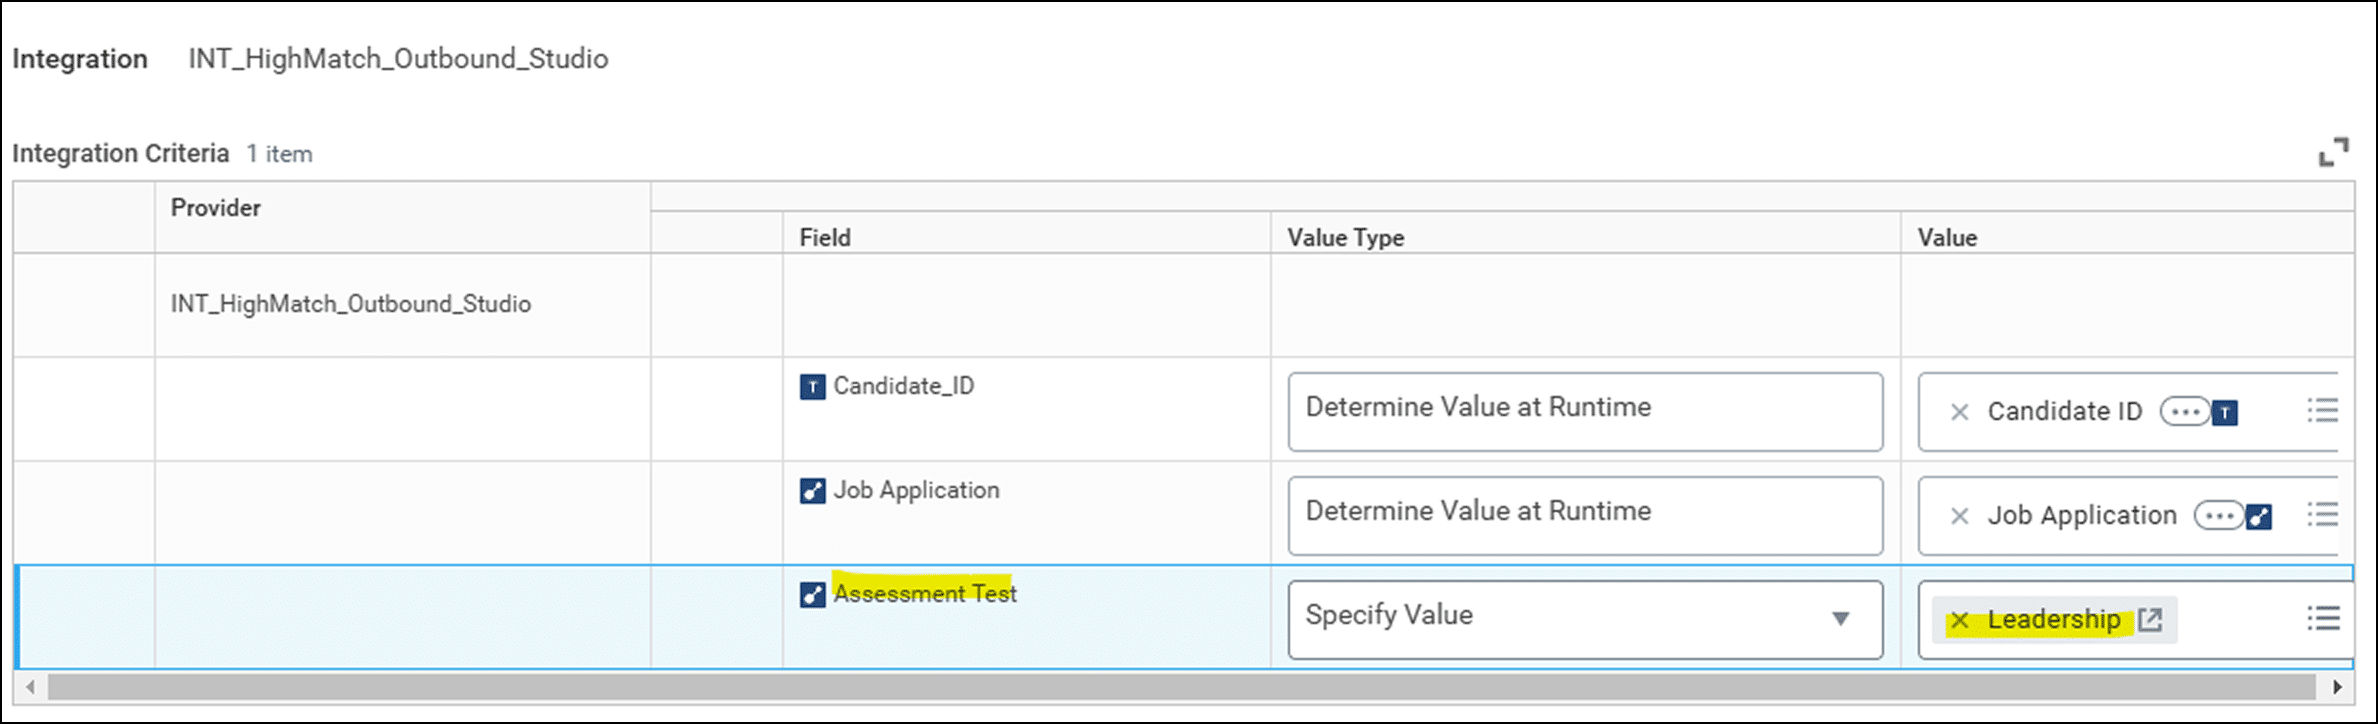
Specific Assessment Example:
Step 9: Create a Custom Report
To view the assessment results, you will need to build a custom report. Create a report that is enabled as RaaS with XML output option with the following:
- Candidates in the Workday standard Assessment Initiated stage.
- The report must be filtered on the Assessment Status of “Initiated.”
- Fields to export in the report (see sample report xml output below):
- Candidate first name
- Candidate last name
- Candidate email address
- Workday Candidate_ID
- Workday Job_Application_ID
- Workday Job_Requisition_ID
- Recruiter email address
- Assessment_Test_Reference (i.e., the assessment test ID)
Make sure to provision a Workday ISU user for the integration. This user must have access to the following:
- RaaS report as described above.
- Assess_Candidate object for pushing back results. Described on this Workday community page.
Step 10: Provide HighMatch with all Details for Configuration
Once your Workday specialist has completed the integration’s configuration in your Workday account, please reach out to your HighMatch success manager and let them know. In this email, please provide the following details:
- Integration System User (ISU) username and password
- All Assessment Status Reference IDs
Once received, HighMatch will configure those details in our systems to enable the integration.
Now your setup is complete and it is now time to schedule a meeting with your HighMatch Success Manager to being integration testing. We will help guide you through Steps 11-13 during your meeting.
Step 11: Test the Configurations
We will reach out once the configuration is completed and recommend testing the integrations.
You will want to test the configurations before deploying them into Production. Make the configuration changes in a lower tenant and connect to a HighMatch test instance. Create test candidates using the configuration as if they were real candidates, and HighMatch will respond in kind.
These tests are recommended, as configuration issues can occur and are best handled in a test environment first.
Testing should be completed for each assessment, and multiple candidates should be created and used to increase the likelihood of errors. It’s important to test for as many error scenarios as possible to ensure error mitigation is in place.
Step 12: Sending the Candidate an Assessment
To send an assessment to a candidate, start by:
- Select a candidate.
- Note: The candidate must have an email or phone number associated with their profile.
- Select a requisition and add the candidate to the requisition.
- Move the candidate into the Initiate status from Step 4.
- Confirm that the candidate has been moved to In Progress status from Step 4.
- Once the candidate has completed the assessment, their status will be updated to Complete.
- Review results (see Step 13).
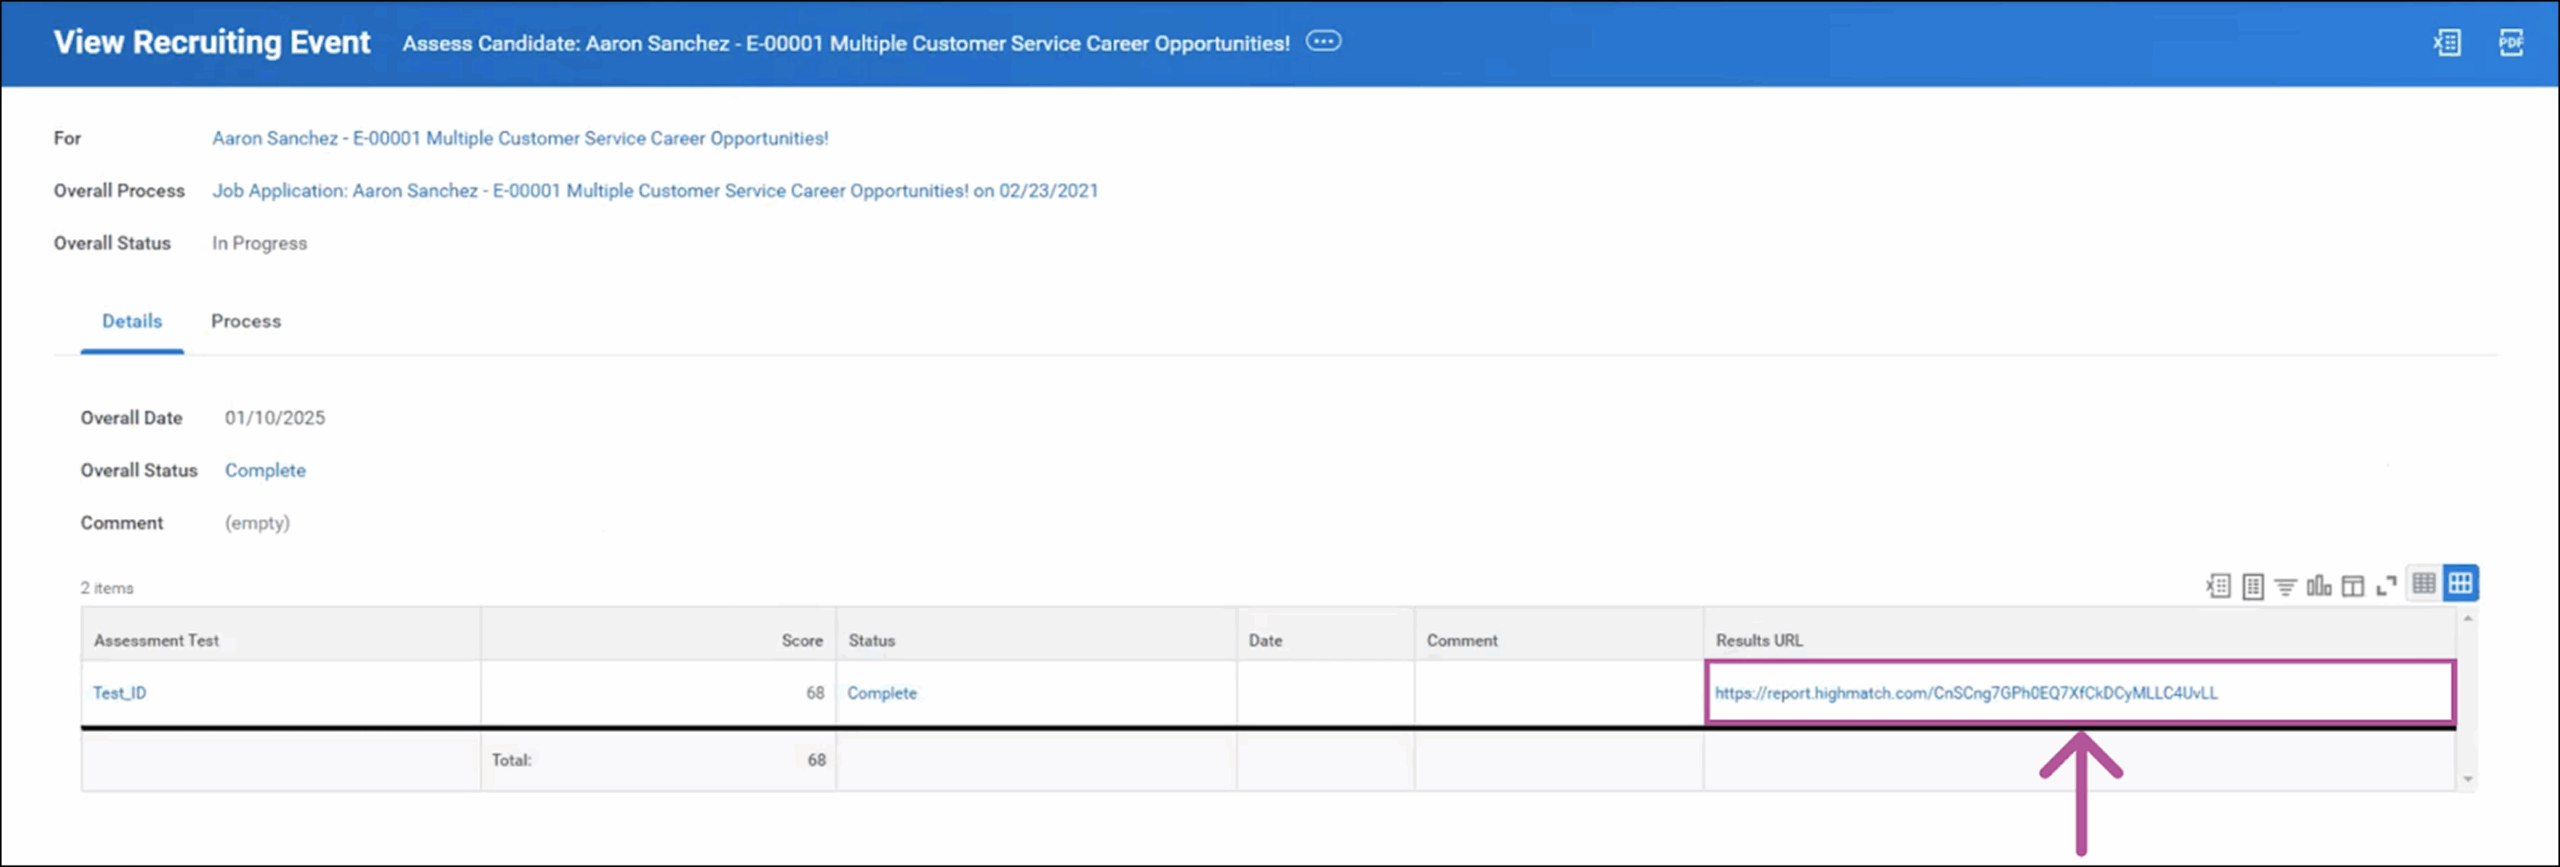
Step 13: View the Candidate’s Assessment Results & Report
Once the candidate has completed the assessment, HighMatch will send the assessment results and the assessment report to the Screening > Assessments section in the candidate’s profile in Workday. The following information will be displayed:
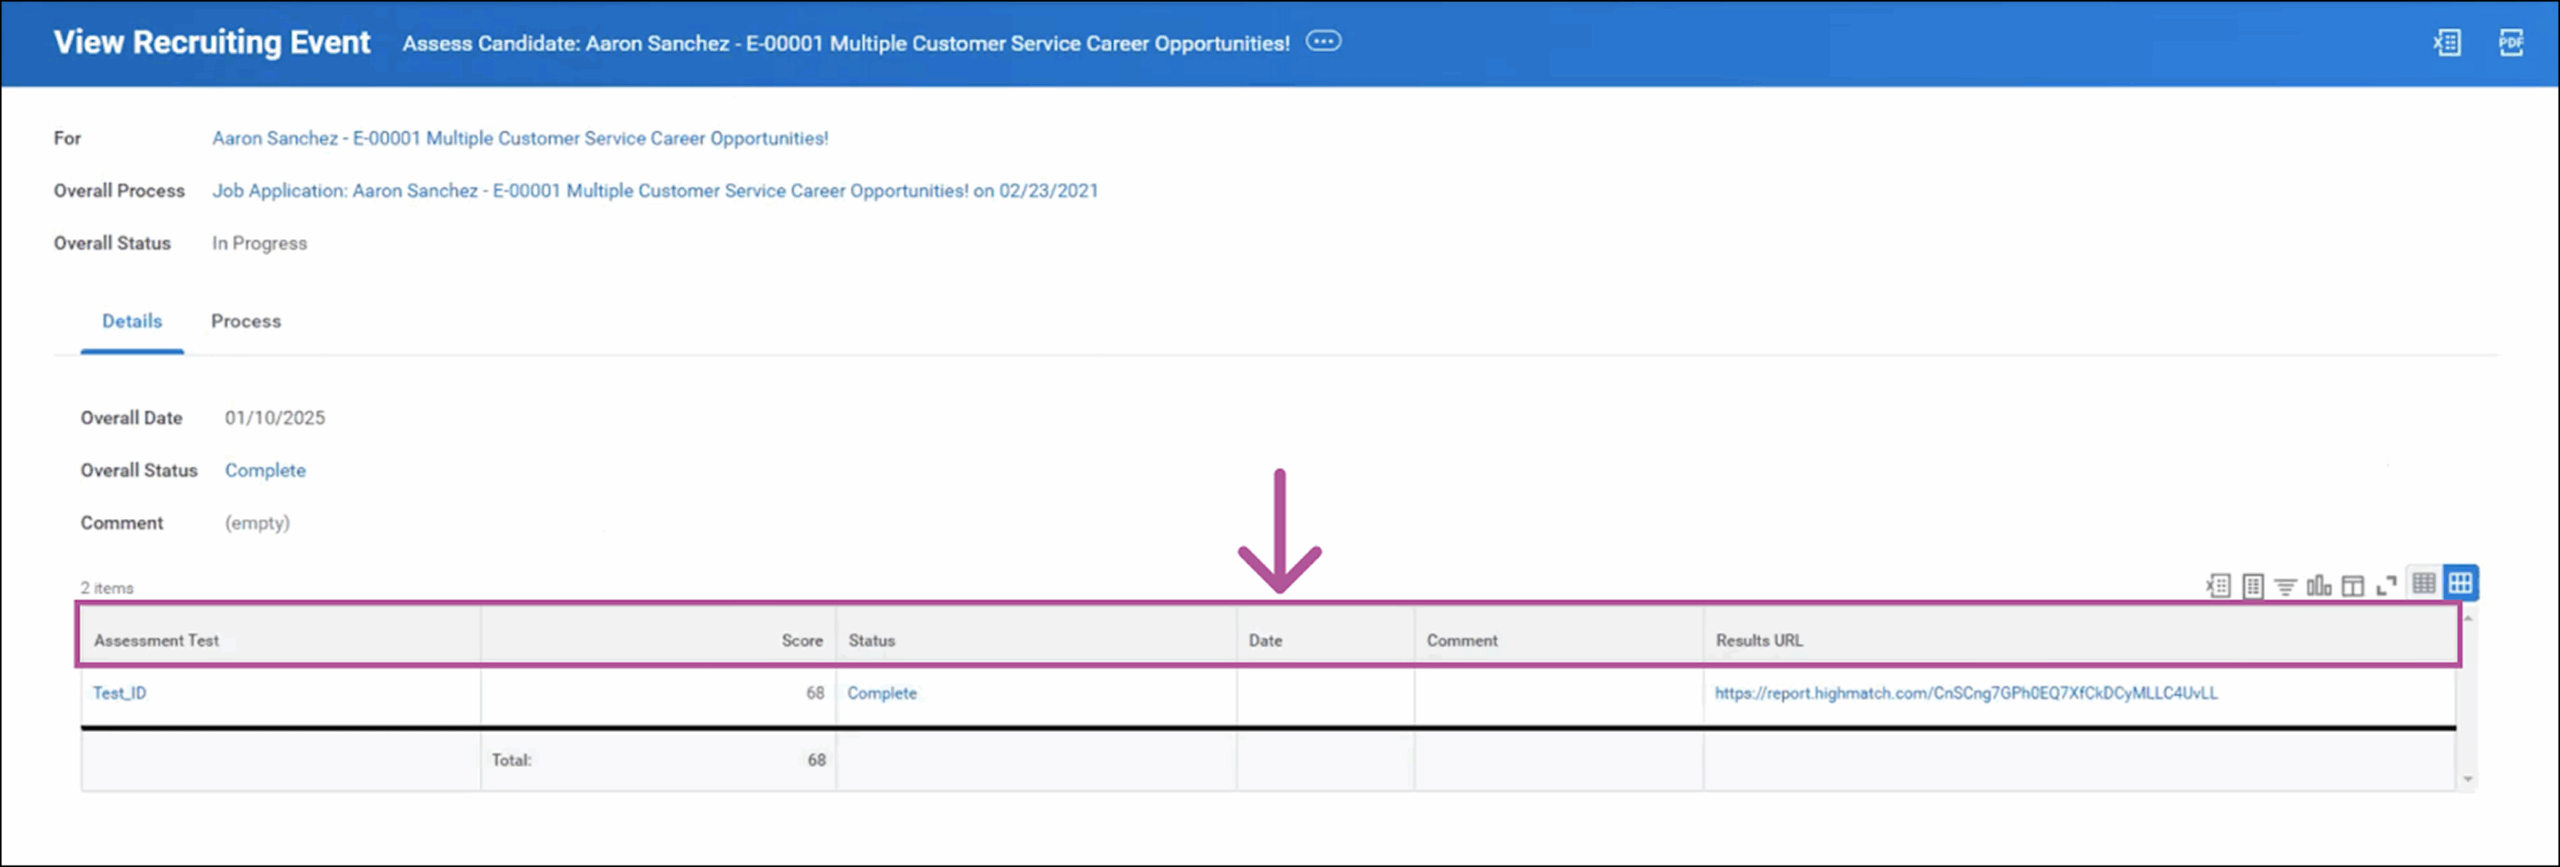
- Assessment Test (name of the assessment)
- Score (numeric score the candidate received on the assessment)
- Status (explained in step 4)
- Date (the date the assessment was completed)
- Comment (the assessment result’s label i.e. Pass or Fail. These labels can be personalized based on your preferences)
- Results URL (clicking the link takes users to a new tab with HighMatch’s detailed report of the assessment’s results)
Your integration is set up and ready to use! Please reach out to HighMatch’s Success team at support@highmatch.com if you have any questions or feedback regarding the HighMatch integration, assessments and assessment reports.