This integration deployment guide will provide you with a preview of what to expect for connecting iCIMS with HighMatch as well as provide you with the integration user guide to help you quickly and easily send candidates a HighMatch assessment invitation and receive those results in iCIMS.
Summary of the Integration Flow
- The integration will trigger an assessment order when the candidate is moved to the HighMatch assessment applicant workflow and will send an invitation for the assessment to the candidate.
- HighMatch will display the assessment status of the HighMatch stage in iCIMS and update the candidate’s profile if the assessment was successfully sent to the candidate or not.
- When the candidate has completed the assessment, HighMatch will post the assessment score and detailed report to the iCIMS HighMatch assessment results stage on the candidate’s profile.
Summary of Steps
There are 8 steps used for enabling and testing the integration before you can request and receive HighMatch assessment results live in production from within iCIMS.
Steps 1-4 will cover the integration deployment guide which provides you with a preview of what to expect when connecting to the HighMatch integration within HighMatch.
Step 1: Reach out to the iCIMS Team
Step 2: Confirm the Assessment Type Setting and the Launch Candidate Assessment Workflow have both been Enabled
Step 3: iCIMS will work with HighMatch to enable the connector
Step 4: Add Assessments to the ‘Assessment Type’ Setting for Job Requisitions
During your configuration process in Steps 1-4, your iCIMS specialist will also show you how to use the integration which is discussed in Steps 5-8 below.
However, you may review the following steps before your configuration process meeting to have a better understanding of the user process and ask questions if needed.
You may also re-review these steps in the future if a refresher is needed or to show new recruiters or hiring managers how to use the HighMatch integration without the need to schedule another meeting with an iCIMS specialist.
Step 5: Adding an Assessment to a Job Requisition
Step 6: Sending Assessments Manually
Step 7: Viewing the Candidate’s Assessment Status
Step 8: Reviewing the Assessment Results and Report
Process Details
Step 1: Reach out to the iCIMS Team
As part of their services, iCIMS requires you to schedule a meeting with an iCIMS implementation specialist or a support representative who will walk you through the entire process of both enabling and using the HighMatch integration on iCIMS. Steps 1-3 will provide you with a brief preview of what to expect during your meeting with iCIMS.
Note: We recommend that you schedule a meeting with iCIMS support as soon as possible, considering the scheduling process may take some time.
Here is a preview of what to expect:
- An iCIMS representative will send you a questionnaire to gather basic information.
- Here you can also schedule a kickoff call to ask any questions as well as discuss the following:
- Different Integration Workflows.
- Technical Configurations.
- Usage Demos and Validations.
- Go Live Preparation.
Step 2: Confirm the Assessment Type Setting and an Assessment Workflow Stage have been Enabled
For users to be able to assign assessments to job requisitions, the setting, Assessment Type, will need to be enabled. See Step 4 to learn more about adding assessments to the Assessment Type setting.
For a candidate to be sent an assessment, they will need to be added to an assessment stage in your job’s requisition workflow.
In a job requisition, moving a candidate to this assessment stage (more info in Step 6) will cause the integration to send an invitation email to the candidate inviting them to take the assessment that is assigned in the Assessment Type setting, which will be selected in Step 5.
These two functions should be enabled by your iCIMS specialist in Step 1. We recommend confirming with them that the Assessment Type setting and an assessment workflow stage have been enabled.
Step 3: iCIMS will work with HighMatch to enable the connector
iCIMS will send all of the information gathered from the questionnaire, on your behalf to HighMatch. HighMatch will configure and enable the webhook, and confirm with iCIMS that the integration has been enabled and is working correctly.
HighMatch will also reach out to provide you with unique codes for each of your HighMatch assessments. These codes are needed in Step 4.
Please reach out to HighMatch’s Success team at support@highmatch.com if you have any questions about this process.
Step 4: Adding Assessments to the ‘Assessment Type’ Setting for Job Requisitions
During your initial integration setup with your iCIMS specialist, the Assessment Type will have been added to your account configuration. The Assessment Type setting will allow you to select assessments that will be sent to candidates in a job requisition. Assessment will need to be added to the Assessment Type setting, in order for you to be able to select assessments for job requisitions.
Please note that this can only be configured by an administrator on your iCIMS account. They can follow these instructions if needed. Start by:
- Clicking the Admin tab on the top menu bar > System Configuration.
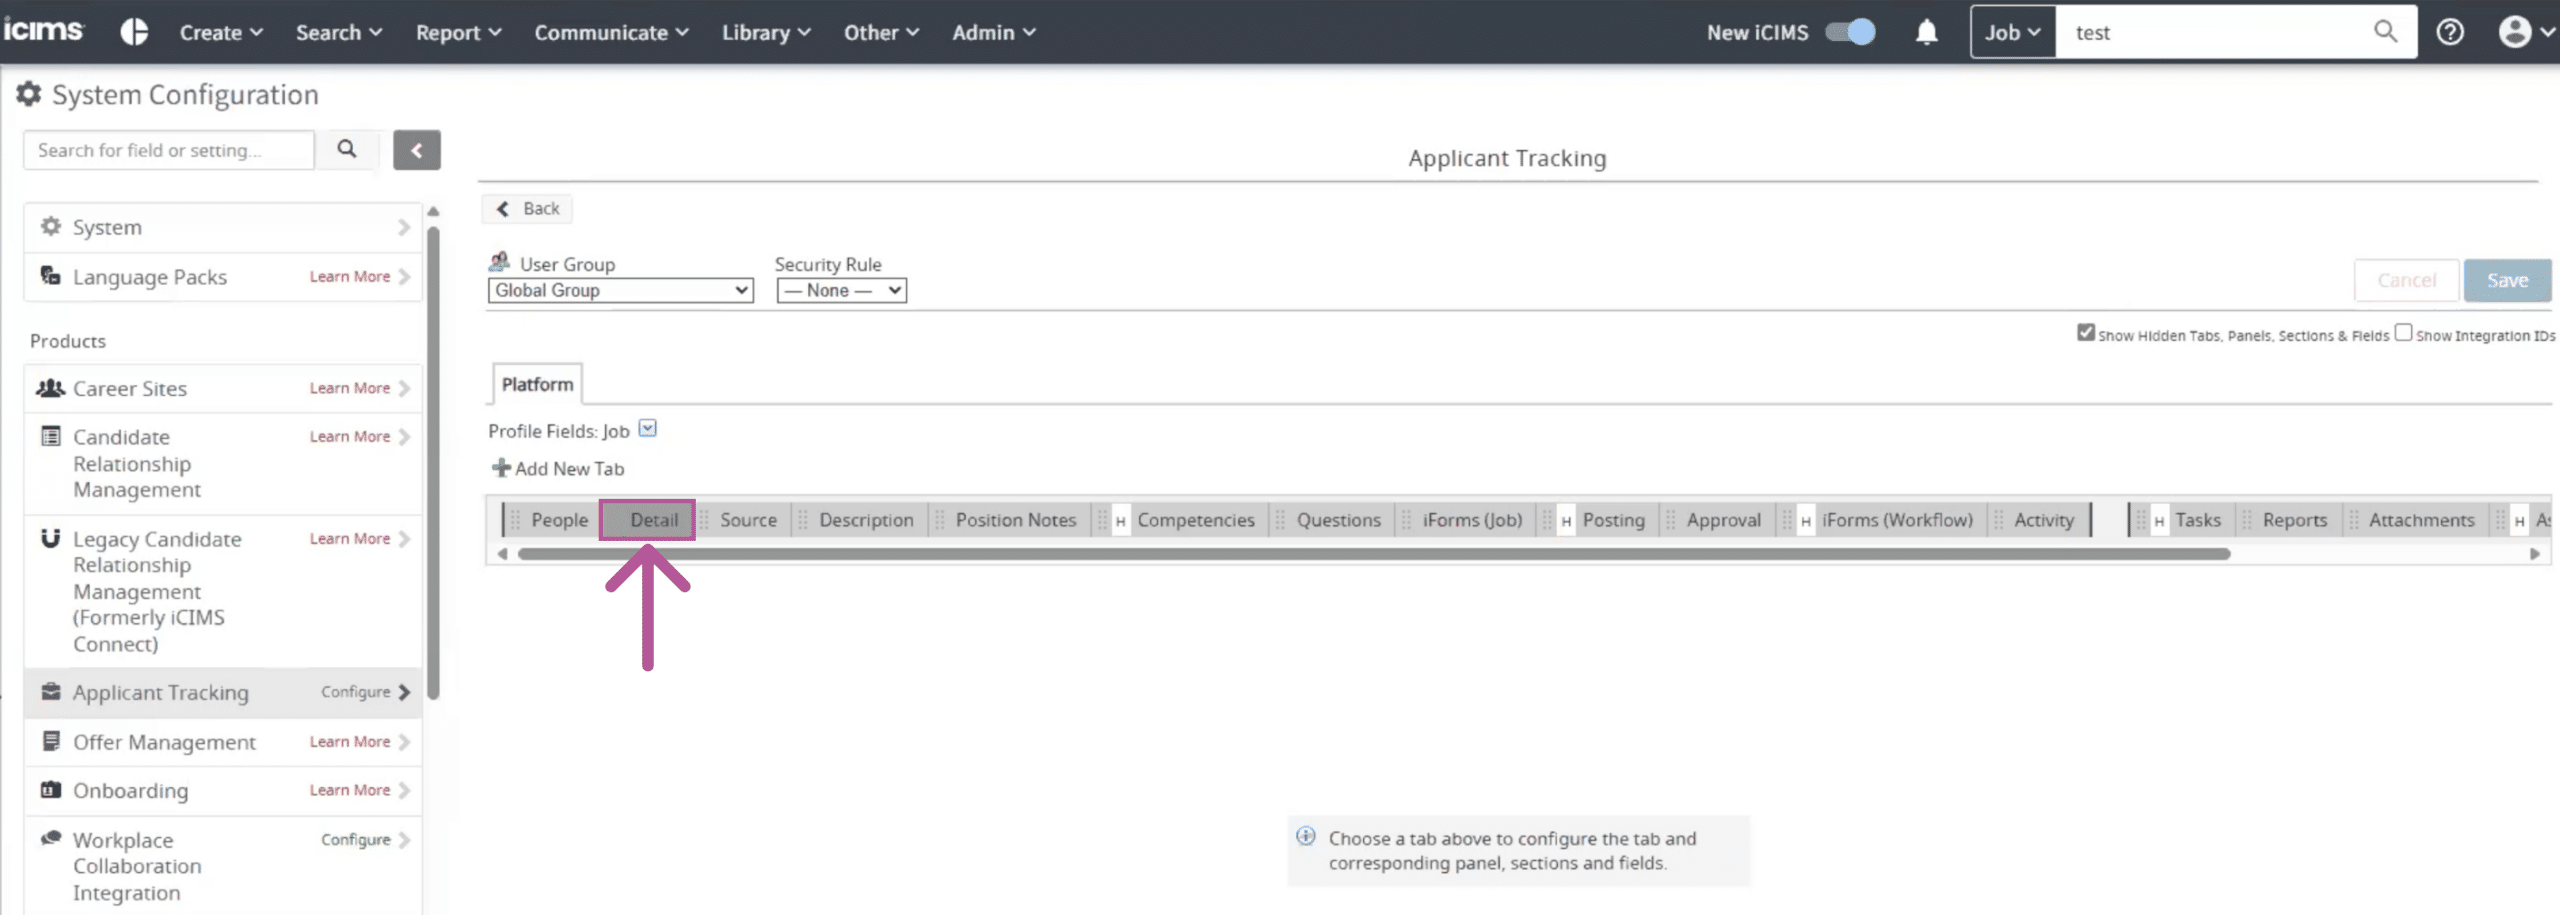
- Go to the Applicant Tracking section > Job > Detail.


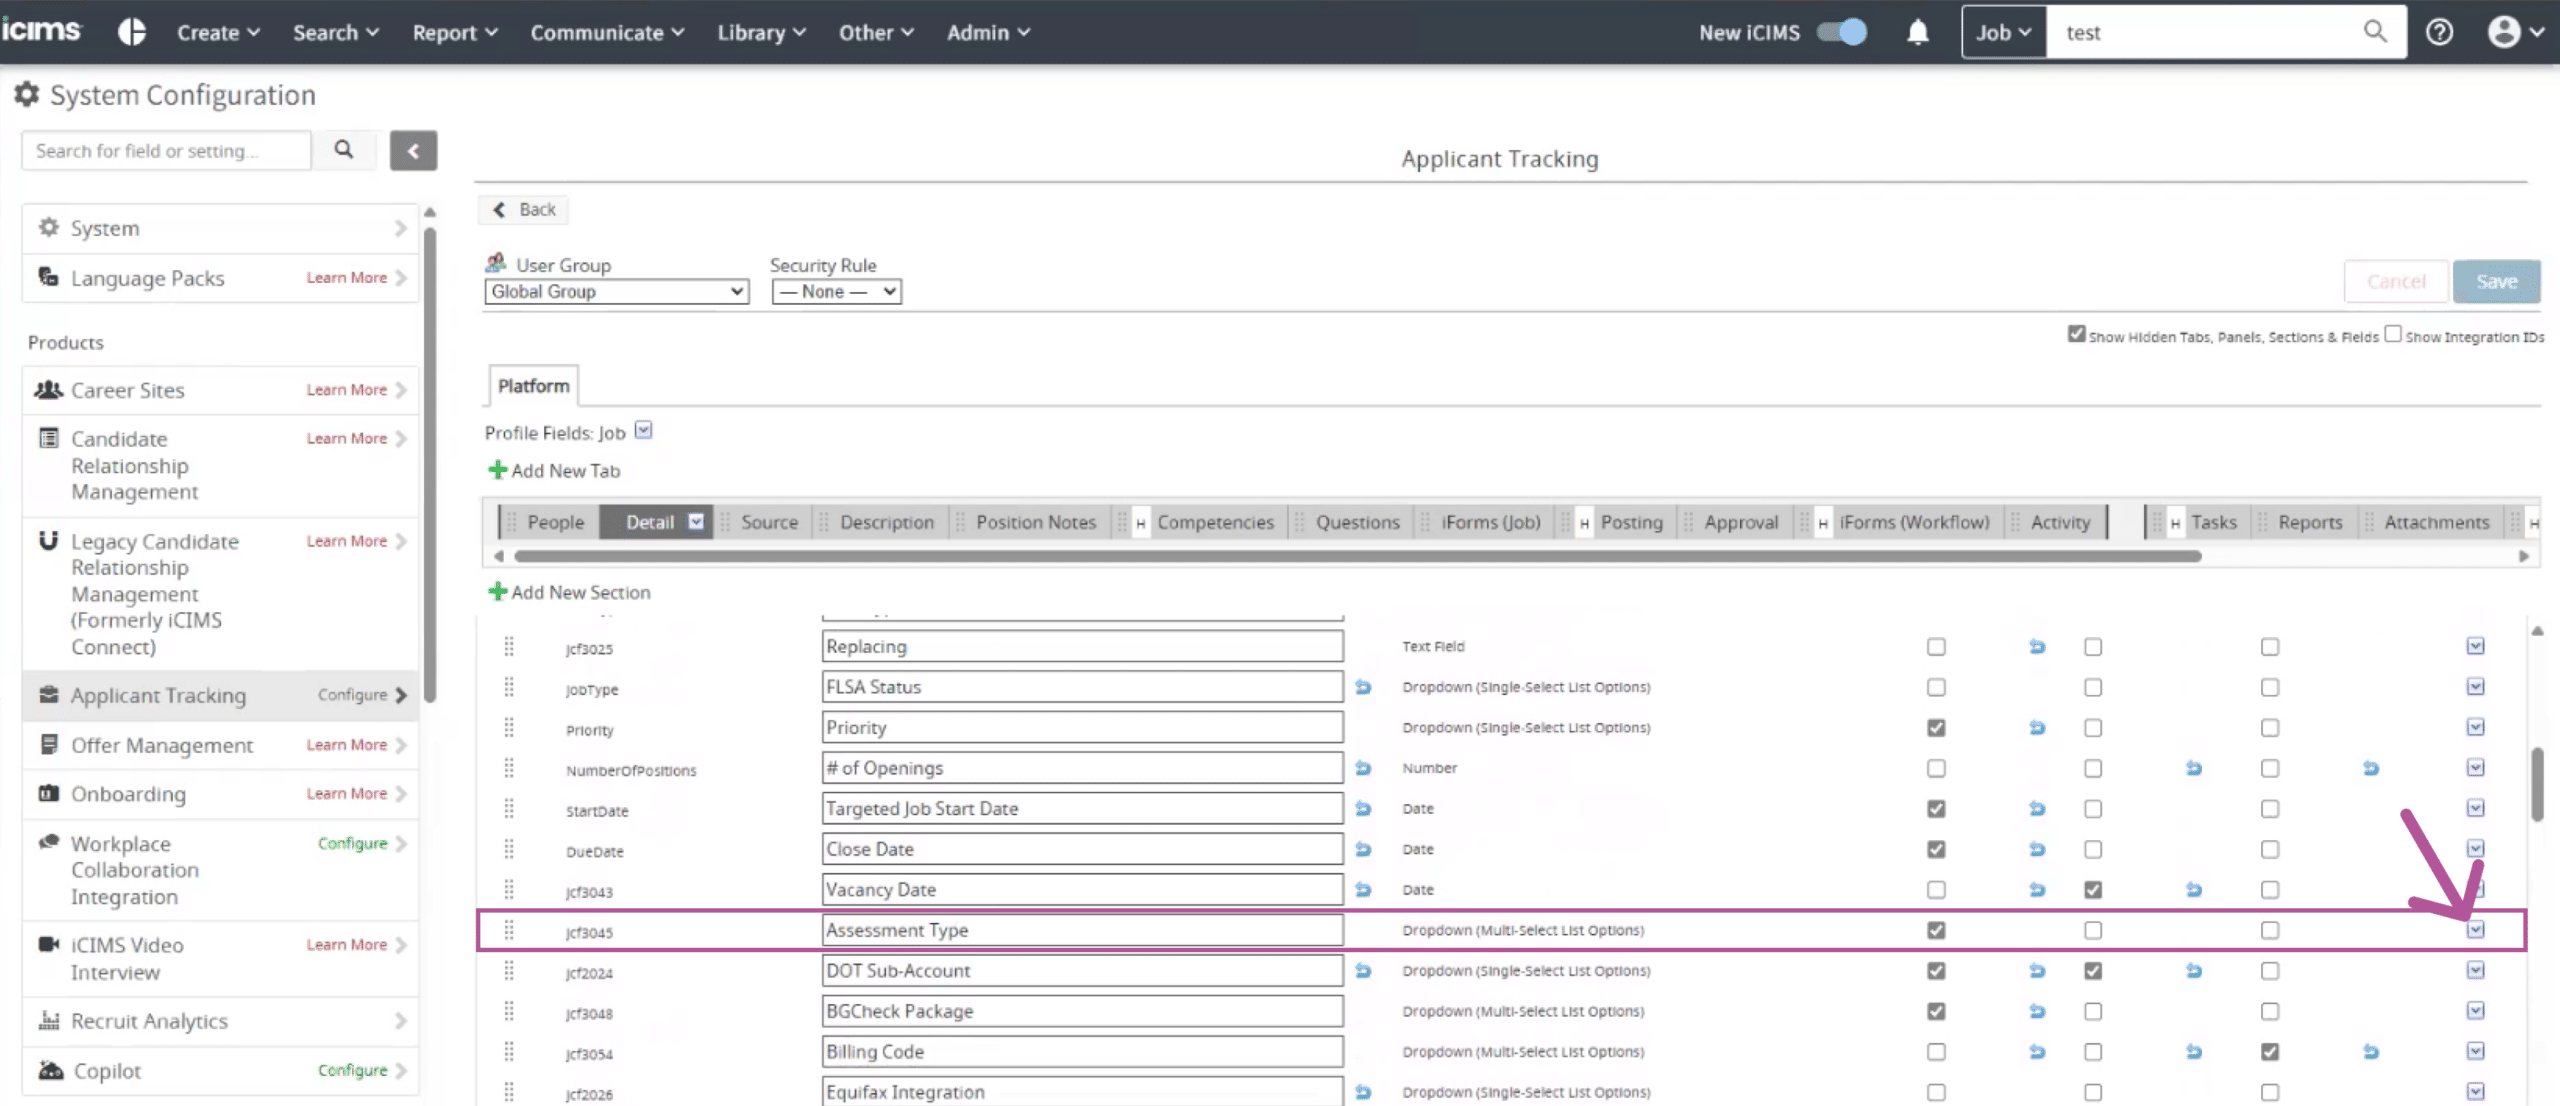
- Scroll down to the Assessment Type field > Click the Action dropdown button > Edit Field Properties.

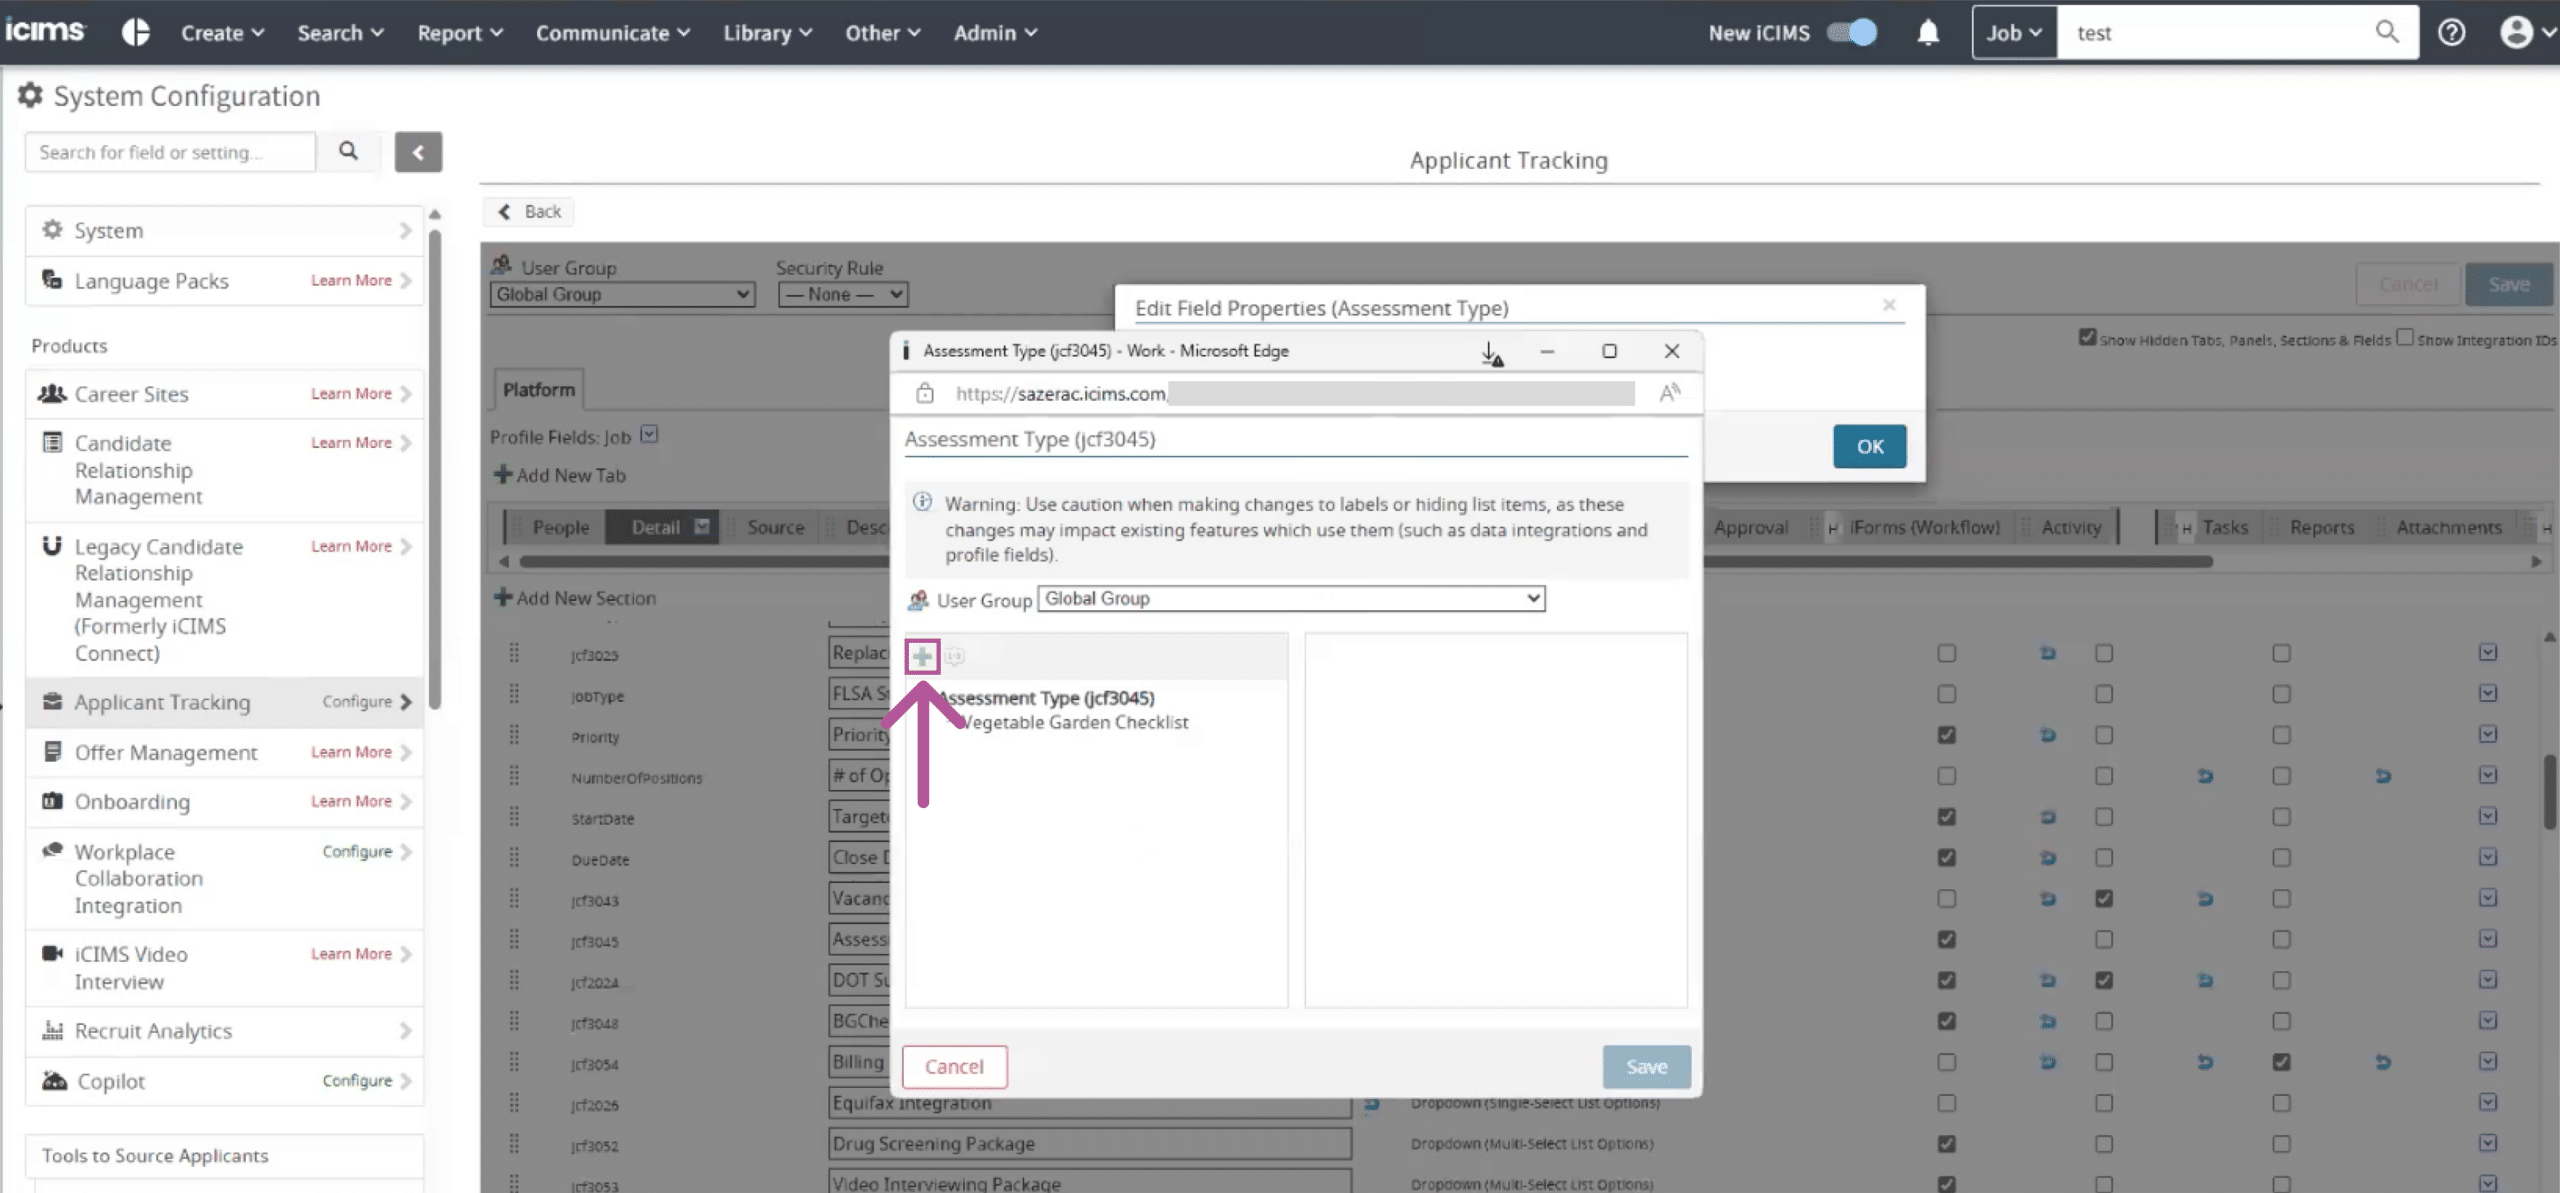
- Click Edit on the List Options section in the Edit Field Properties (Assessment Type) popup.
- To add an assessment to this list, click the Create List Item green + (plus) button.
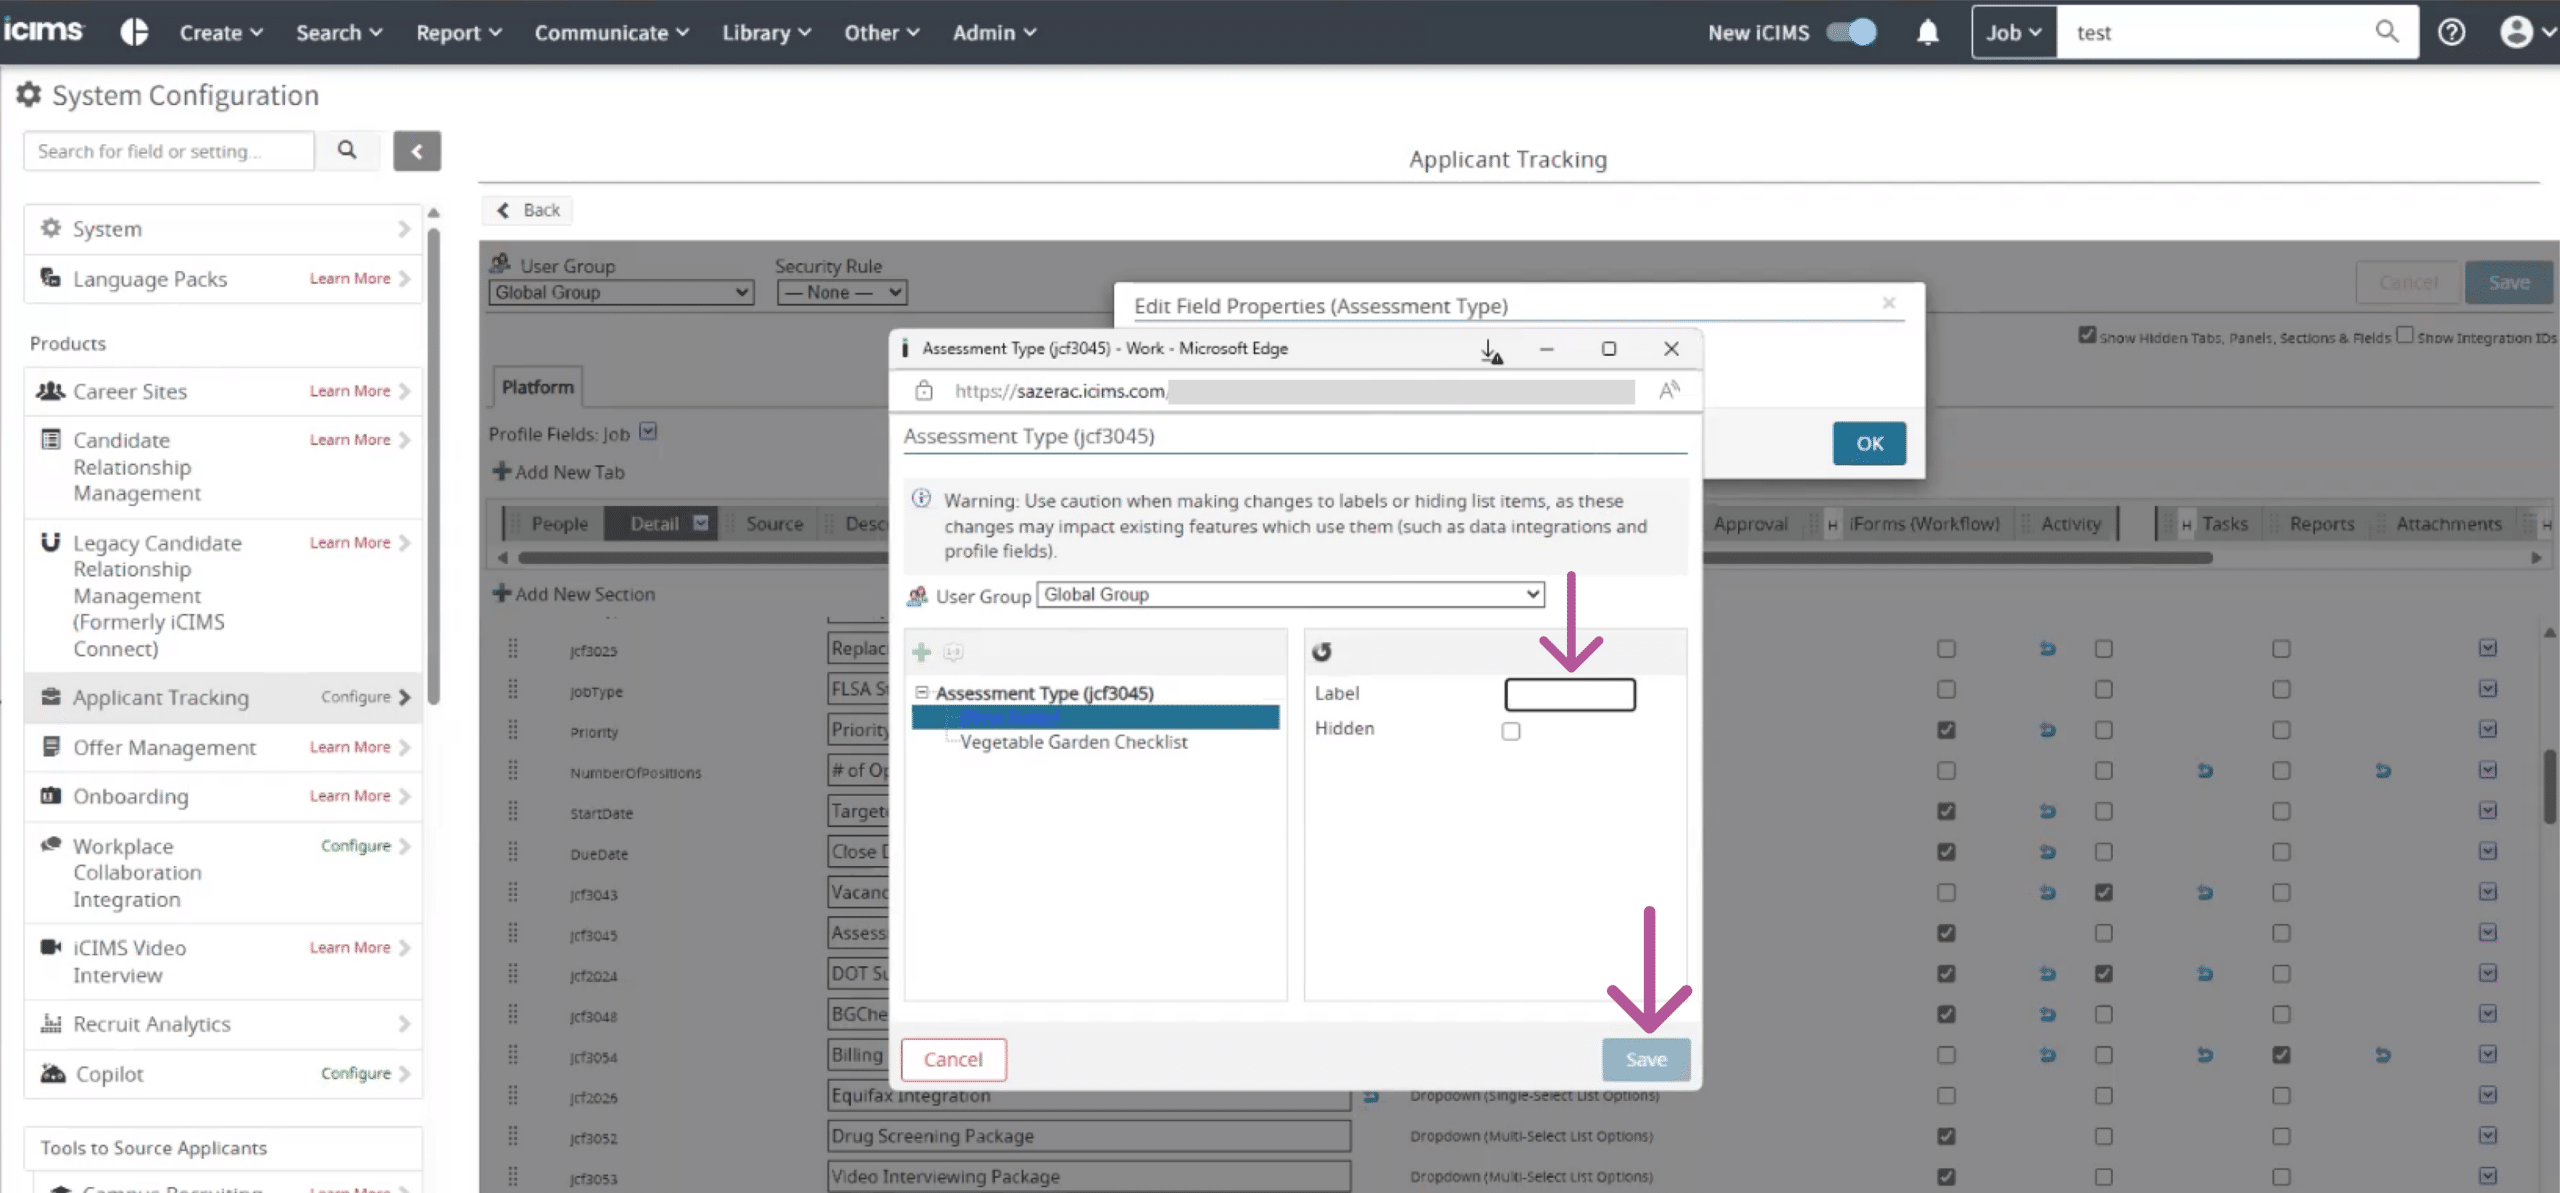
- Enter the name of the assessment you would like to add in the Label field.
- Note: These list items can NOT be deleted once they are created, but can be hidden and unavailable as a selectable assessment type in the setting (more info in Step 5) by clicking the Hidden checkbox.
- Click Save.
- Click the User Group dropdown menu > select HighMatch.
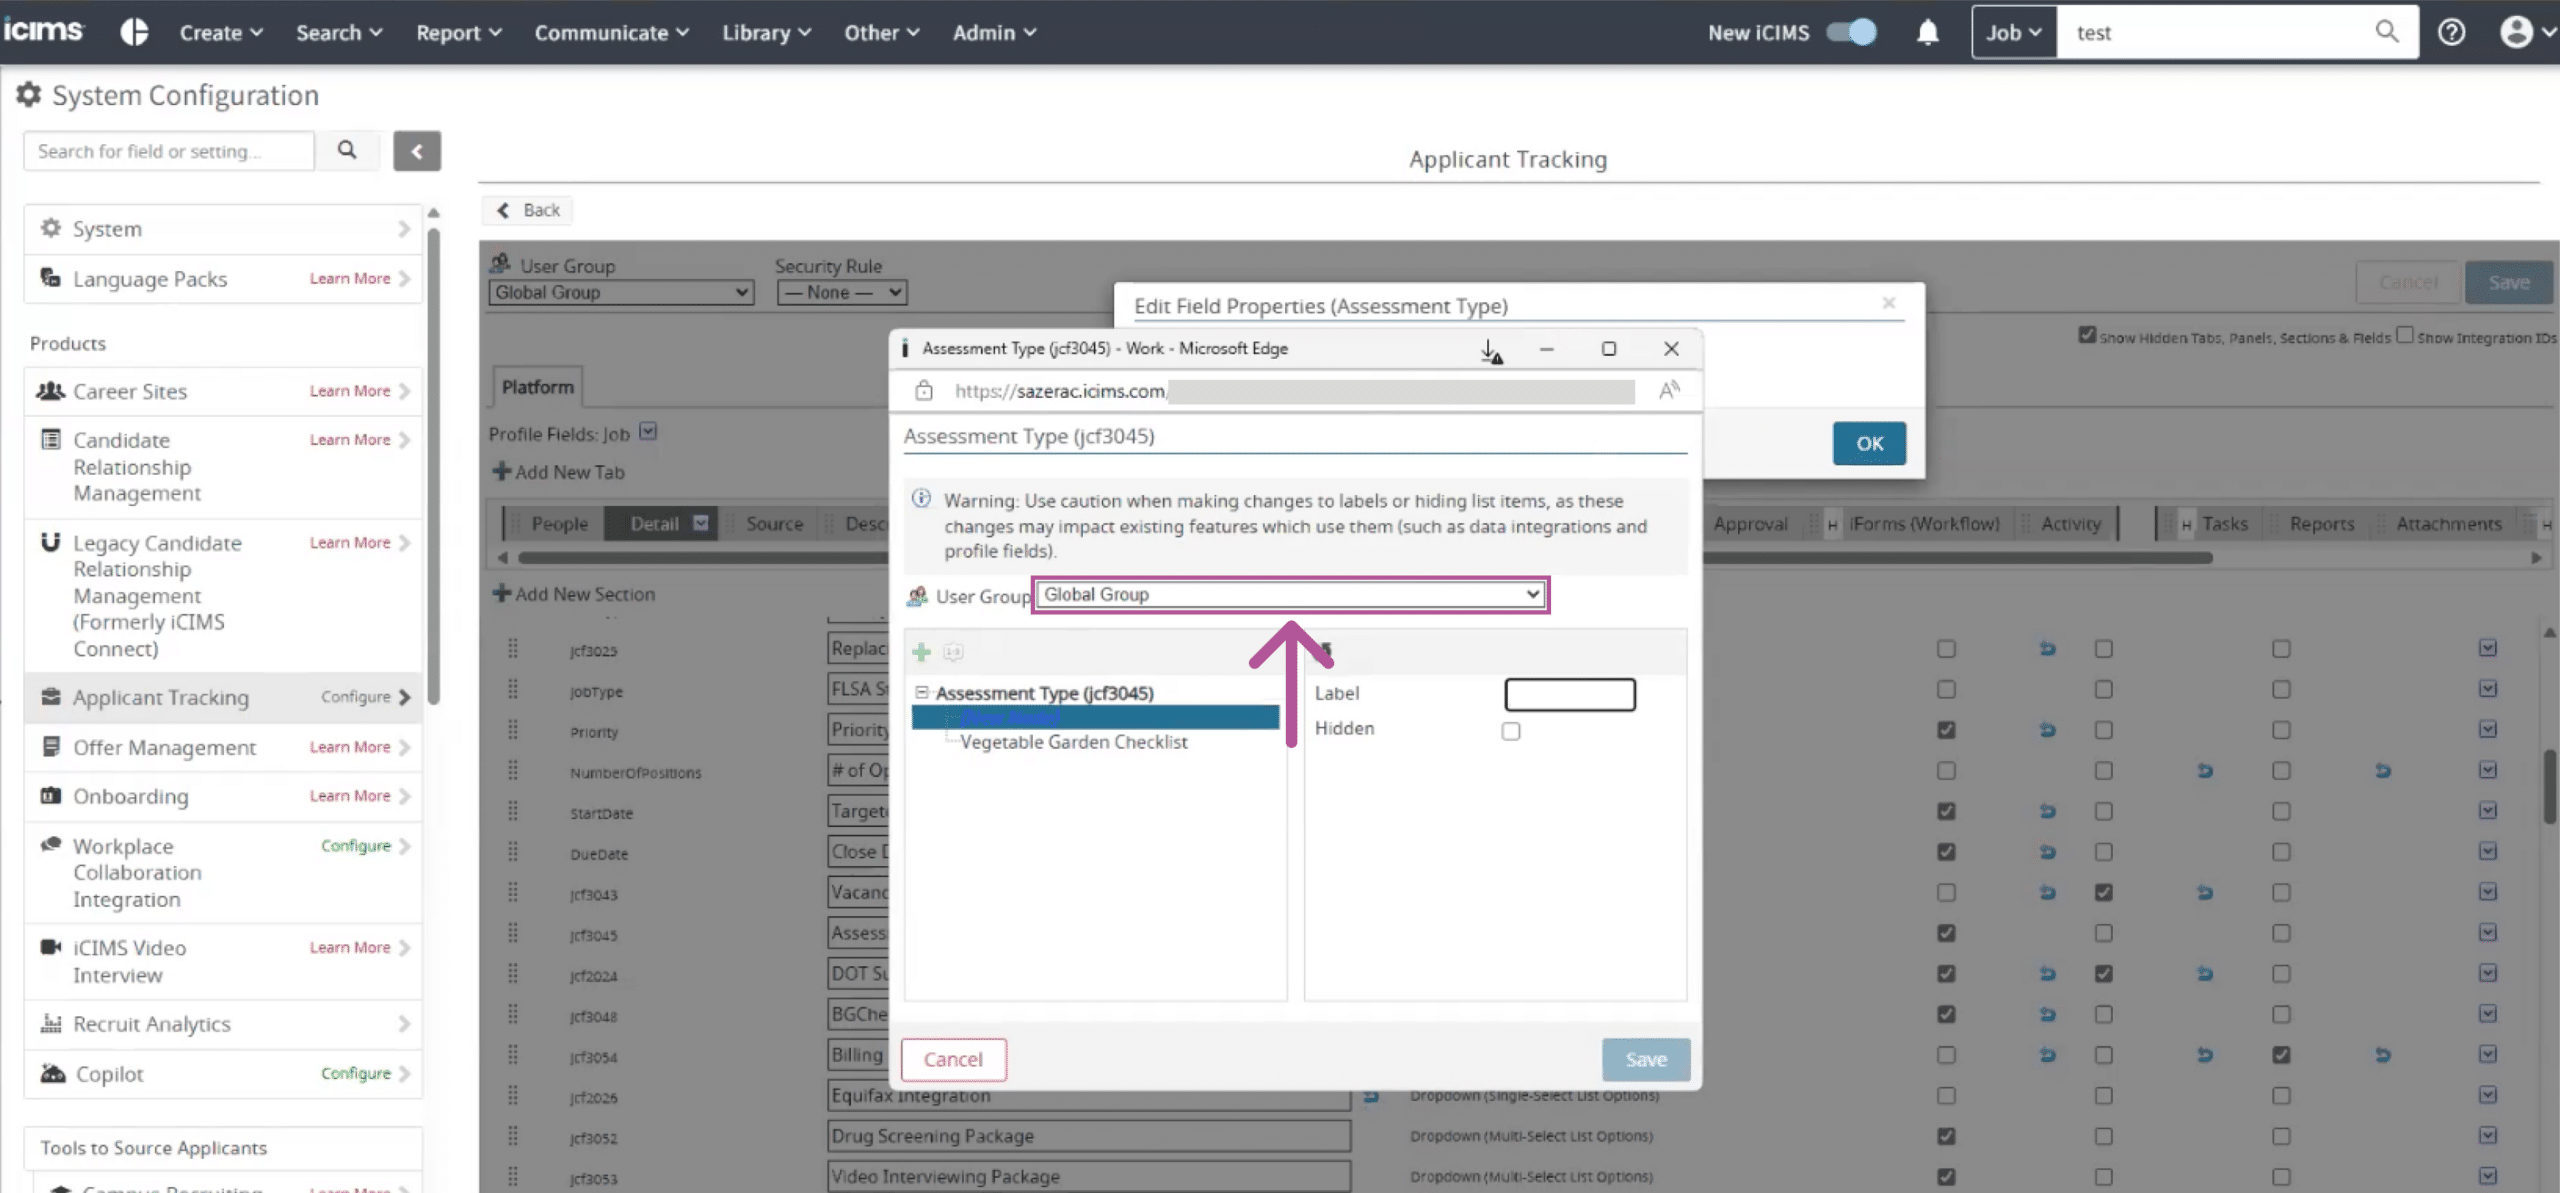
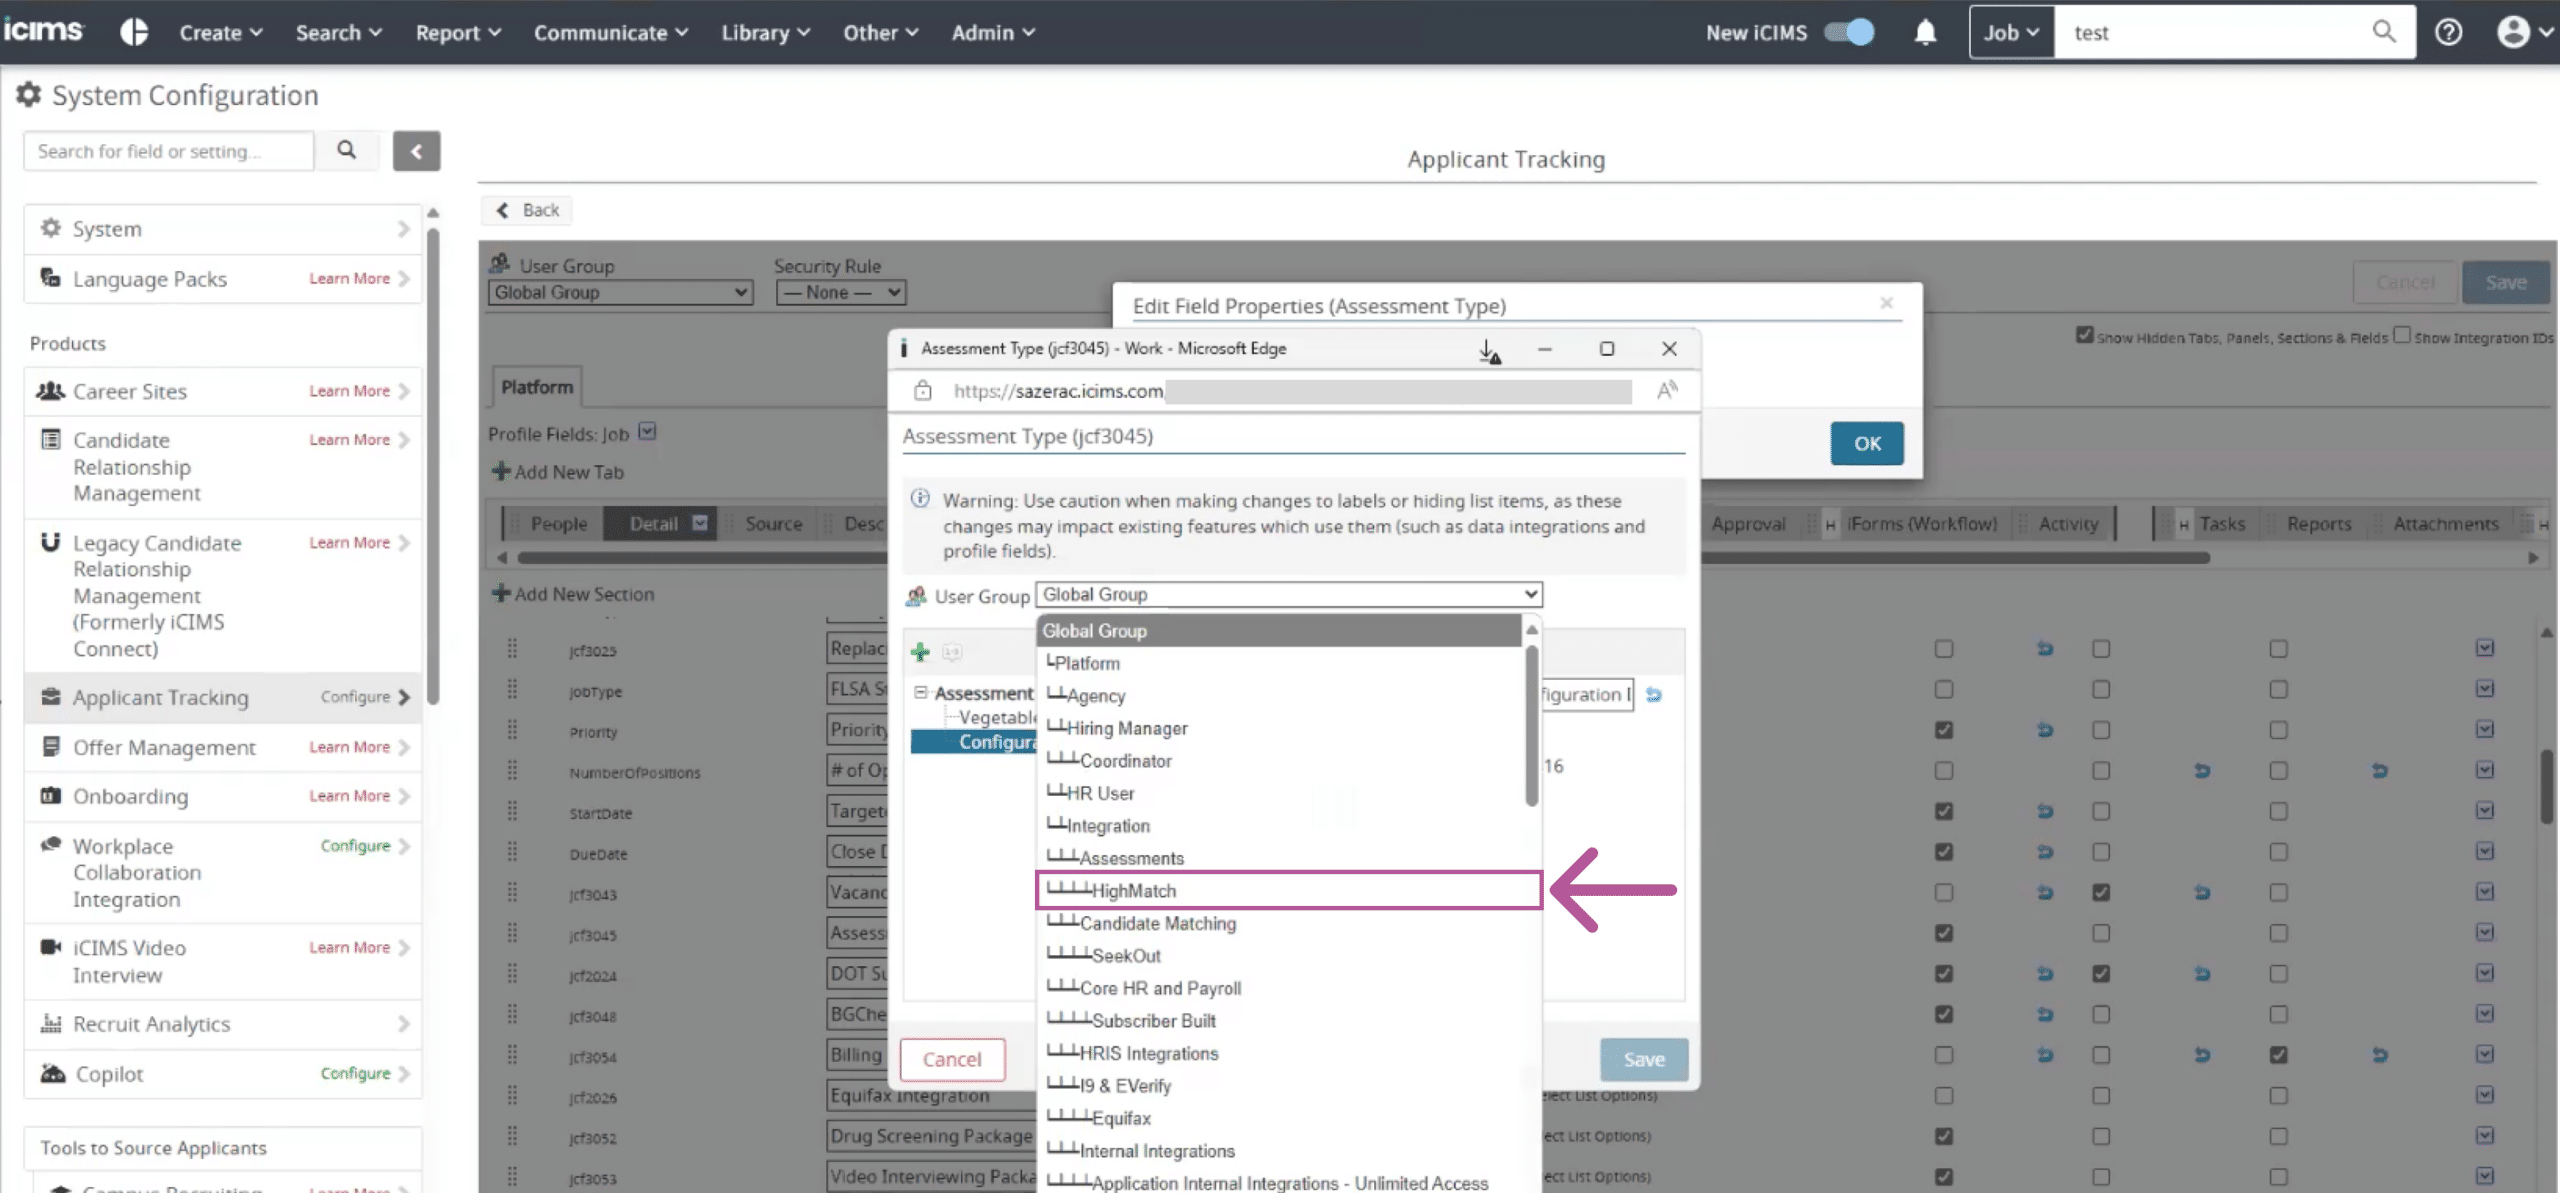
- Click on the assessment item you just created and enter the assessment’s unique code in the Label field.
- Note: HighMatch will have provided these codes in Step 3.
- Click Save.
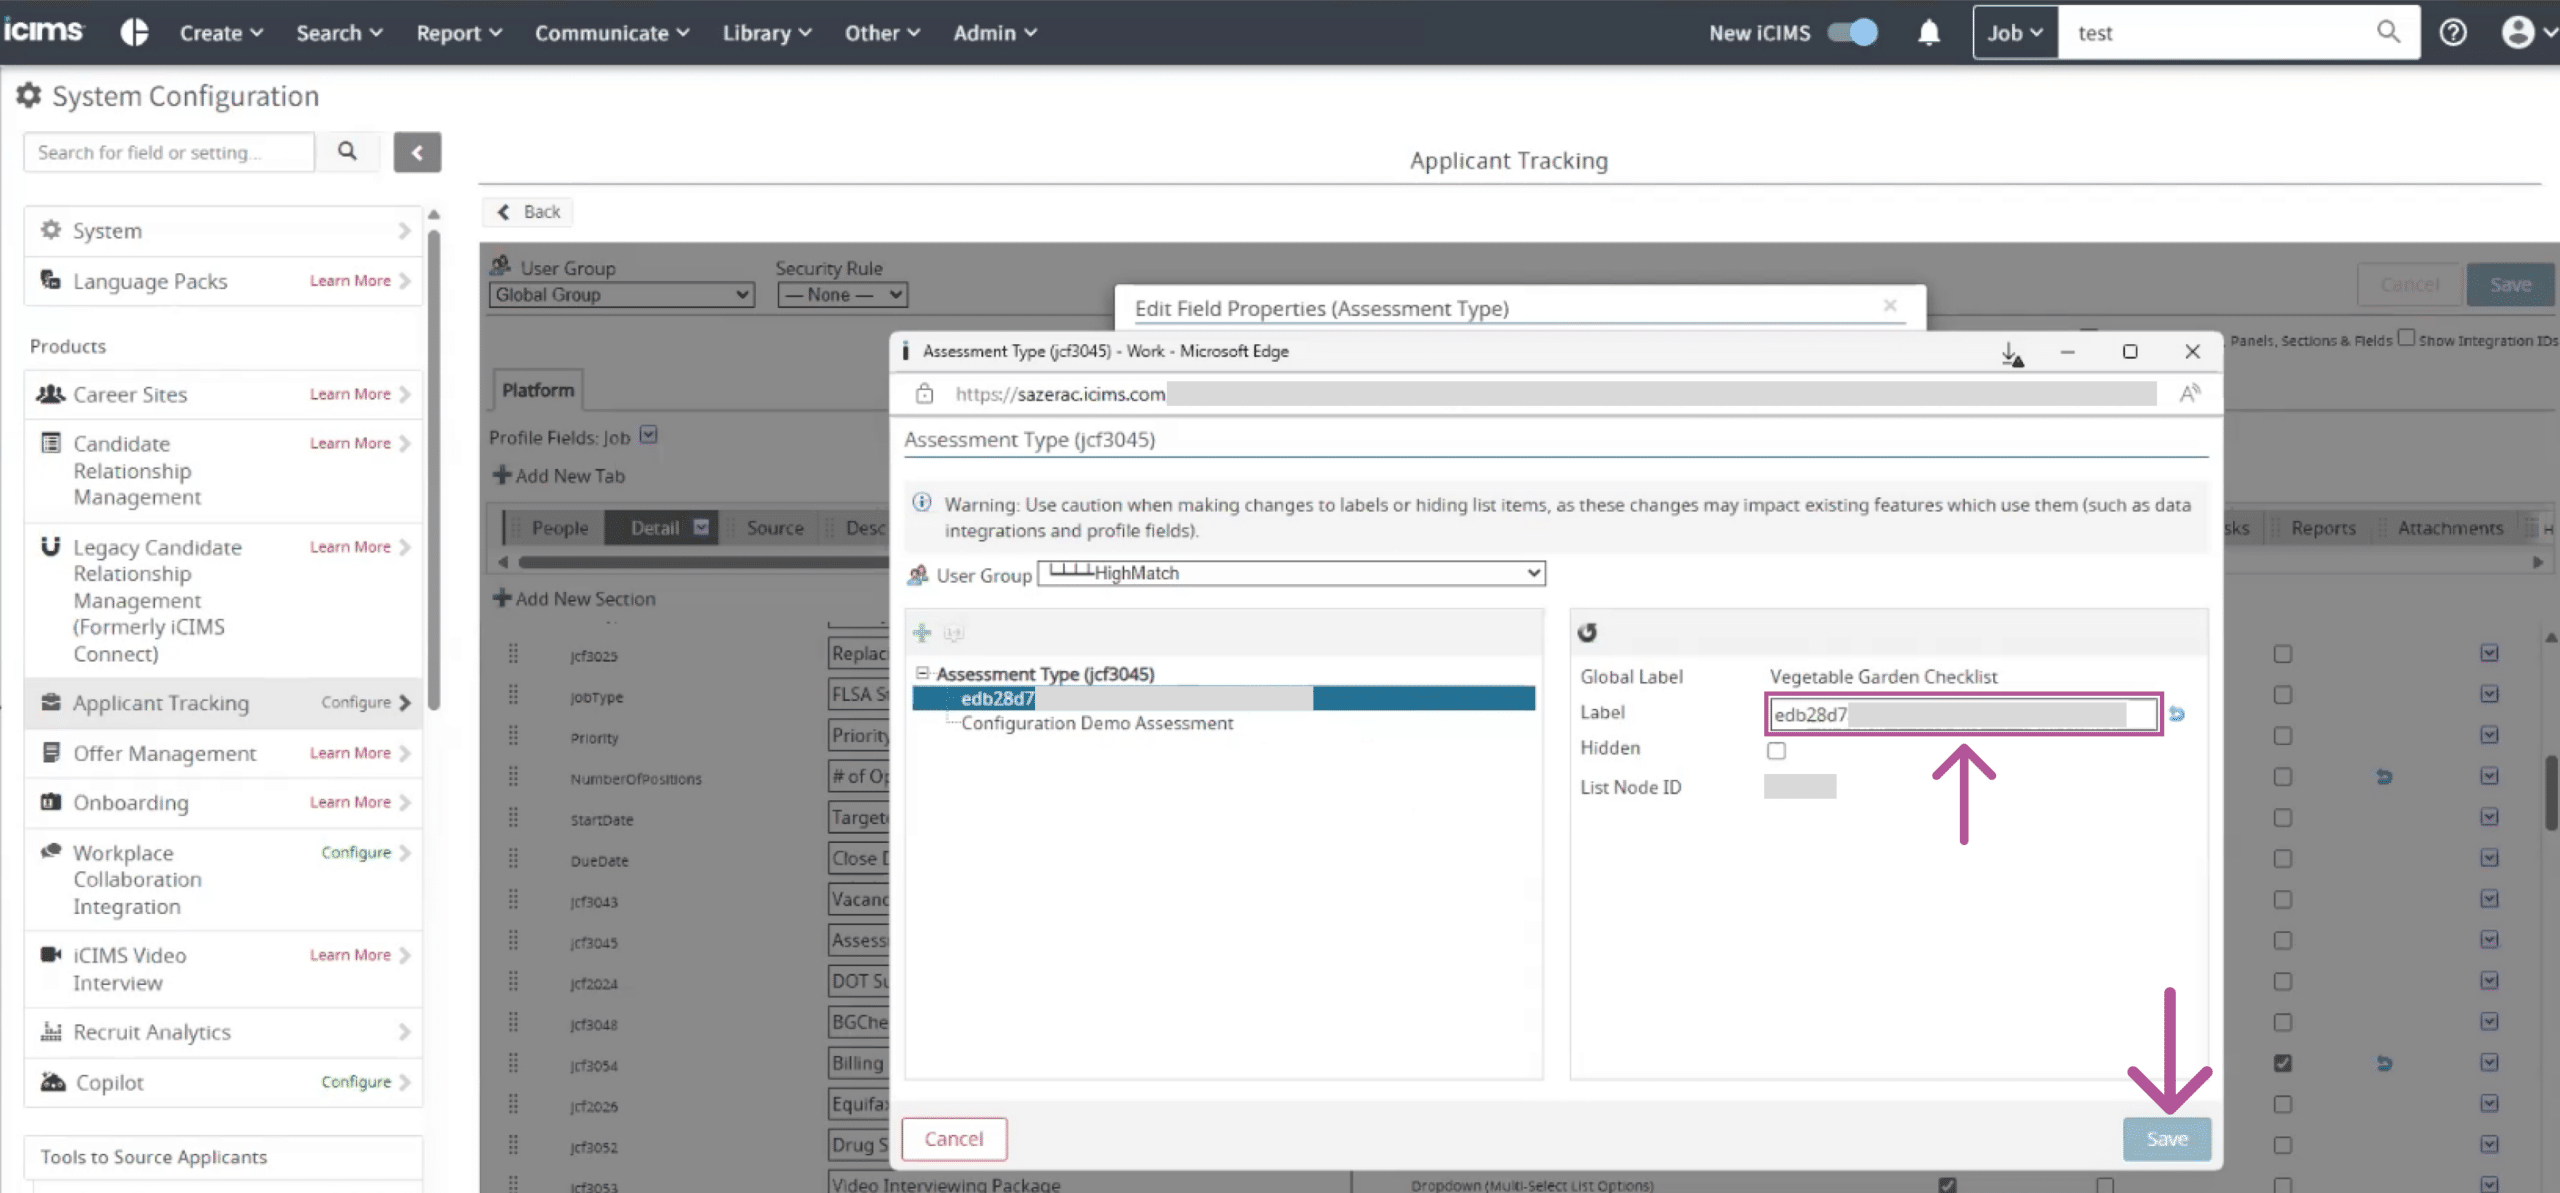
Once complete, your integration will be ready to use! Please refer to the integration user guide below to help you quickly and easily send candidates a HighMatch assessment invitation and receive those results.
Now that your setup is complete, Steps 5-8 below will cover the Integration User Guide for how to use the HighMatch integration on iCIMS. Please reach out to your iCIMS specialist or your HighMatch Success Manager at support@highmatch.com if you have any questions.
Step 5: Adding an Assessment to a Job Requisition
An assessment can be added to one job requisition or multiple job requisitions in bulk by an iCIMS user:
Note: The assessments that will be selectable in the Assessment Type setting mentioned below need to be added to the Assessment Type list. See Step 4 for more information.
Add an assessment to One Job Requisition Option:
- Go to the job requisition you would like to add an assessment to.
- Click the Detail tab.
- Note: Depending on how your Company has configured its account, the information and layout of the Detail tab page may differ from the screenshots shown in this document.

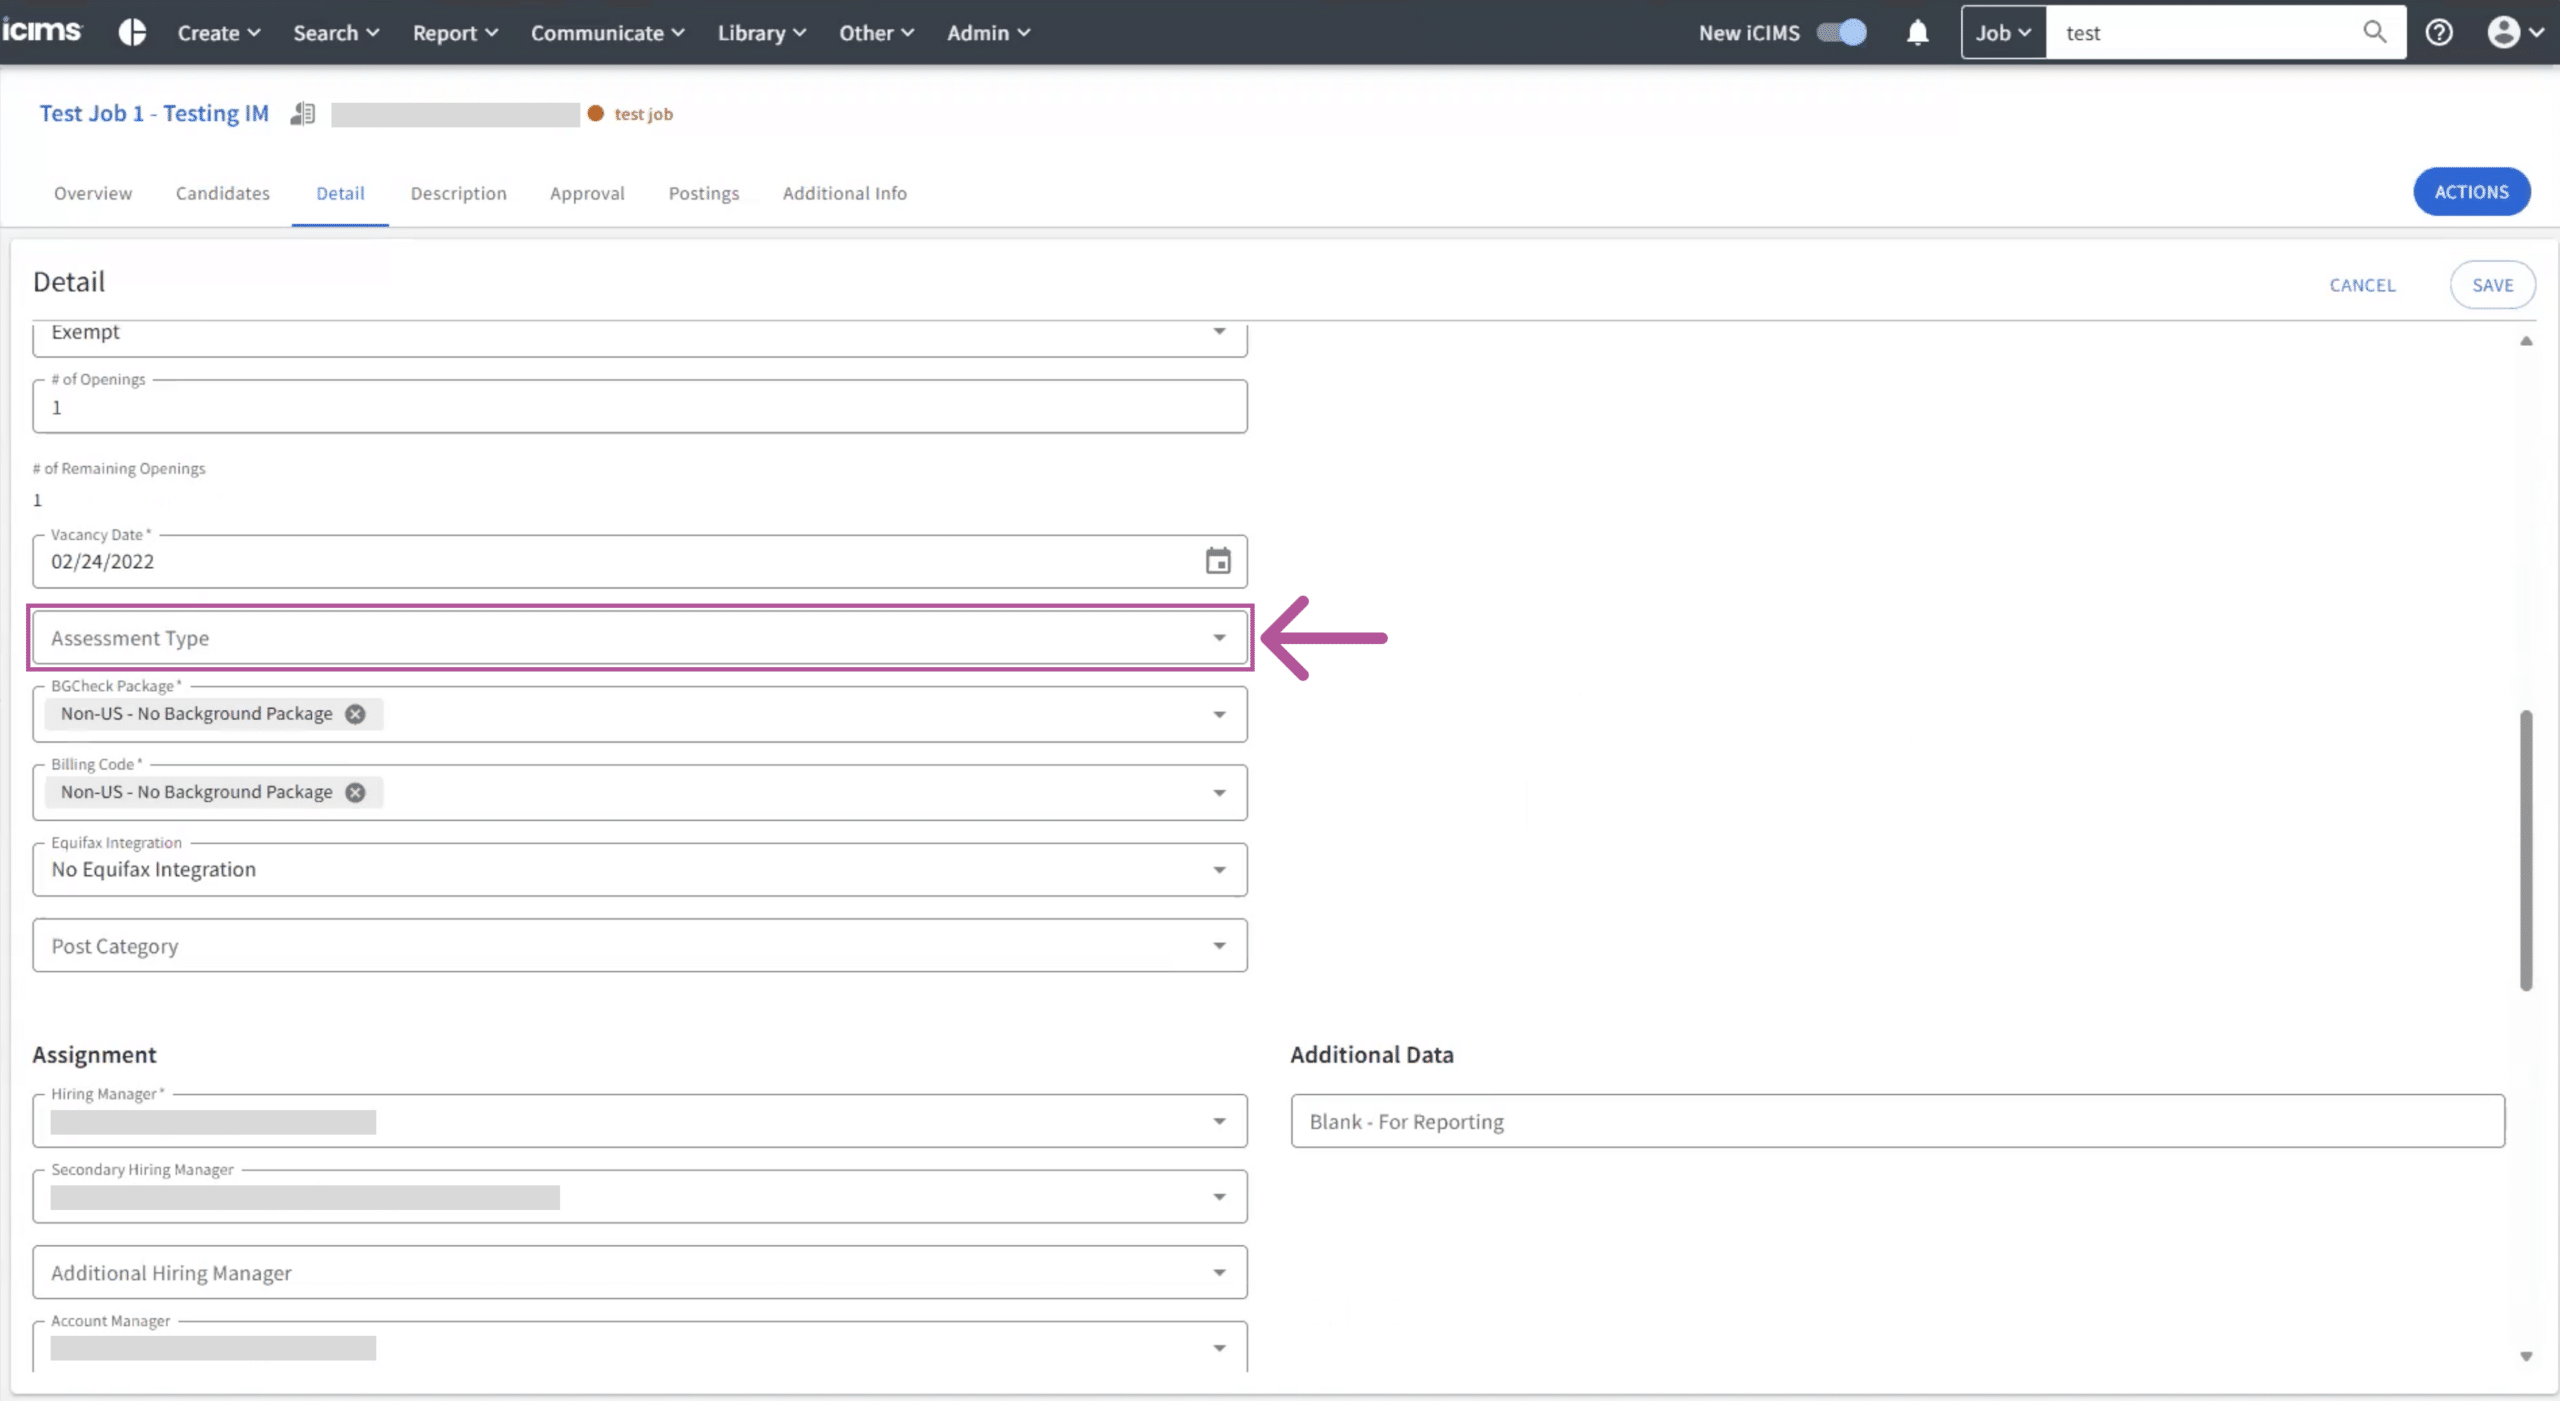
- Click Edit > find the Assessment Type option and select the assessment you would like to add in the dropdown menu.
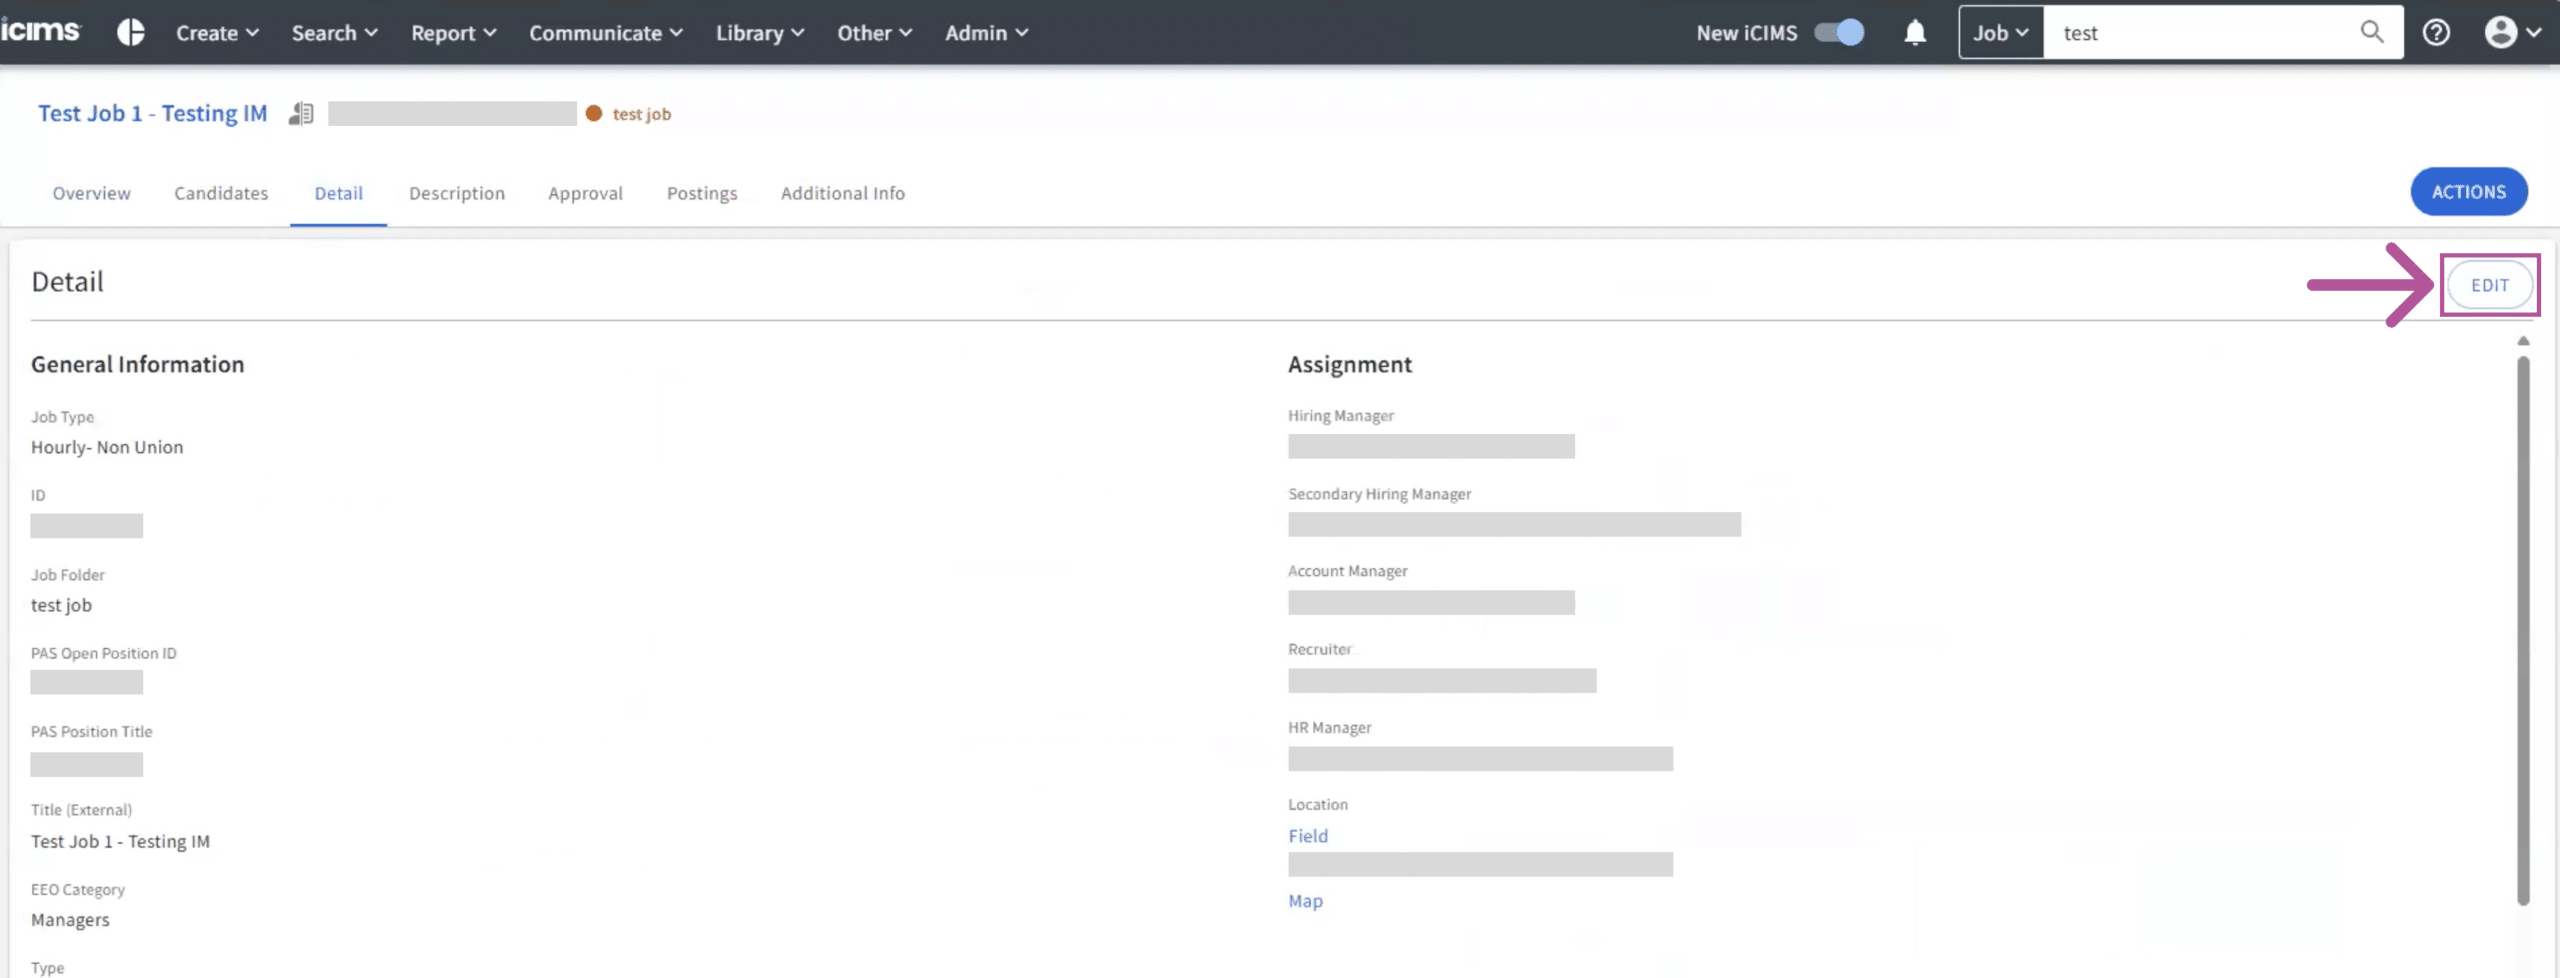
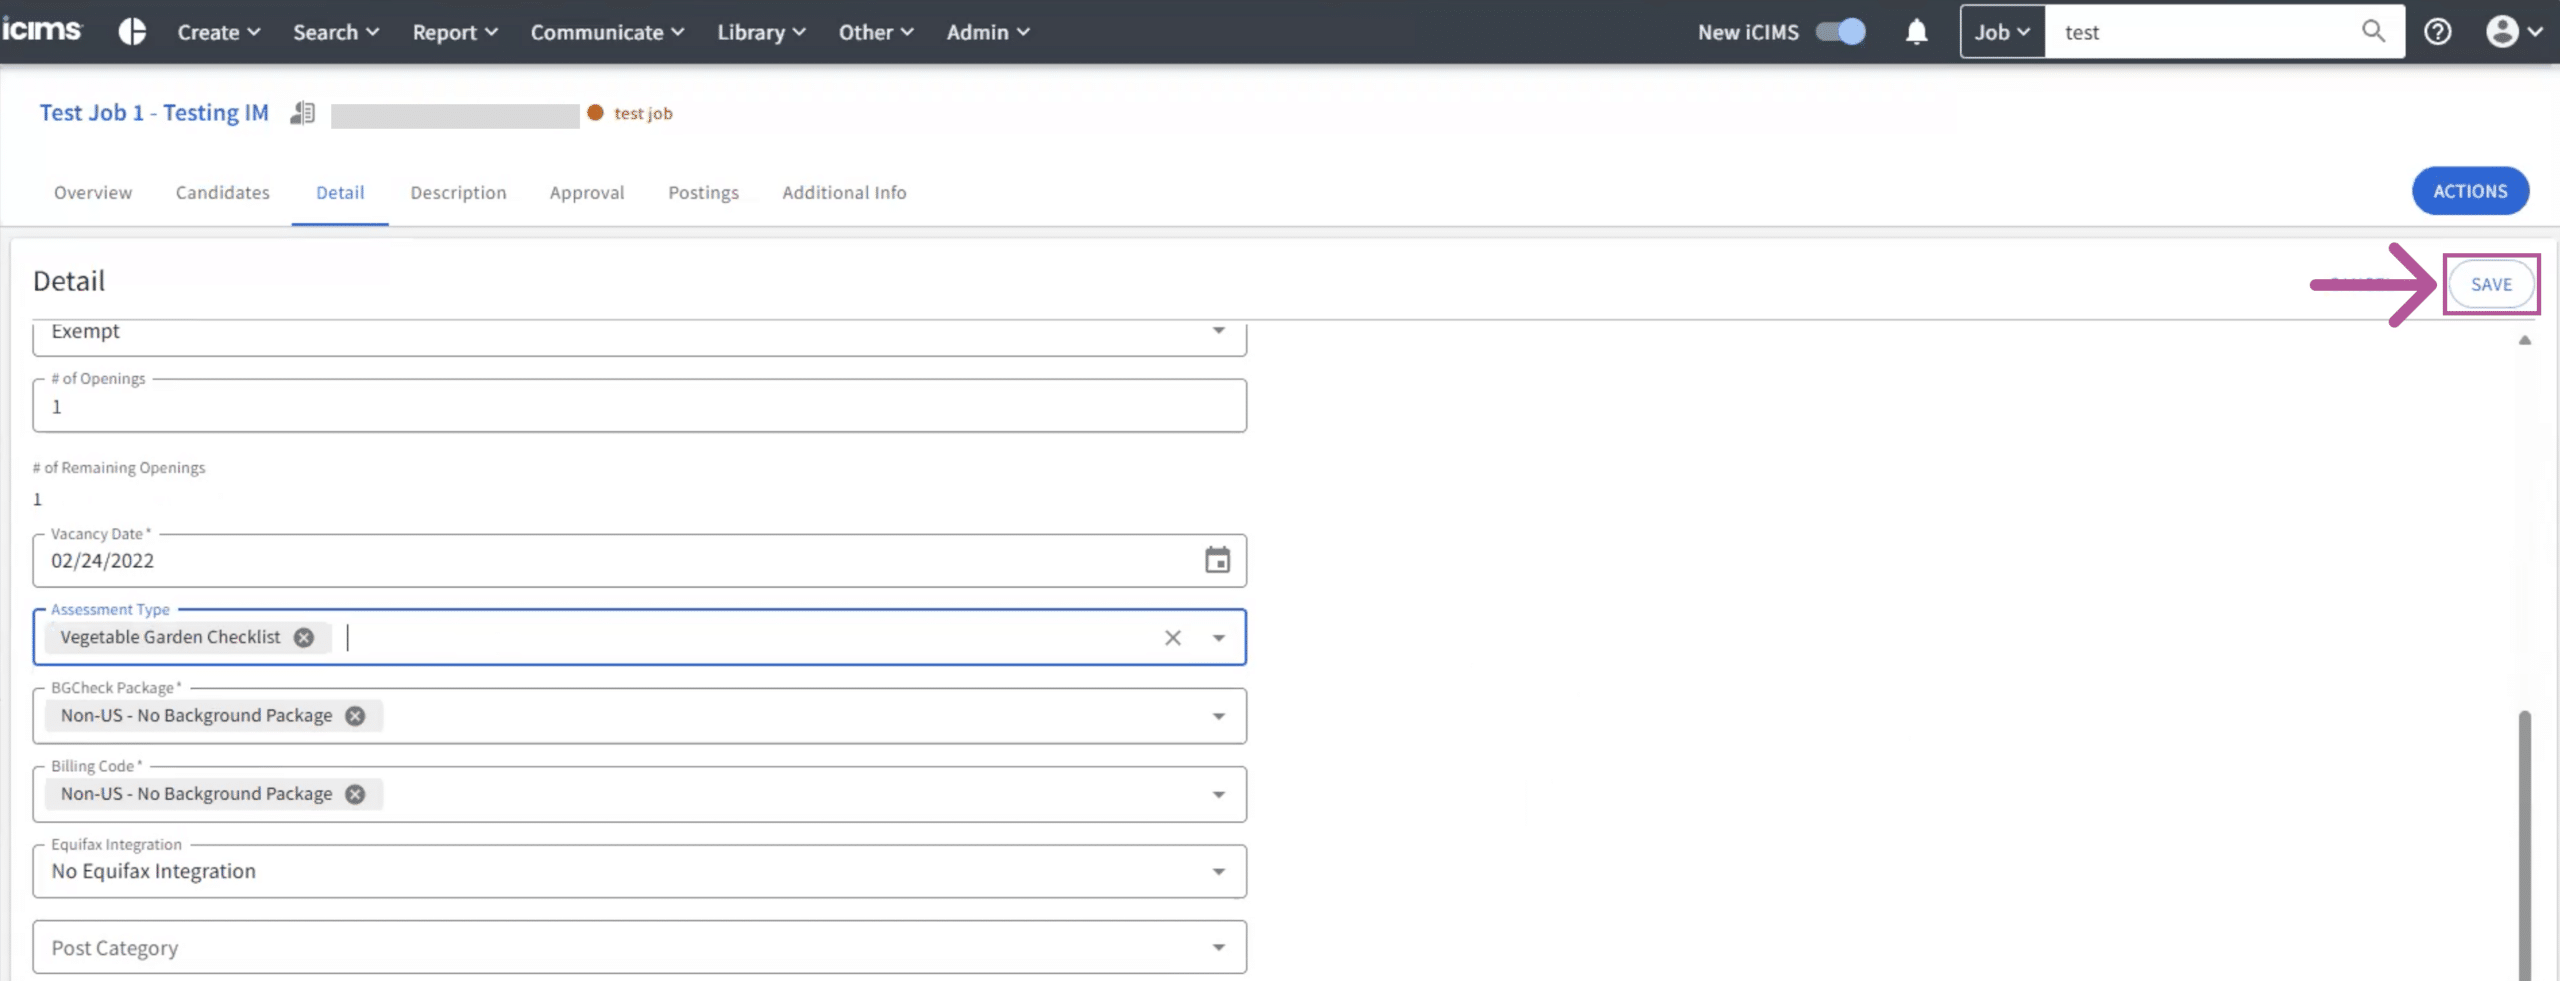
- The job requisition will be ready after you click Save.
Add an assessment to Multiple Job Requisitions Option (Admin Only):
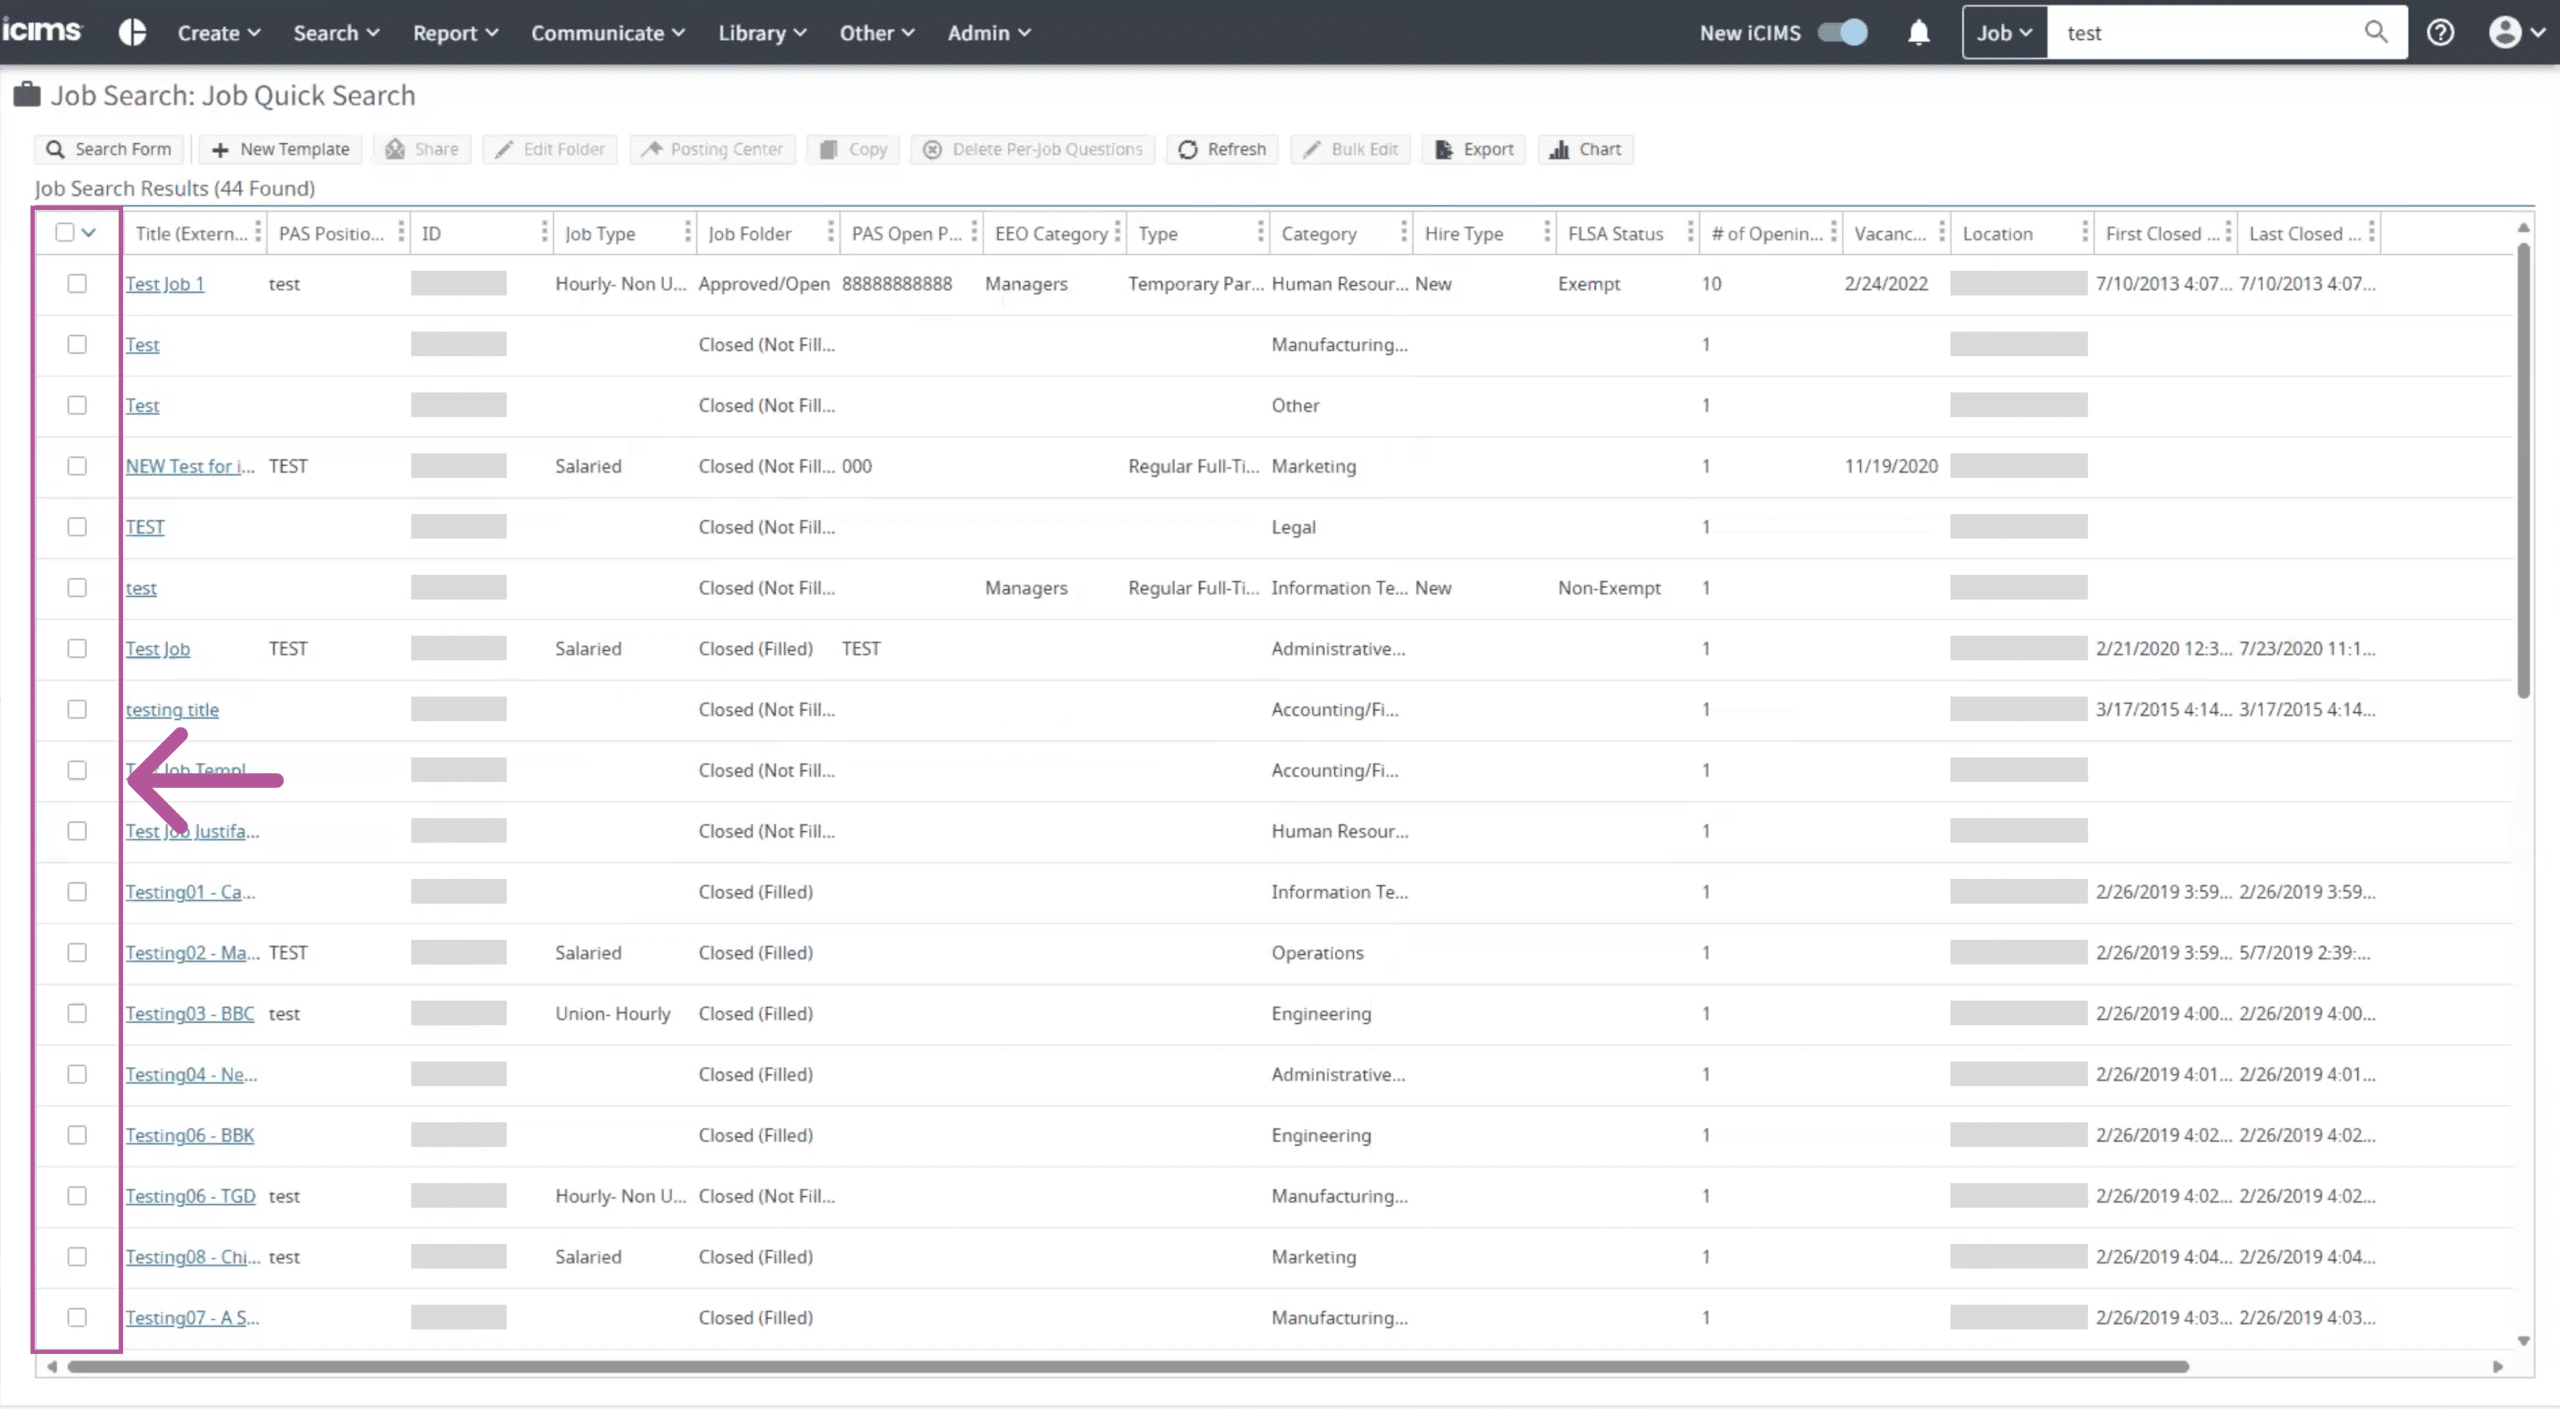
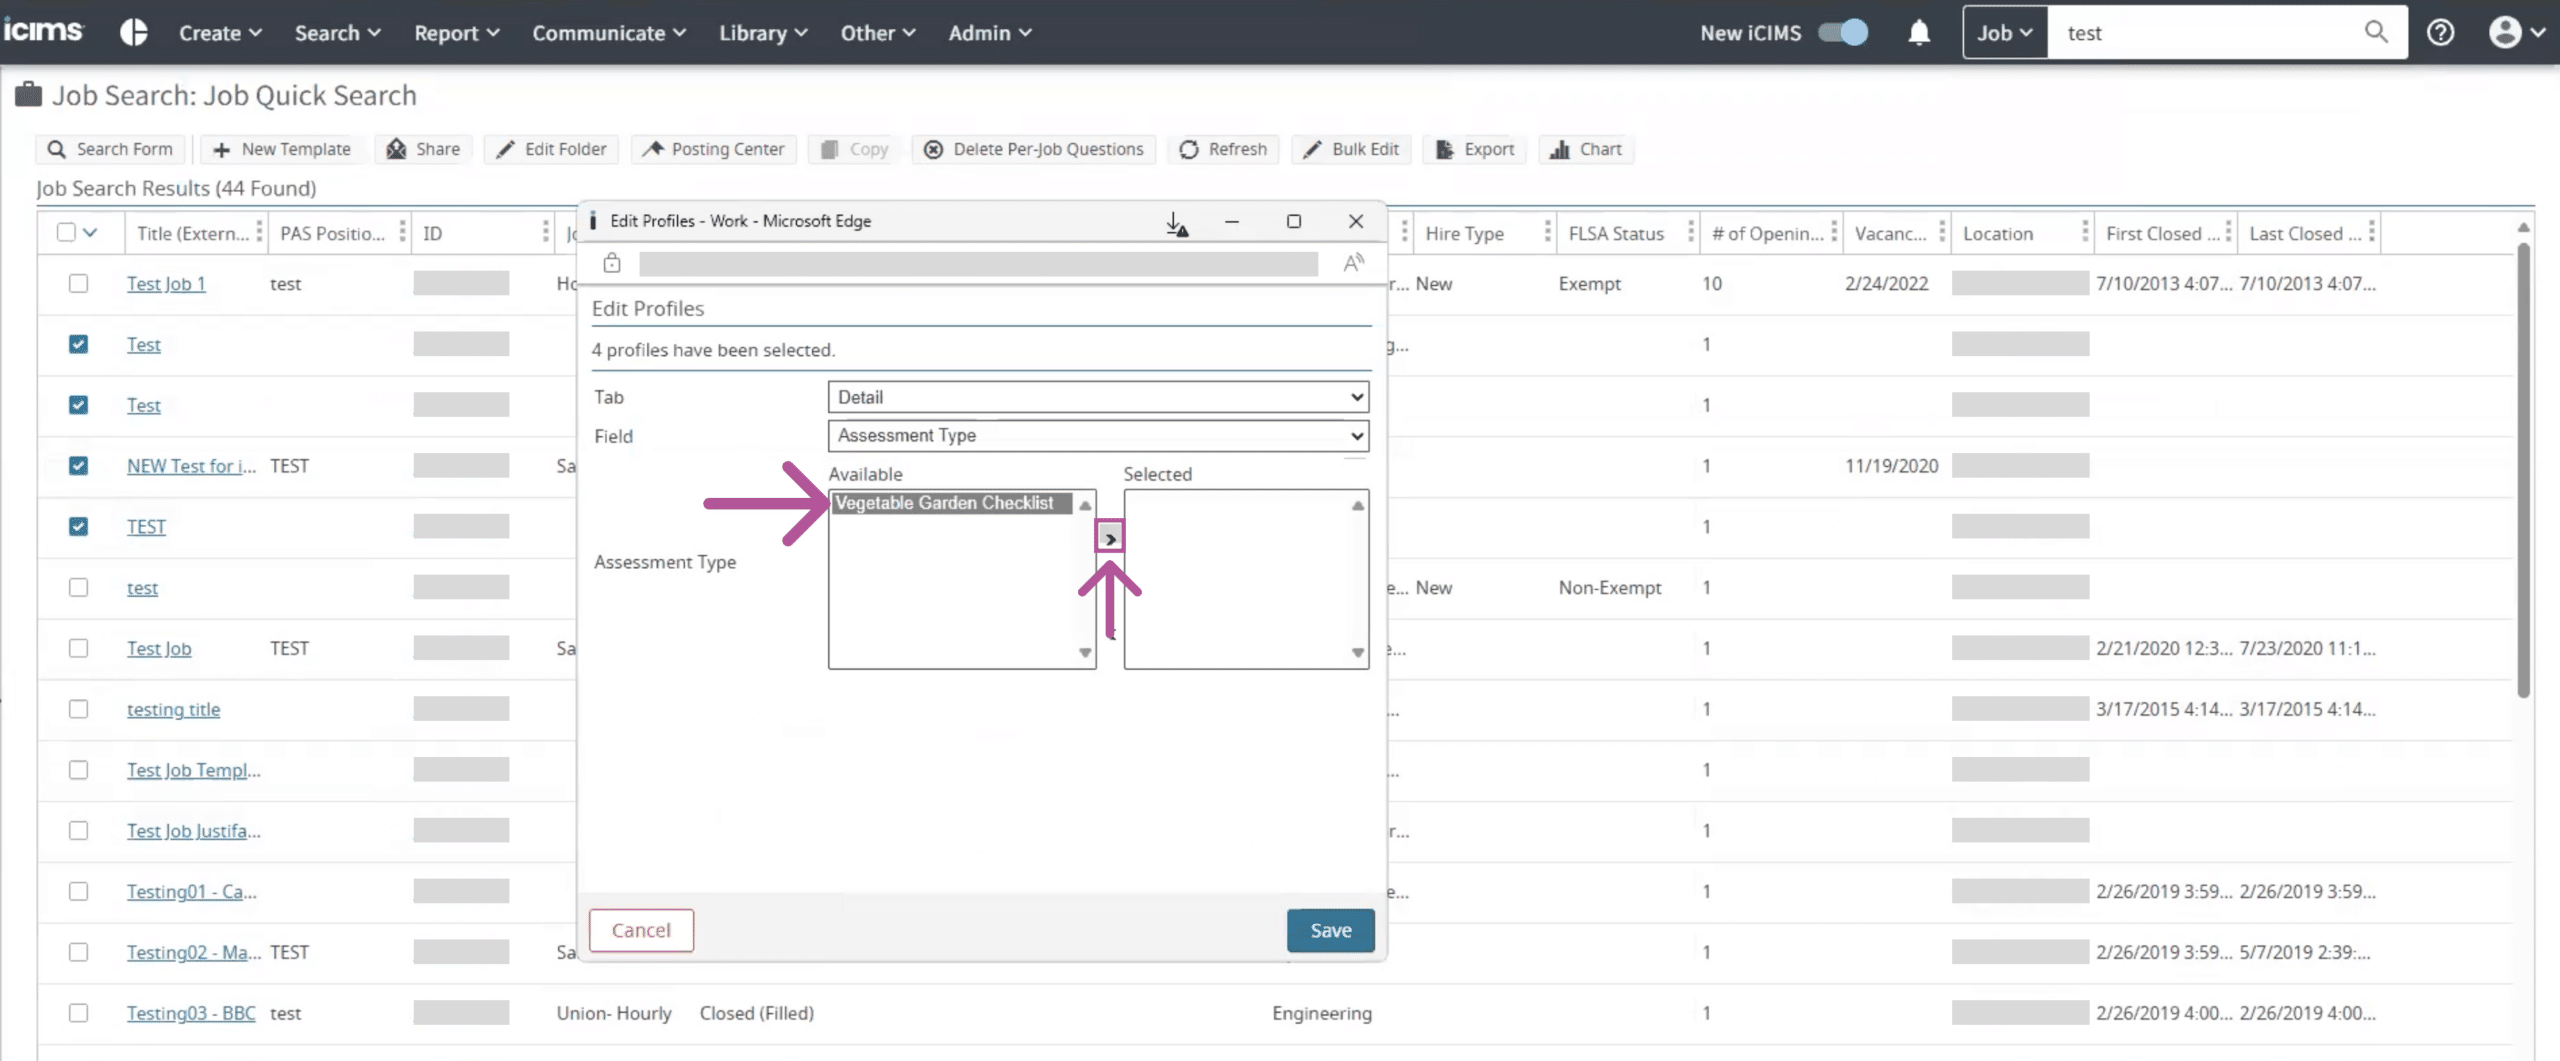
- View your list of job requisitions and use the select tool to select all the job requisitions you would like to add to an assessment.
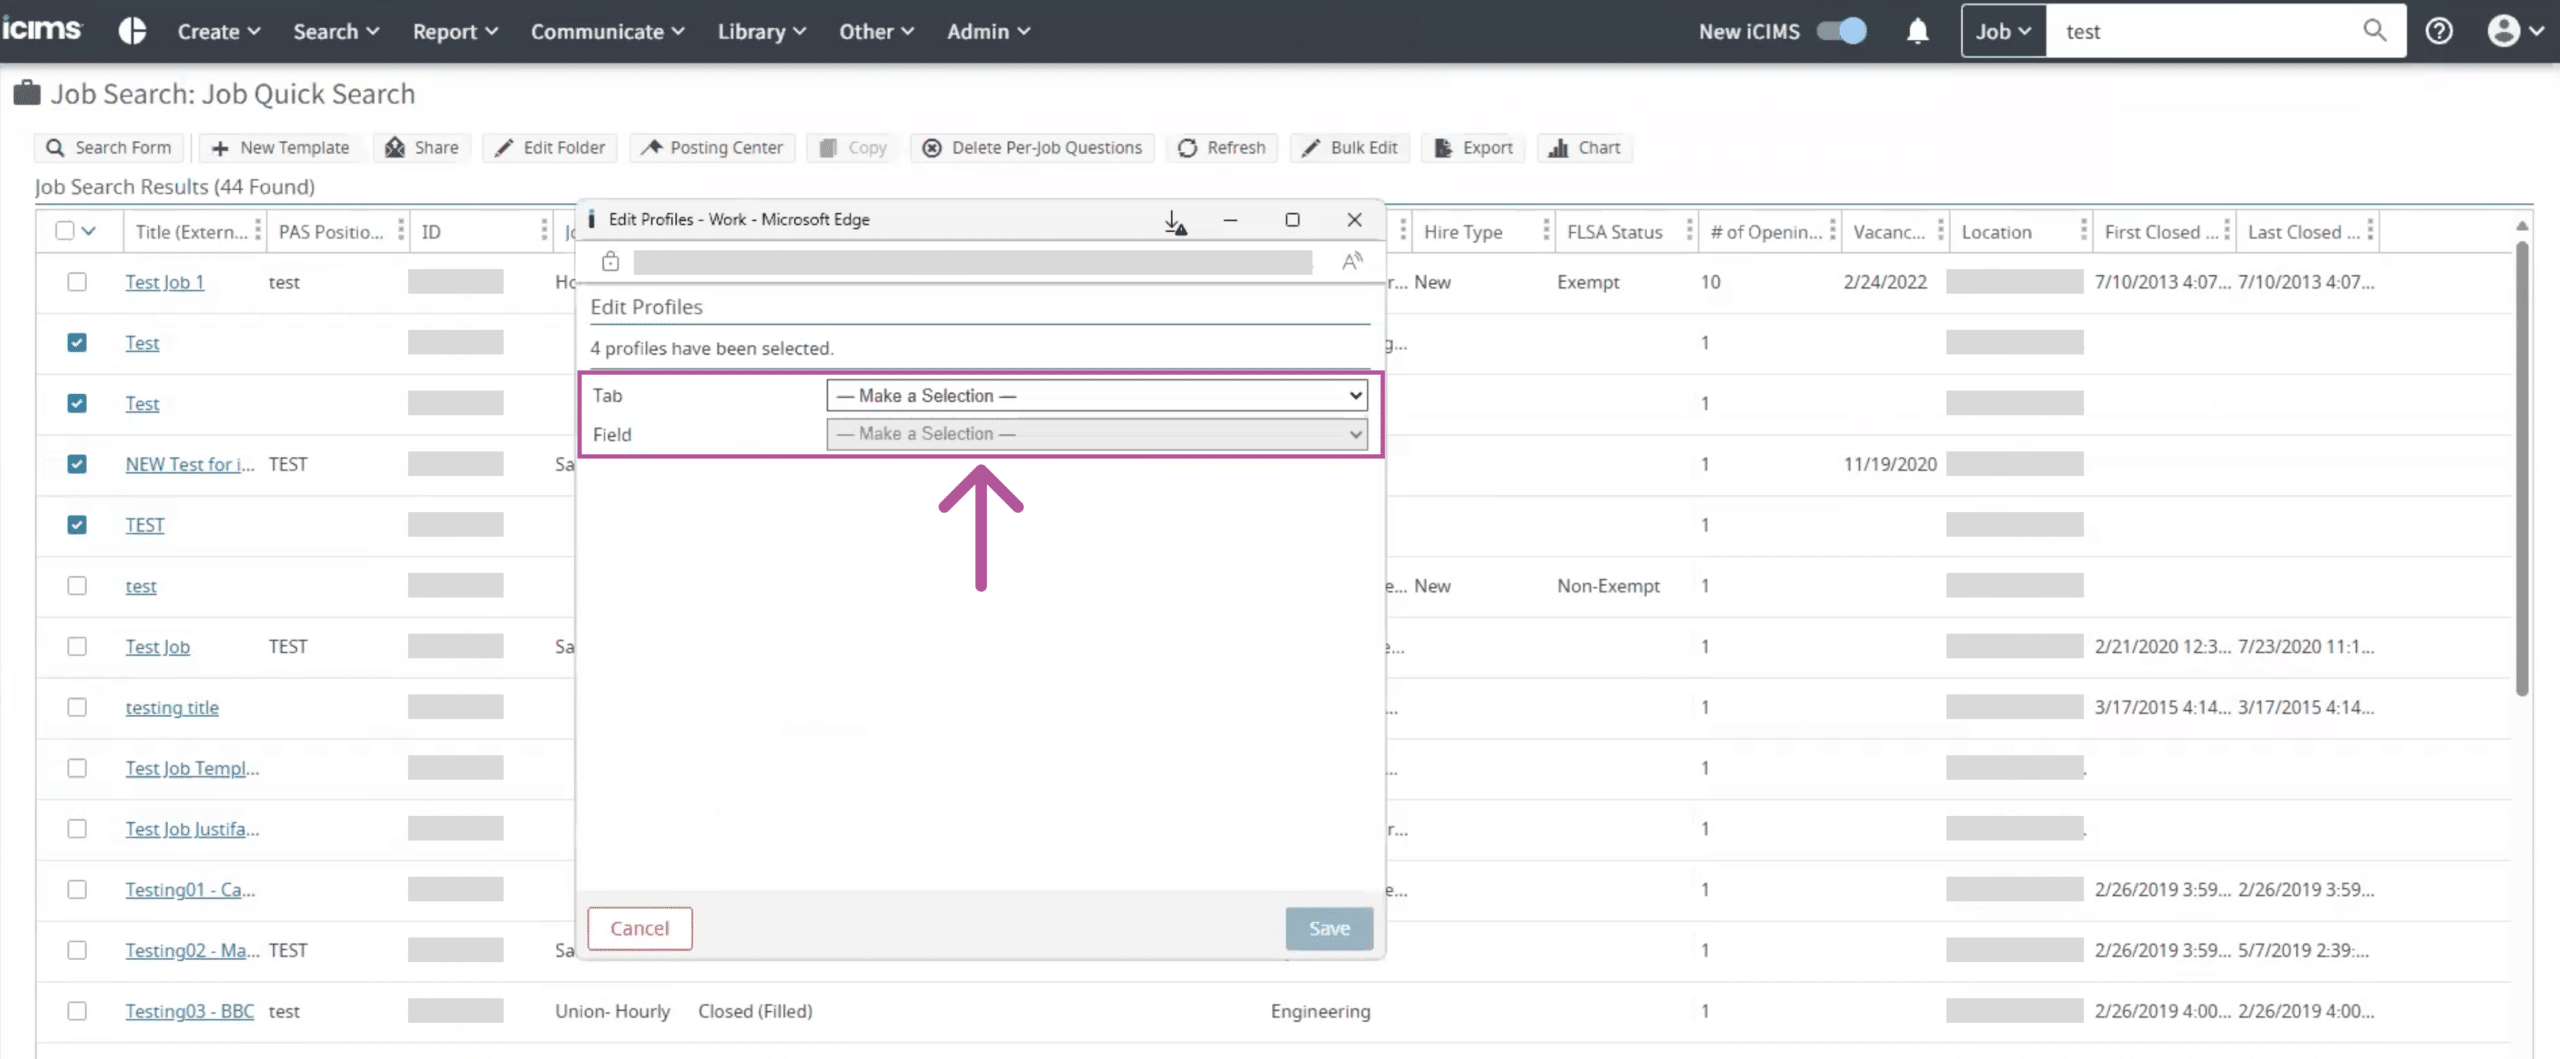
- Click Bulk Edit.

- Click the Tab dropdown menu > select Detail.
- Click the Field dropdown menu > select Assessment Type.
- Select the assessment you would like to add located in the Available table and click the > (add) button to add the assessment to the Selected table.
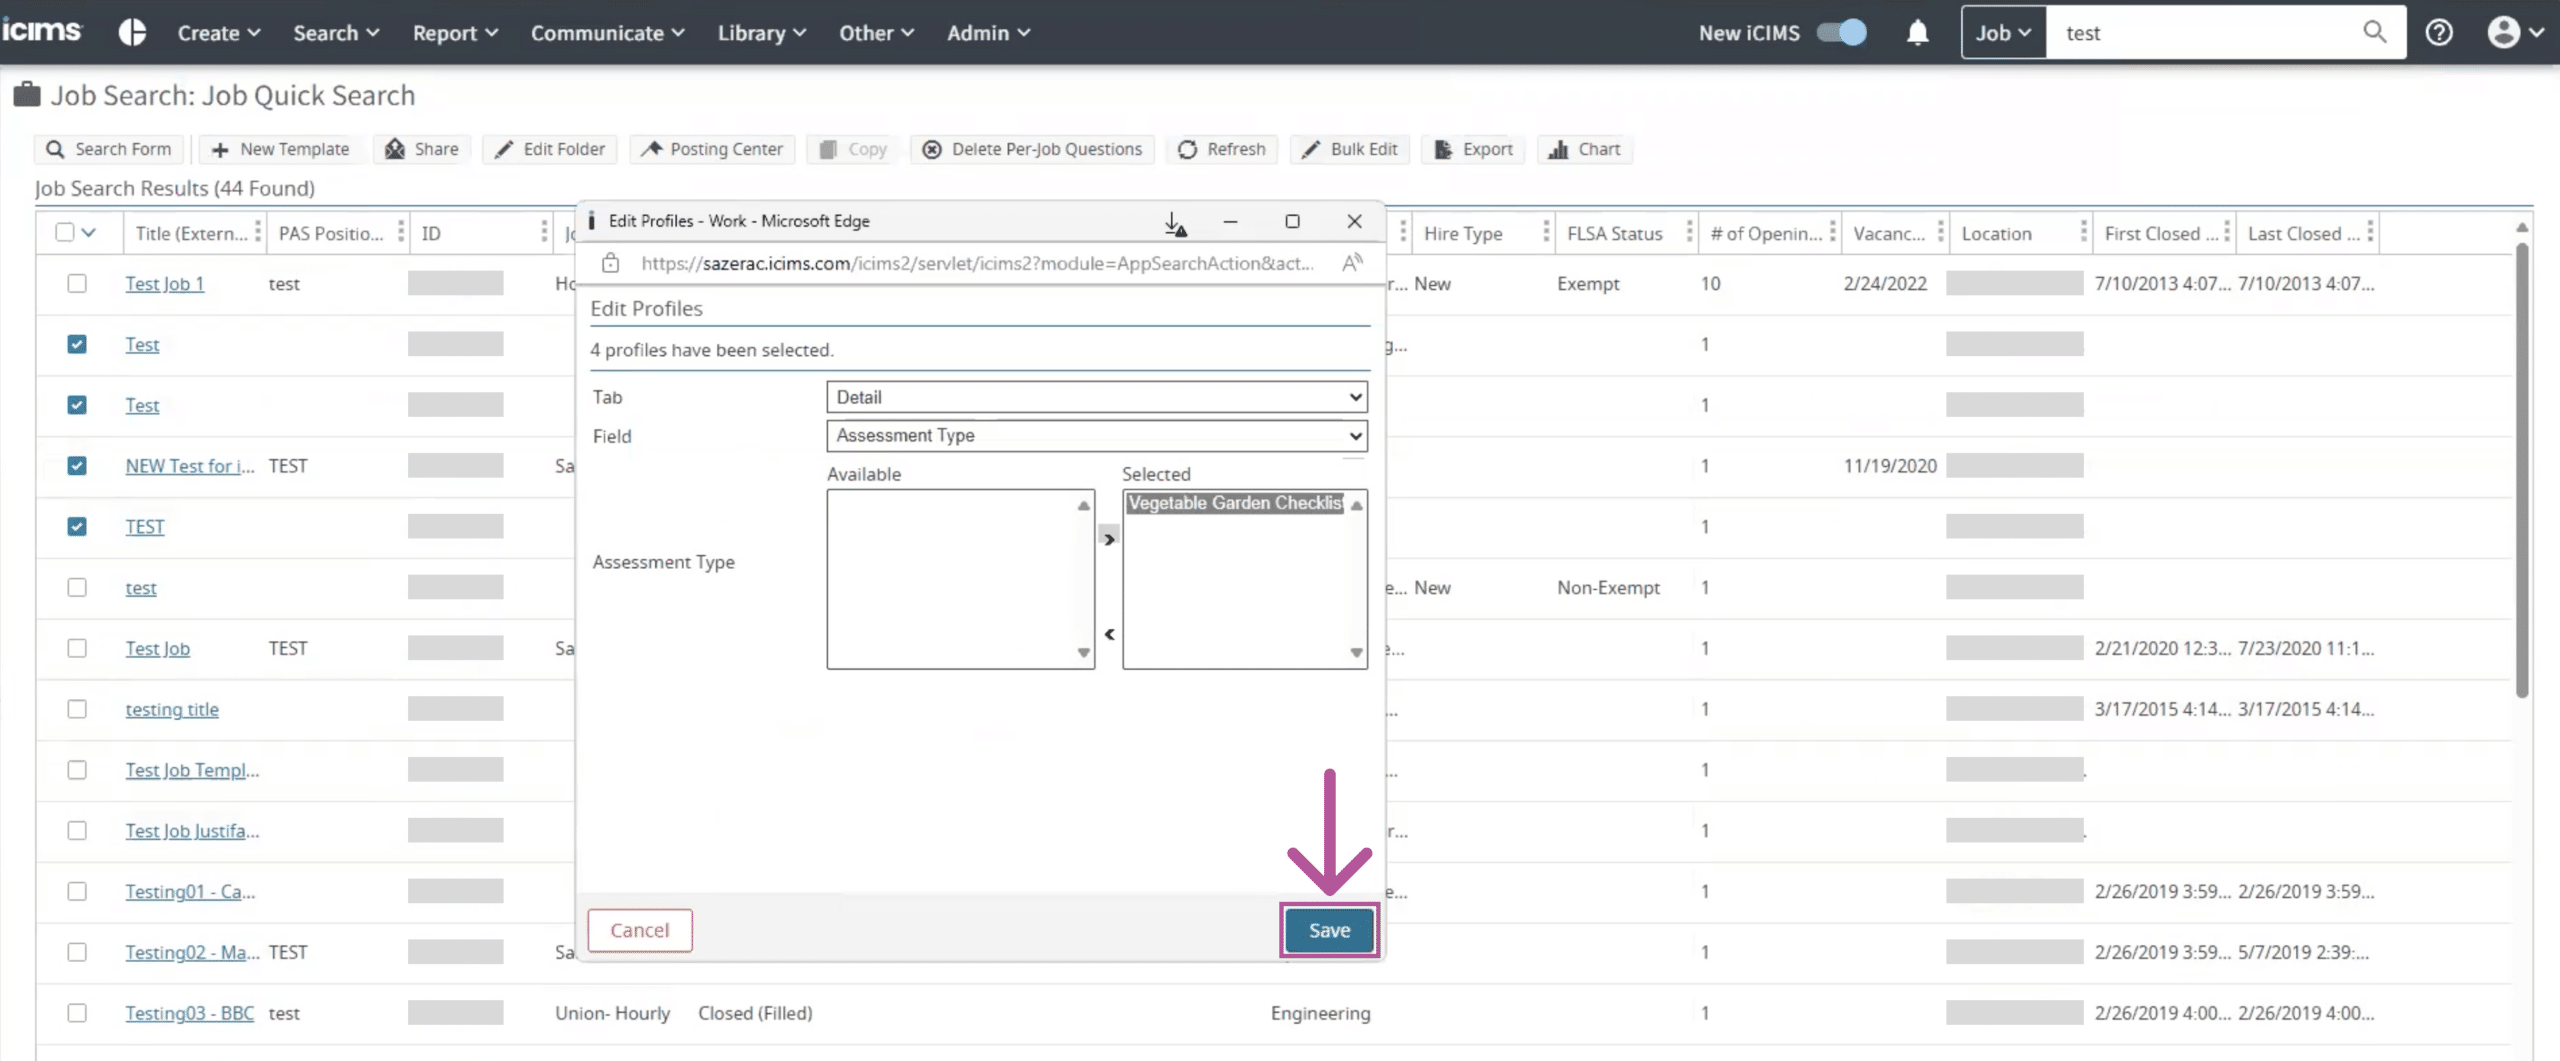
- Click Save and the assessment will be added to the selected job requisitions.
Step 6: Sending Assessments Manually
To manually trigger an assessment to be sent to a candidate, you will need to have the assessment be assigned to a specific stage in your workflow. This stage will be created by your iCIMS specialist (see Step 2).
Once you have a specific assessment stage, advance the candidate to said stage and it will trigger HighMatch’s systems to send the assessment invitation to the candidate.
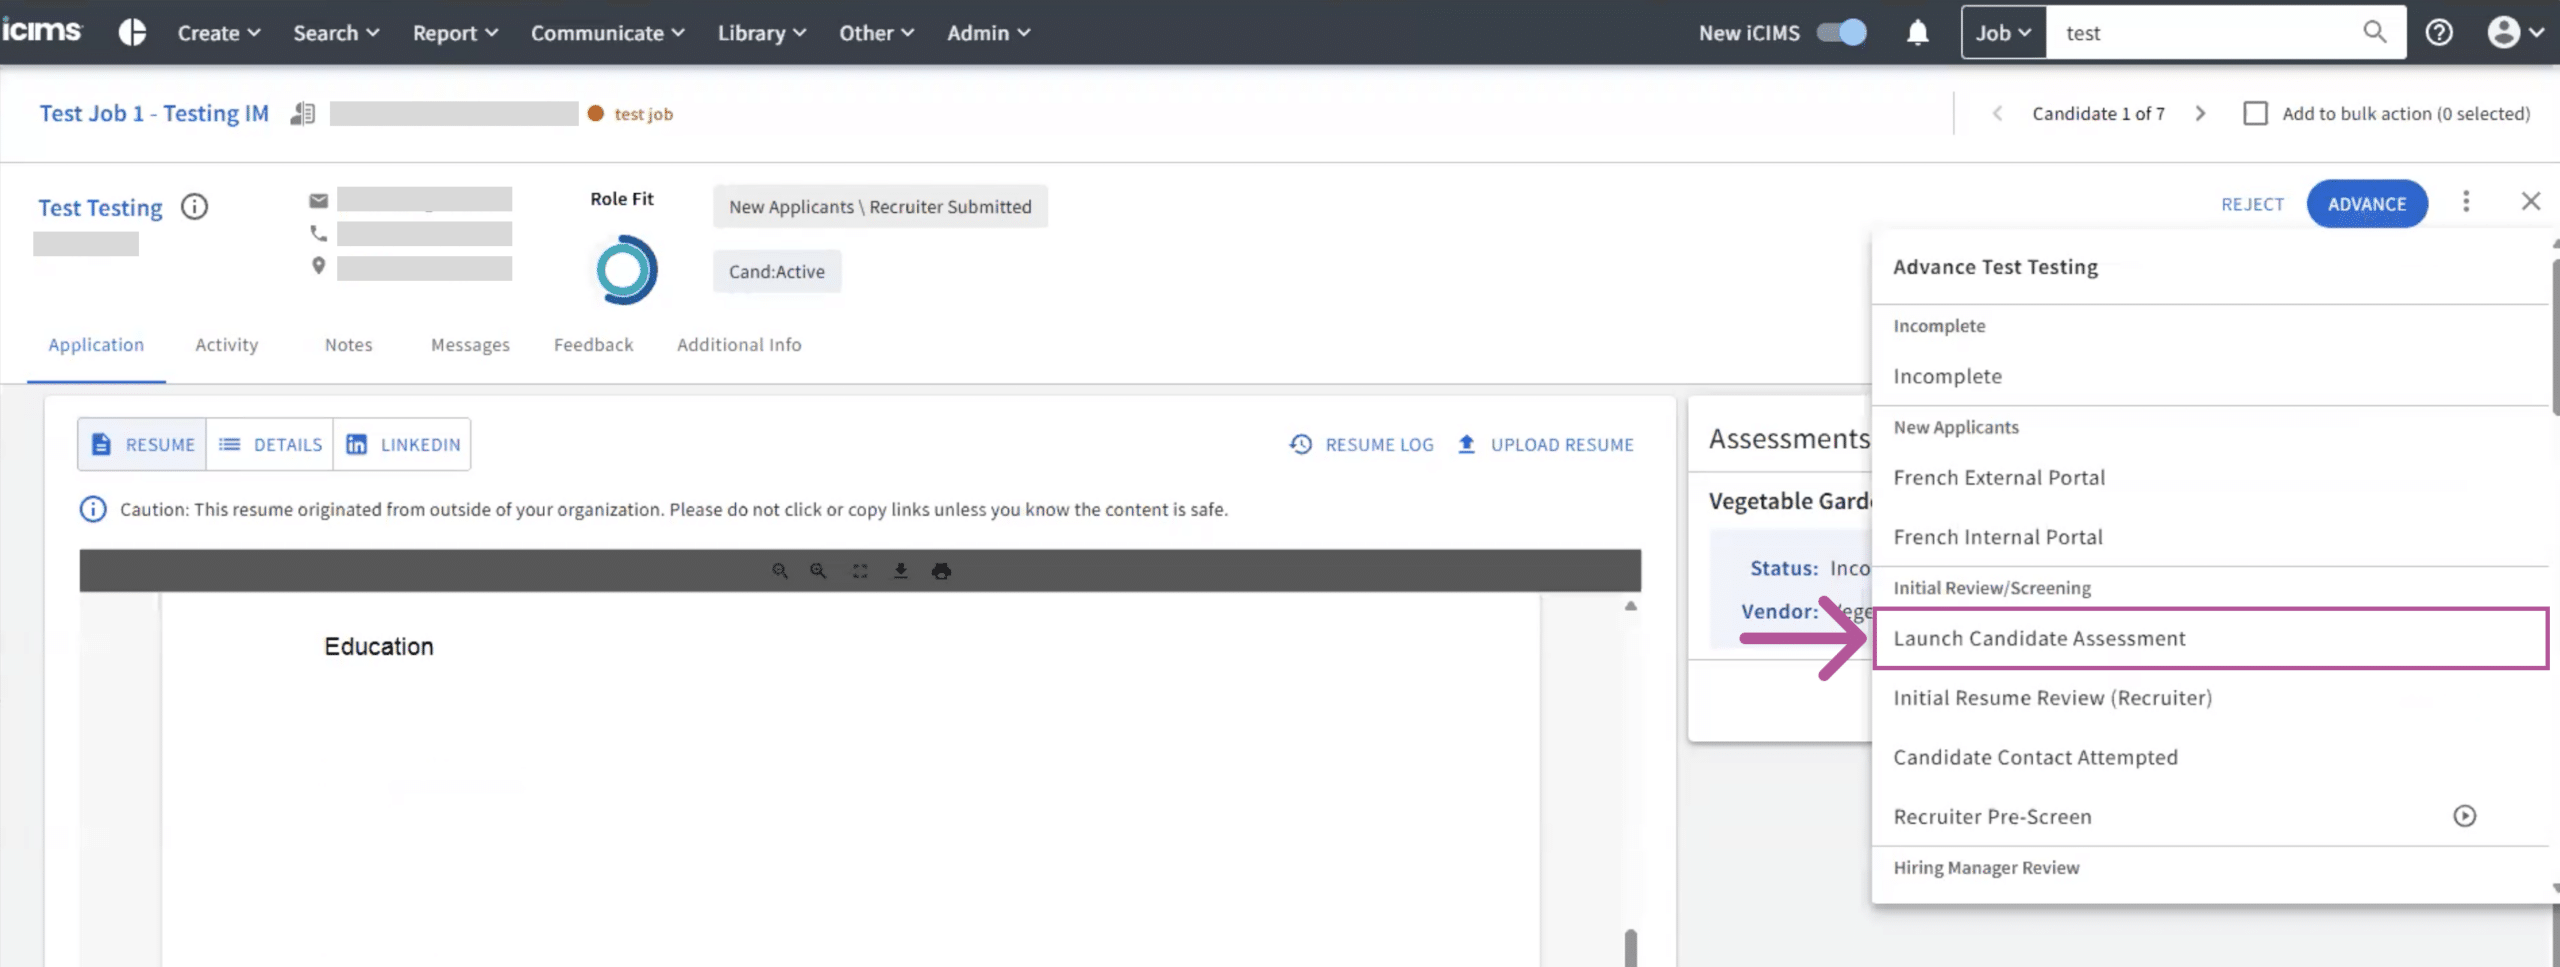
Note: In the example below, the workflow stage is called Launch Candidate Assessment and may differ from your account.
To advance a candidate, start by:
- Going to the Candidate’s profile you would like to send an assessment to.
- Go to the Application tab > Click the Advance button > Launch Candidate Assessment.

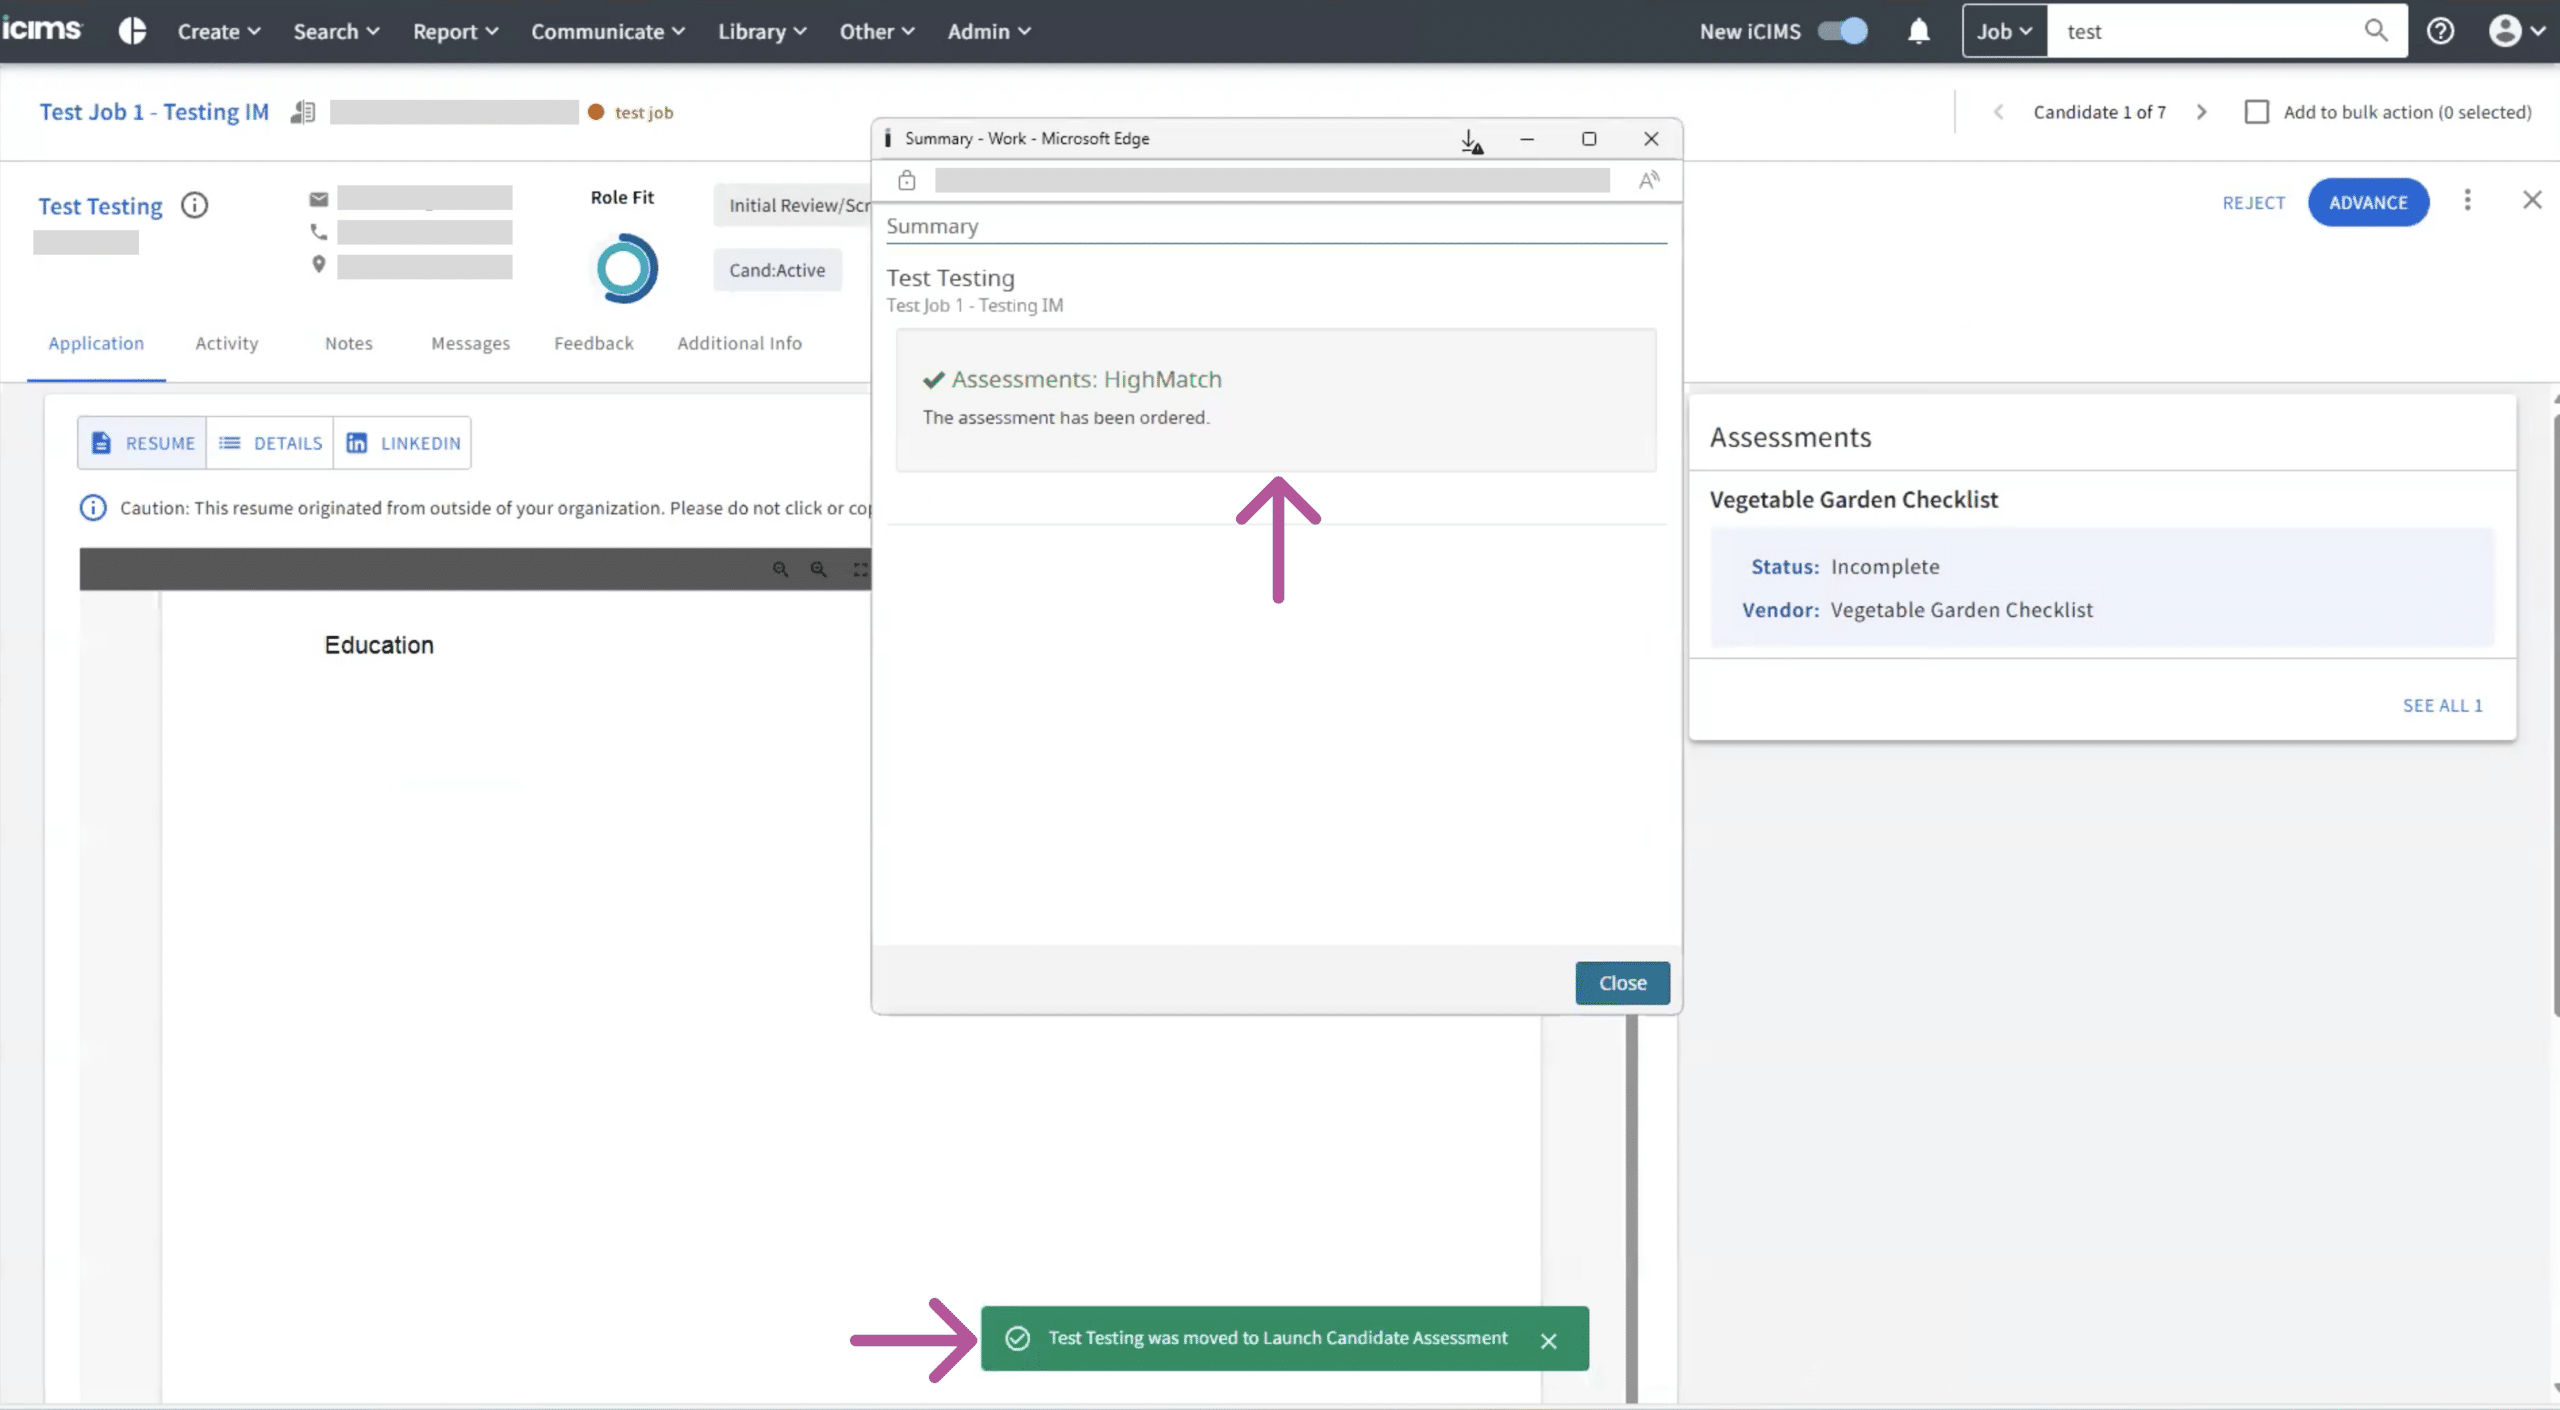
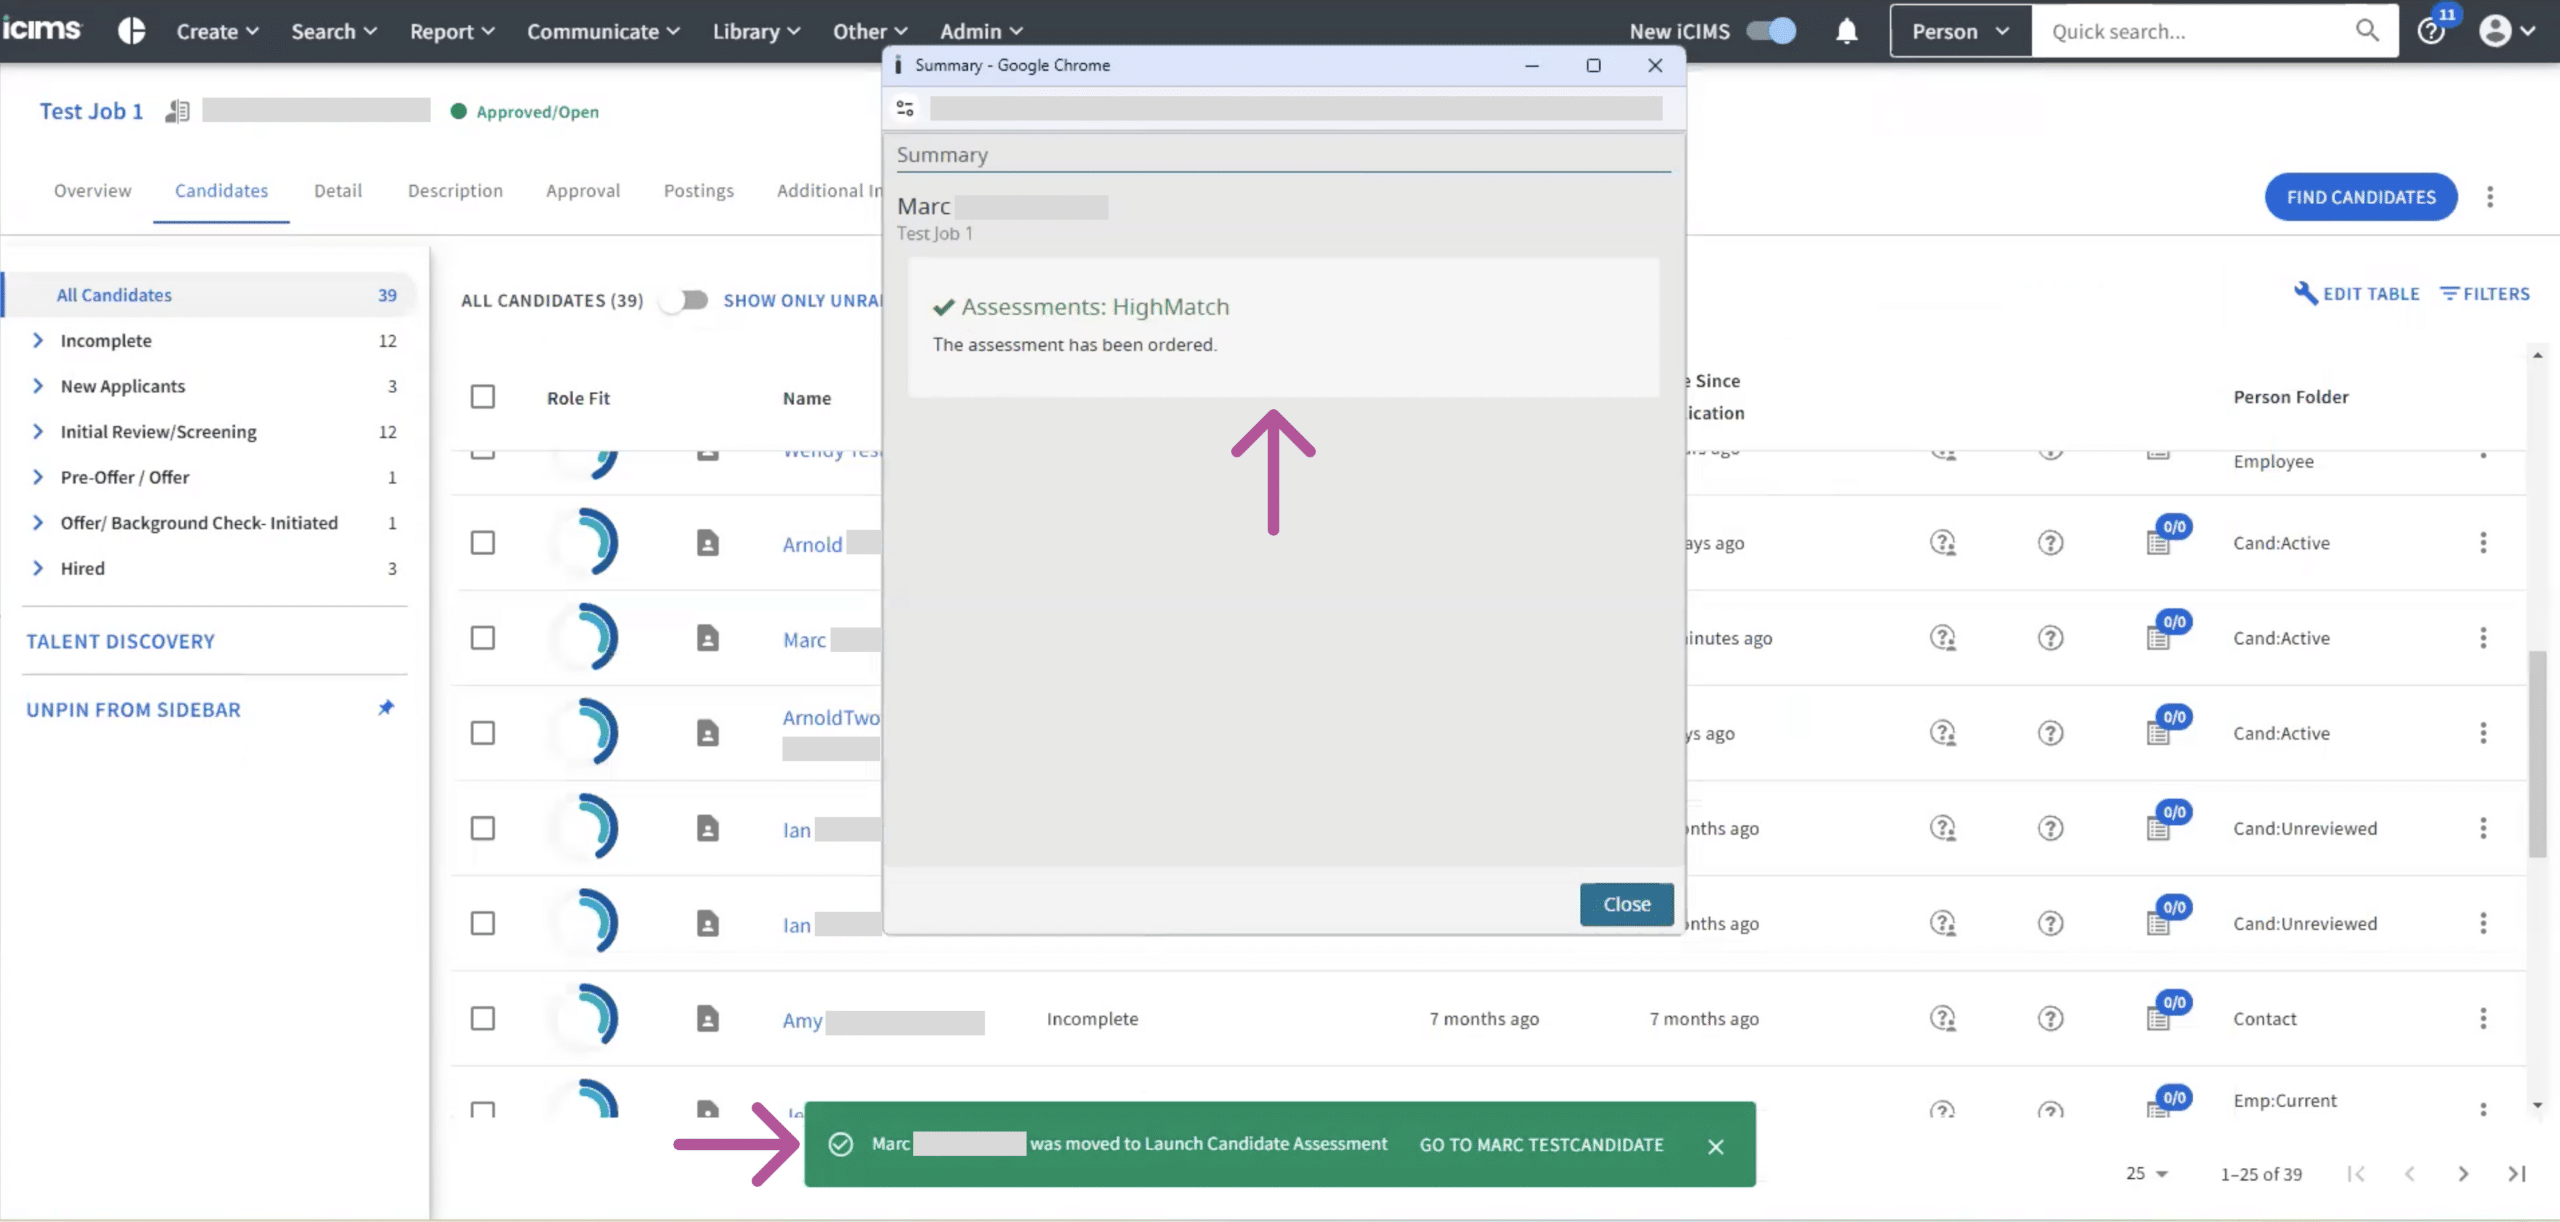
- A popup will appear to confirm that the assessment invite has been ordered and that the candidate has moved to the assessment stage.
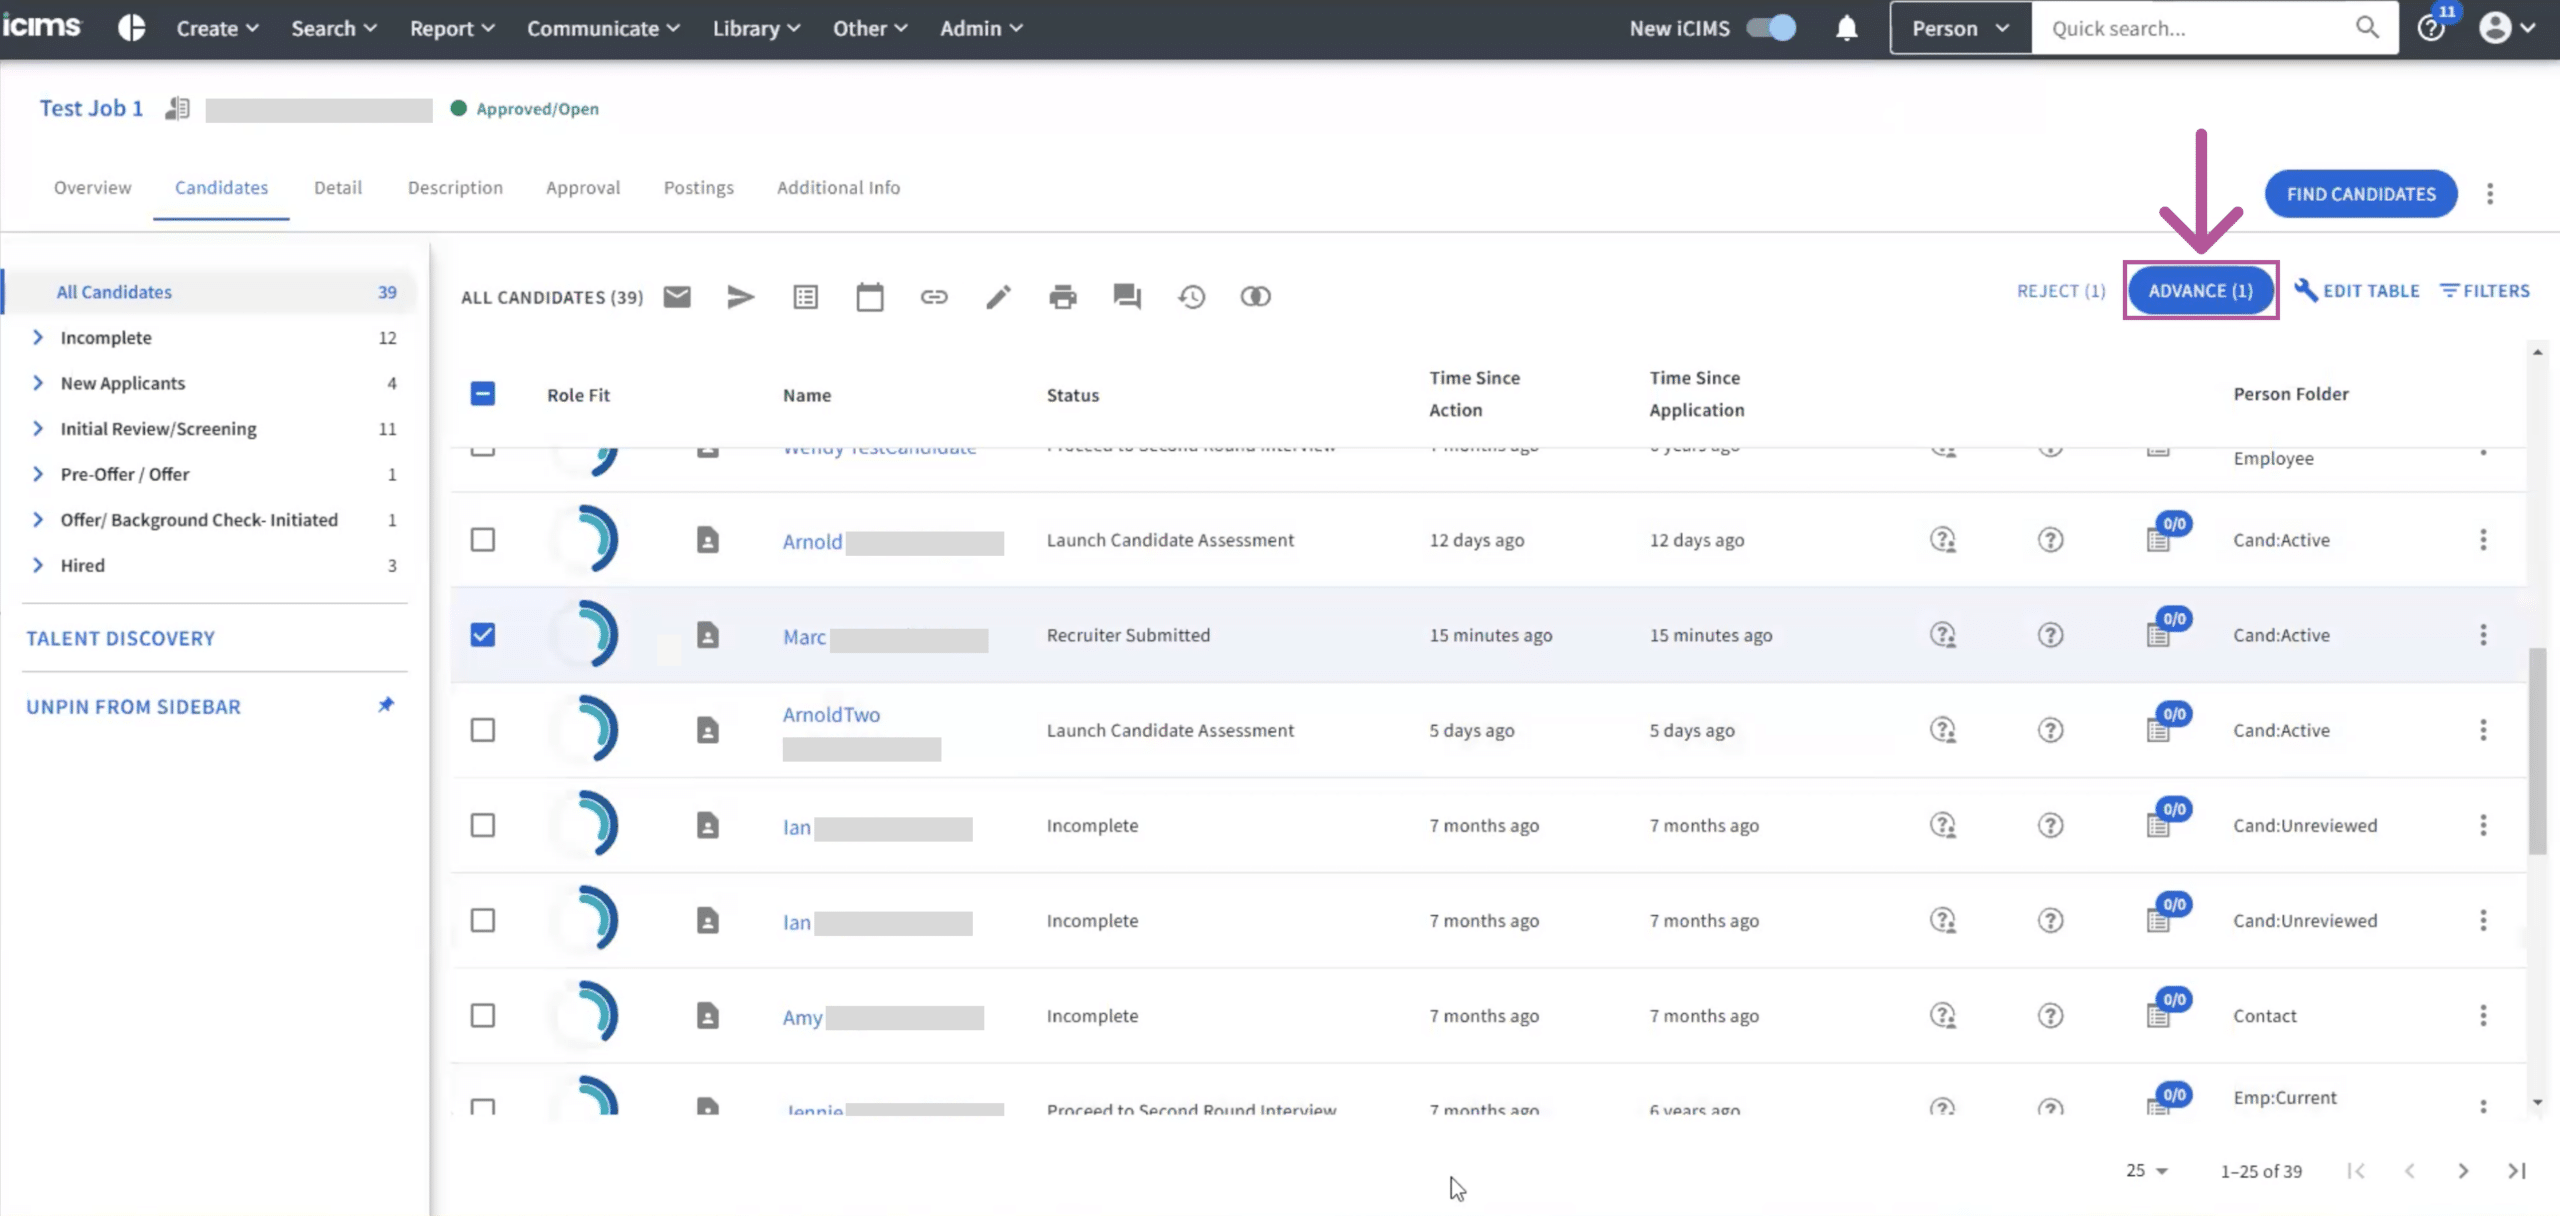
You can also manually send assessments to multiple candidates at once. Please follow these steps to send assessments in bulk:
- Go to the job requisition that contains the candidates you wish to send an assessment to.
- Click the Candidates tab.

- Click on any stage filter you would prefer > use the select tool to select all required candidates.

- Click the Advance button > Launch Candidate Assessment.
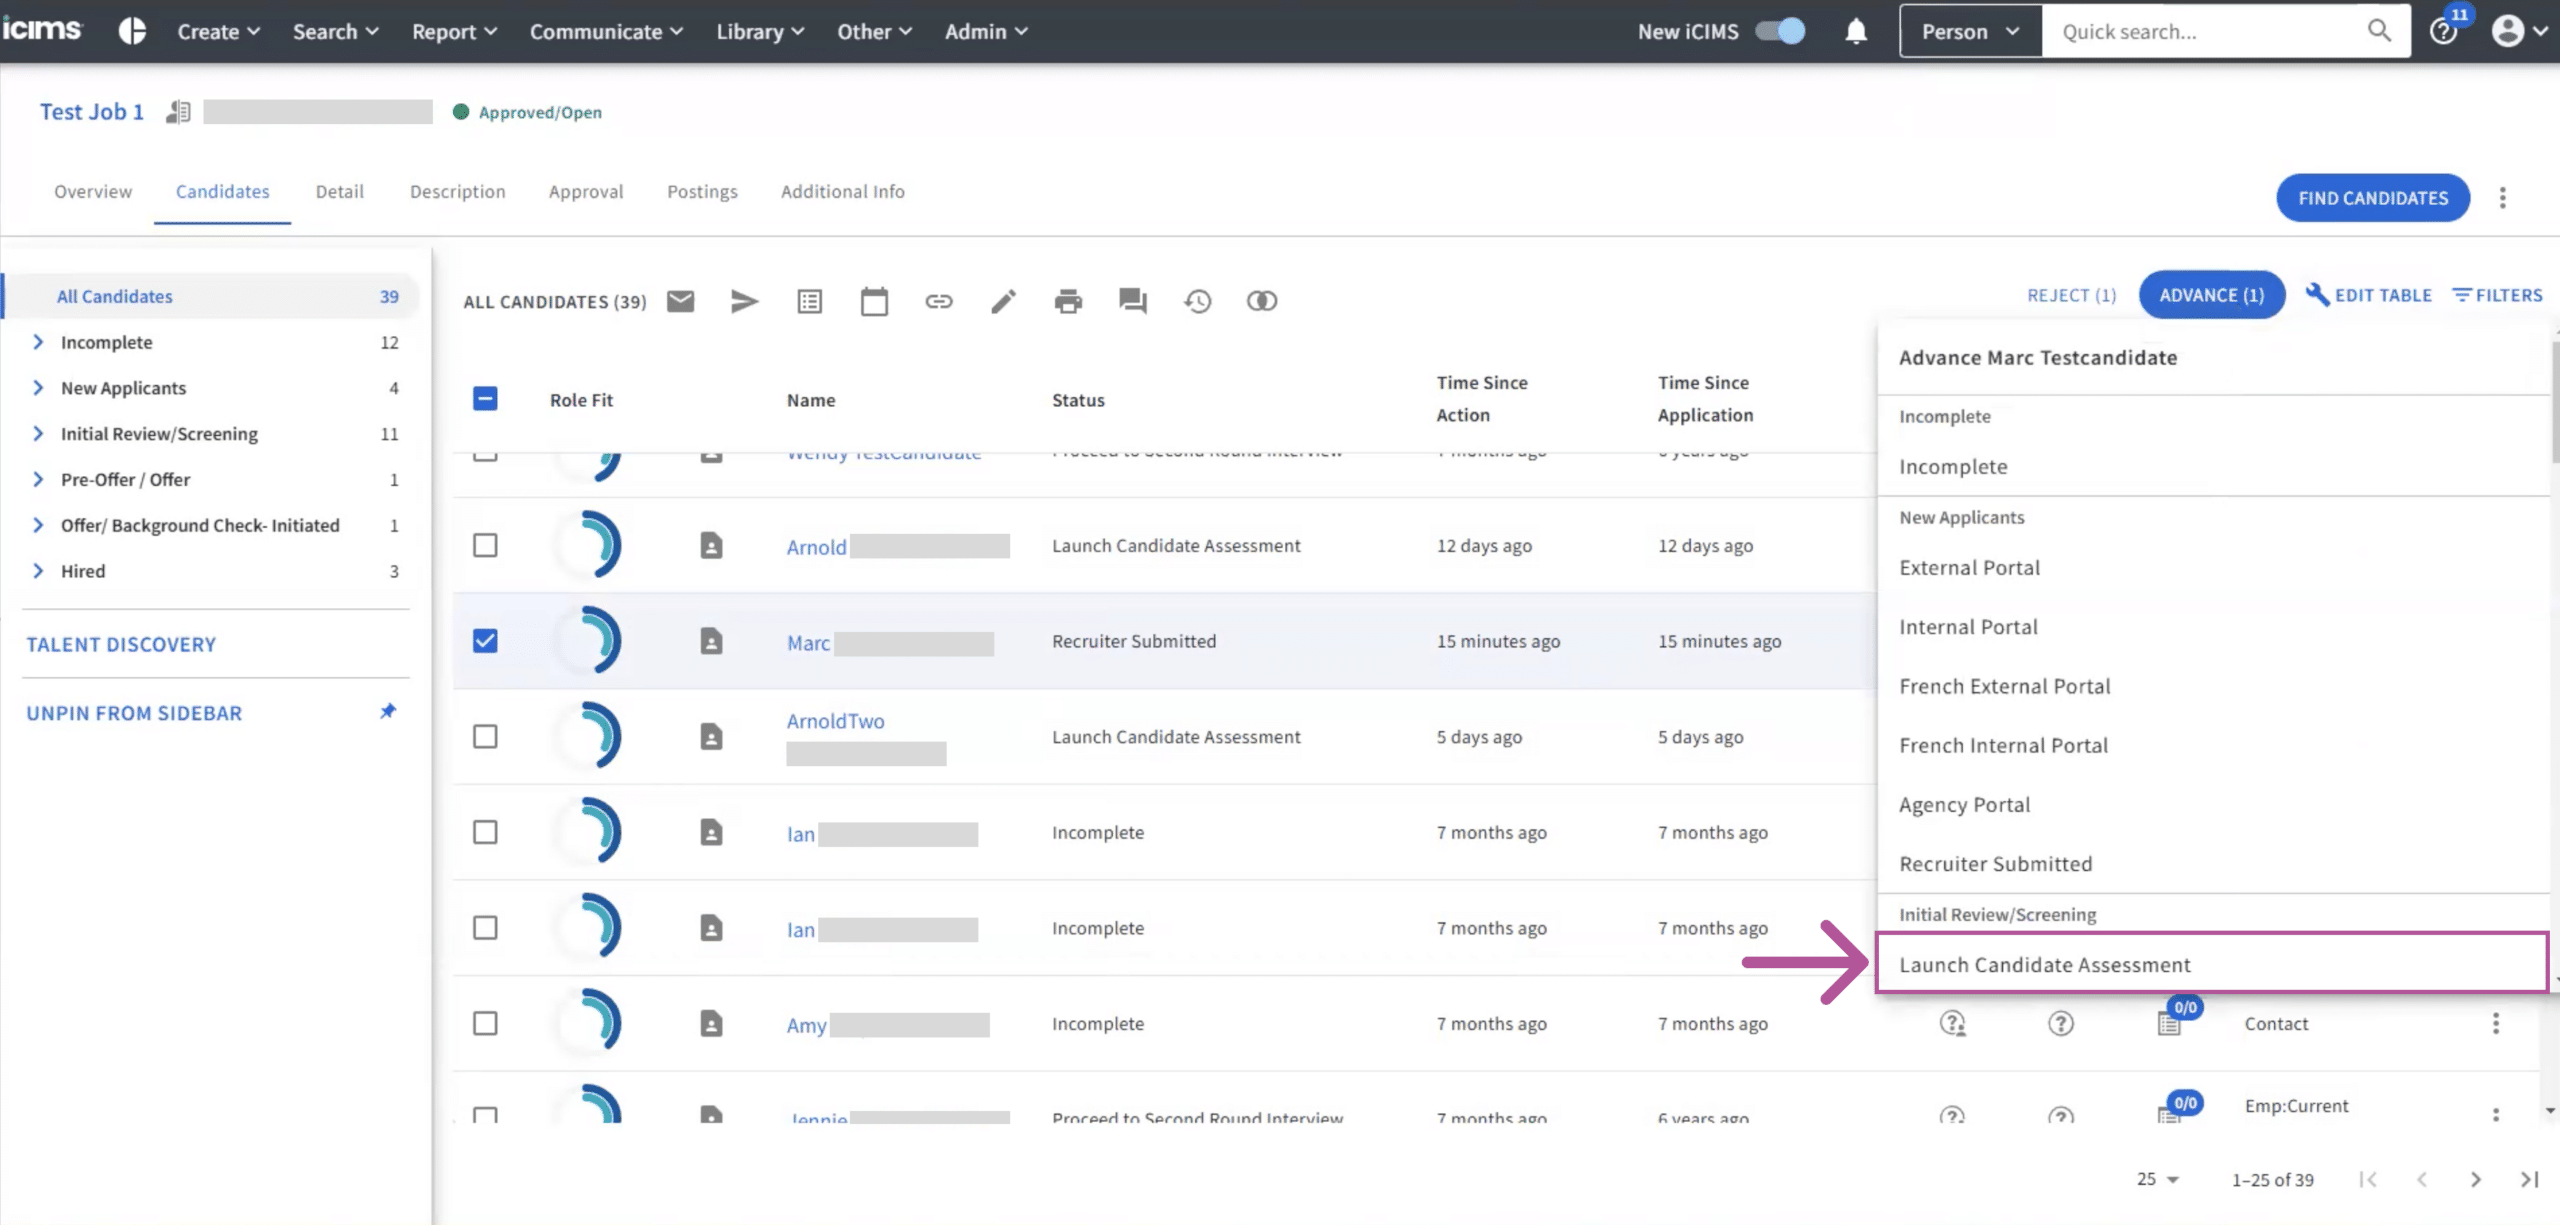
- A popup will appear to confirm that the assessment invite has been ordered and that the candidates have moved to the assessment stage.
Step 7: Viewing the Candidate’s Assessment Status
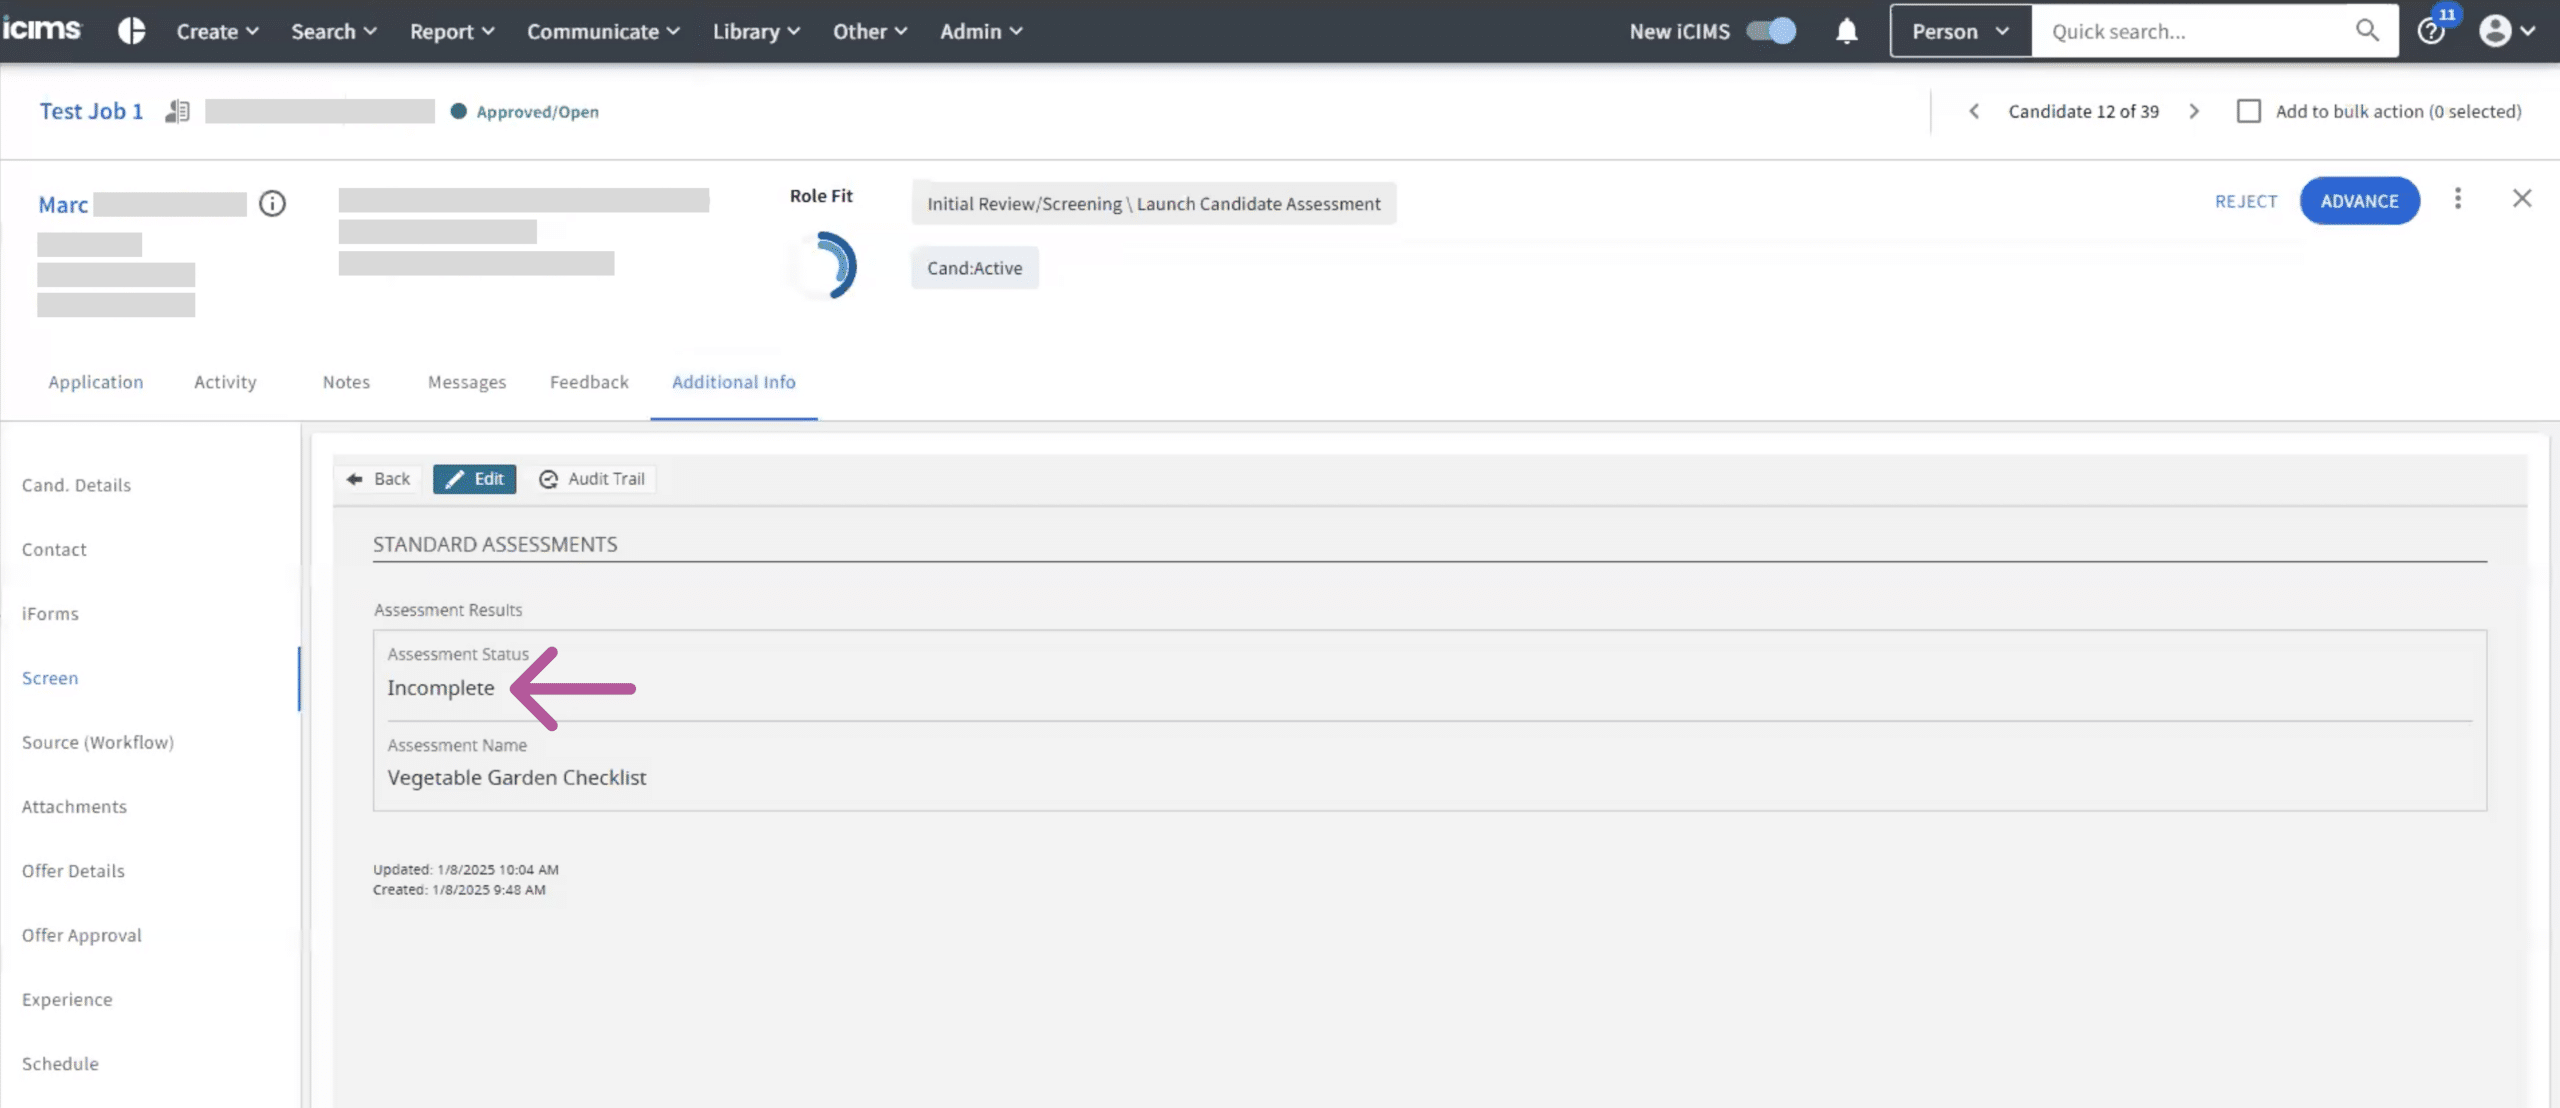
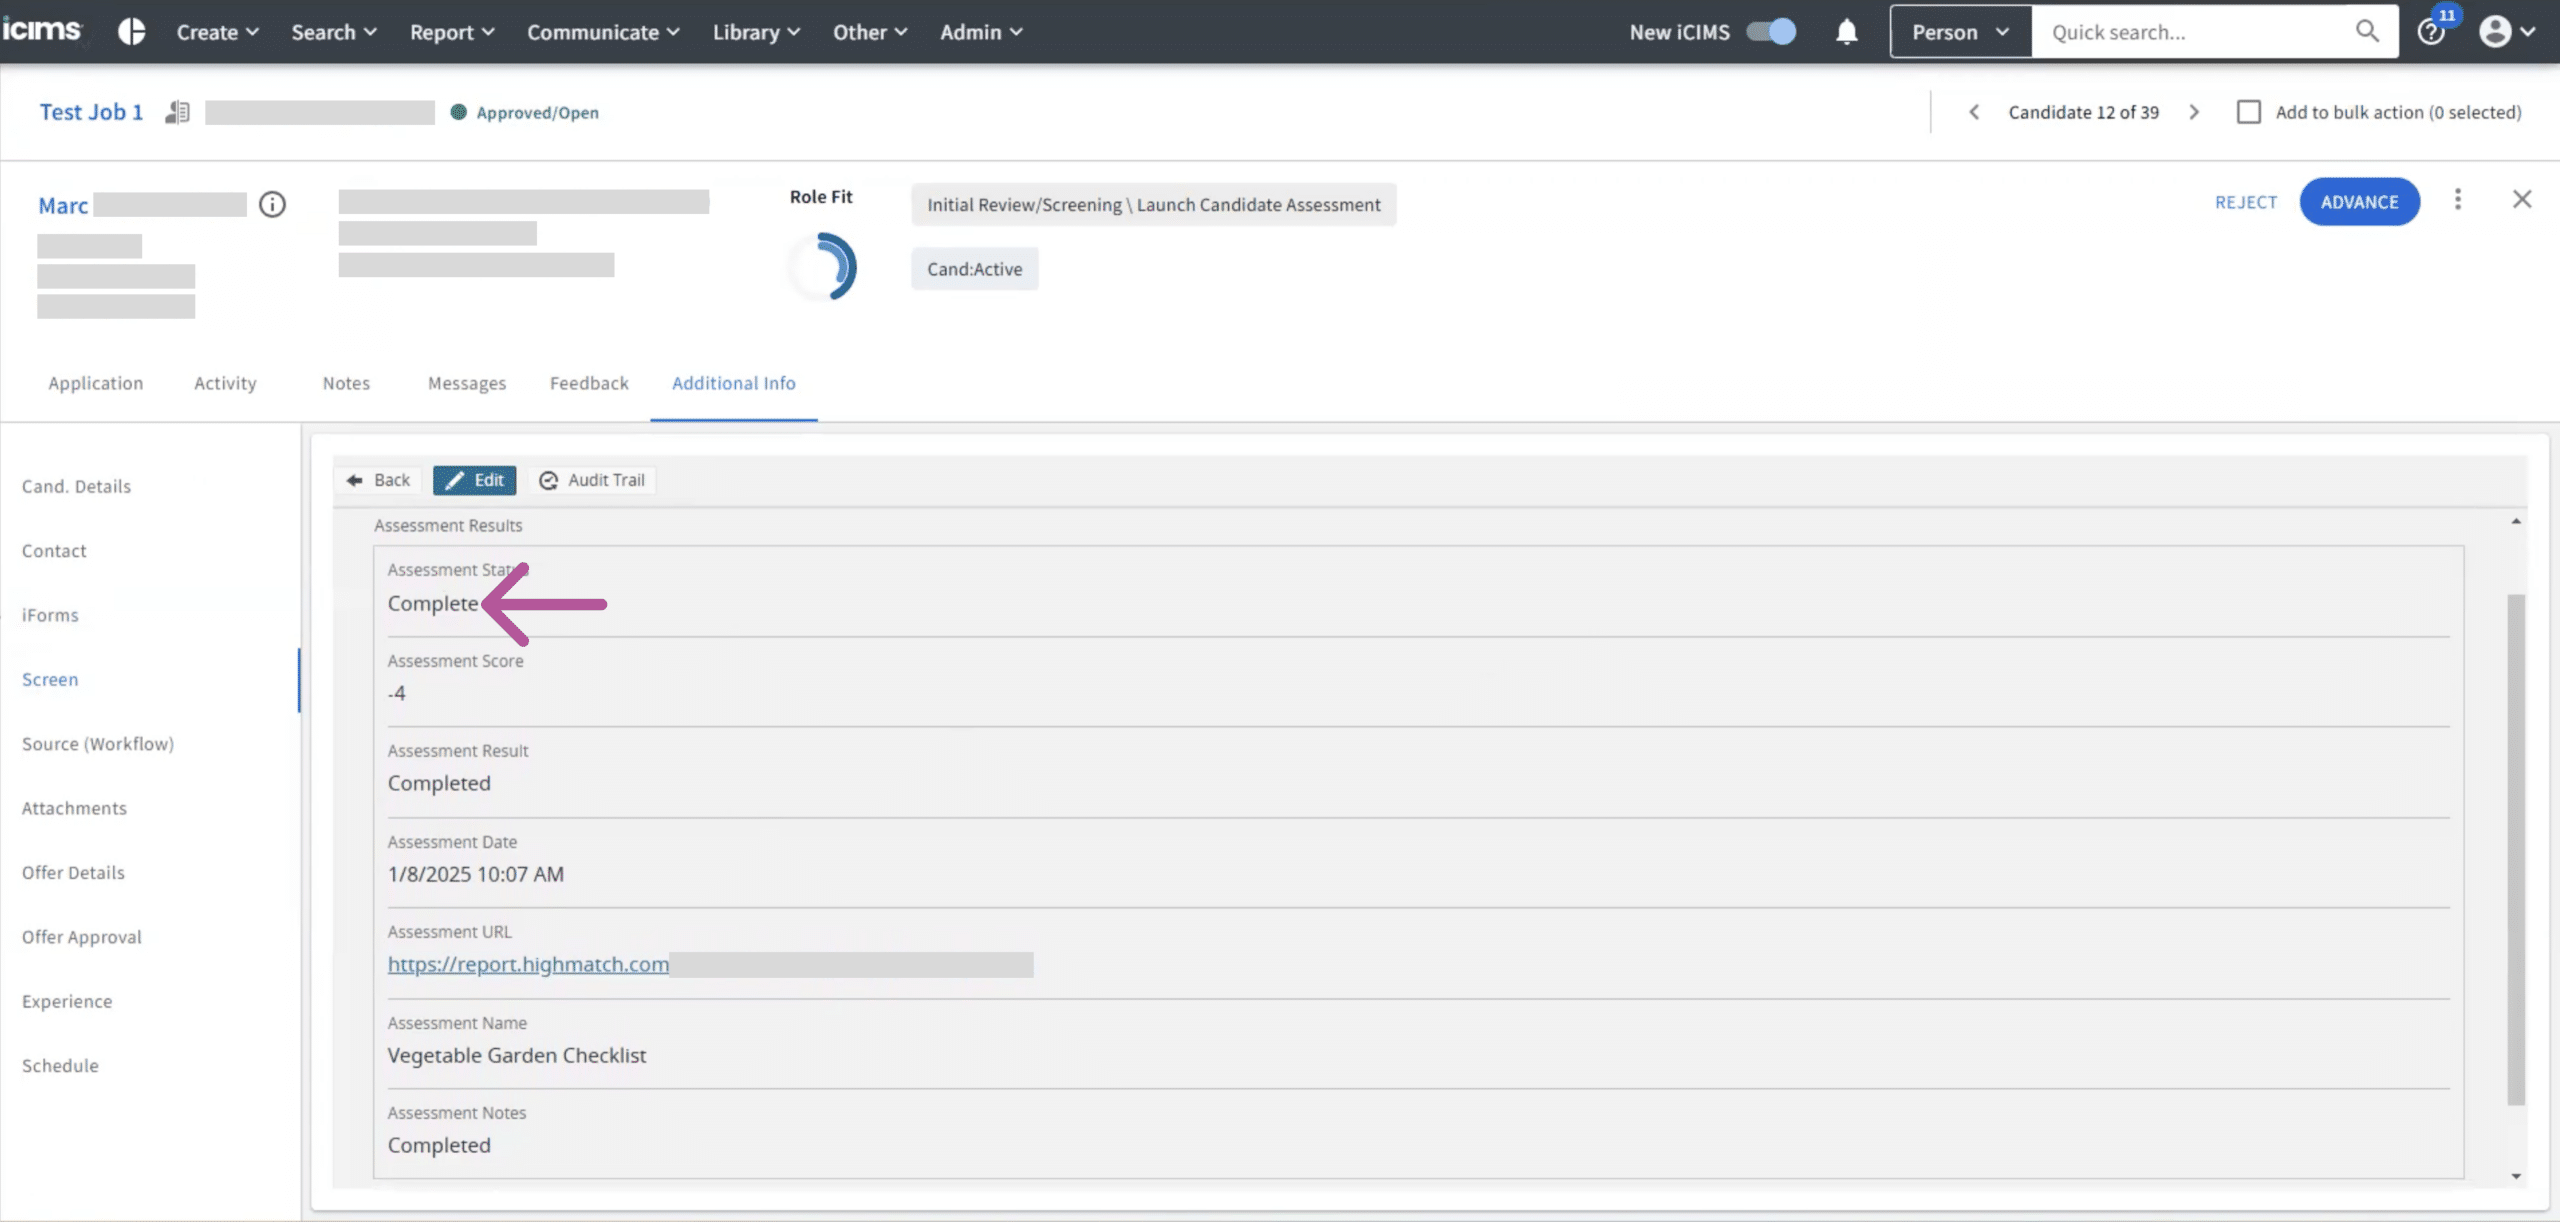
After an assessment is sent to a candidate, the candidate’s assessment status will be displayed on their profile as Incomplete, and will update to In-Progress when the candidate begins the assessment.
HighMatch will update the candidate’s assessment status to Complete once the candidate has completed the assessment.
To view the candidate’s assessment status:
- Go to the Candidate’s profile you wish to review.
- Click the Additional Info tab > Screen > Assessments.

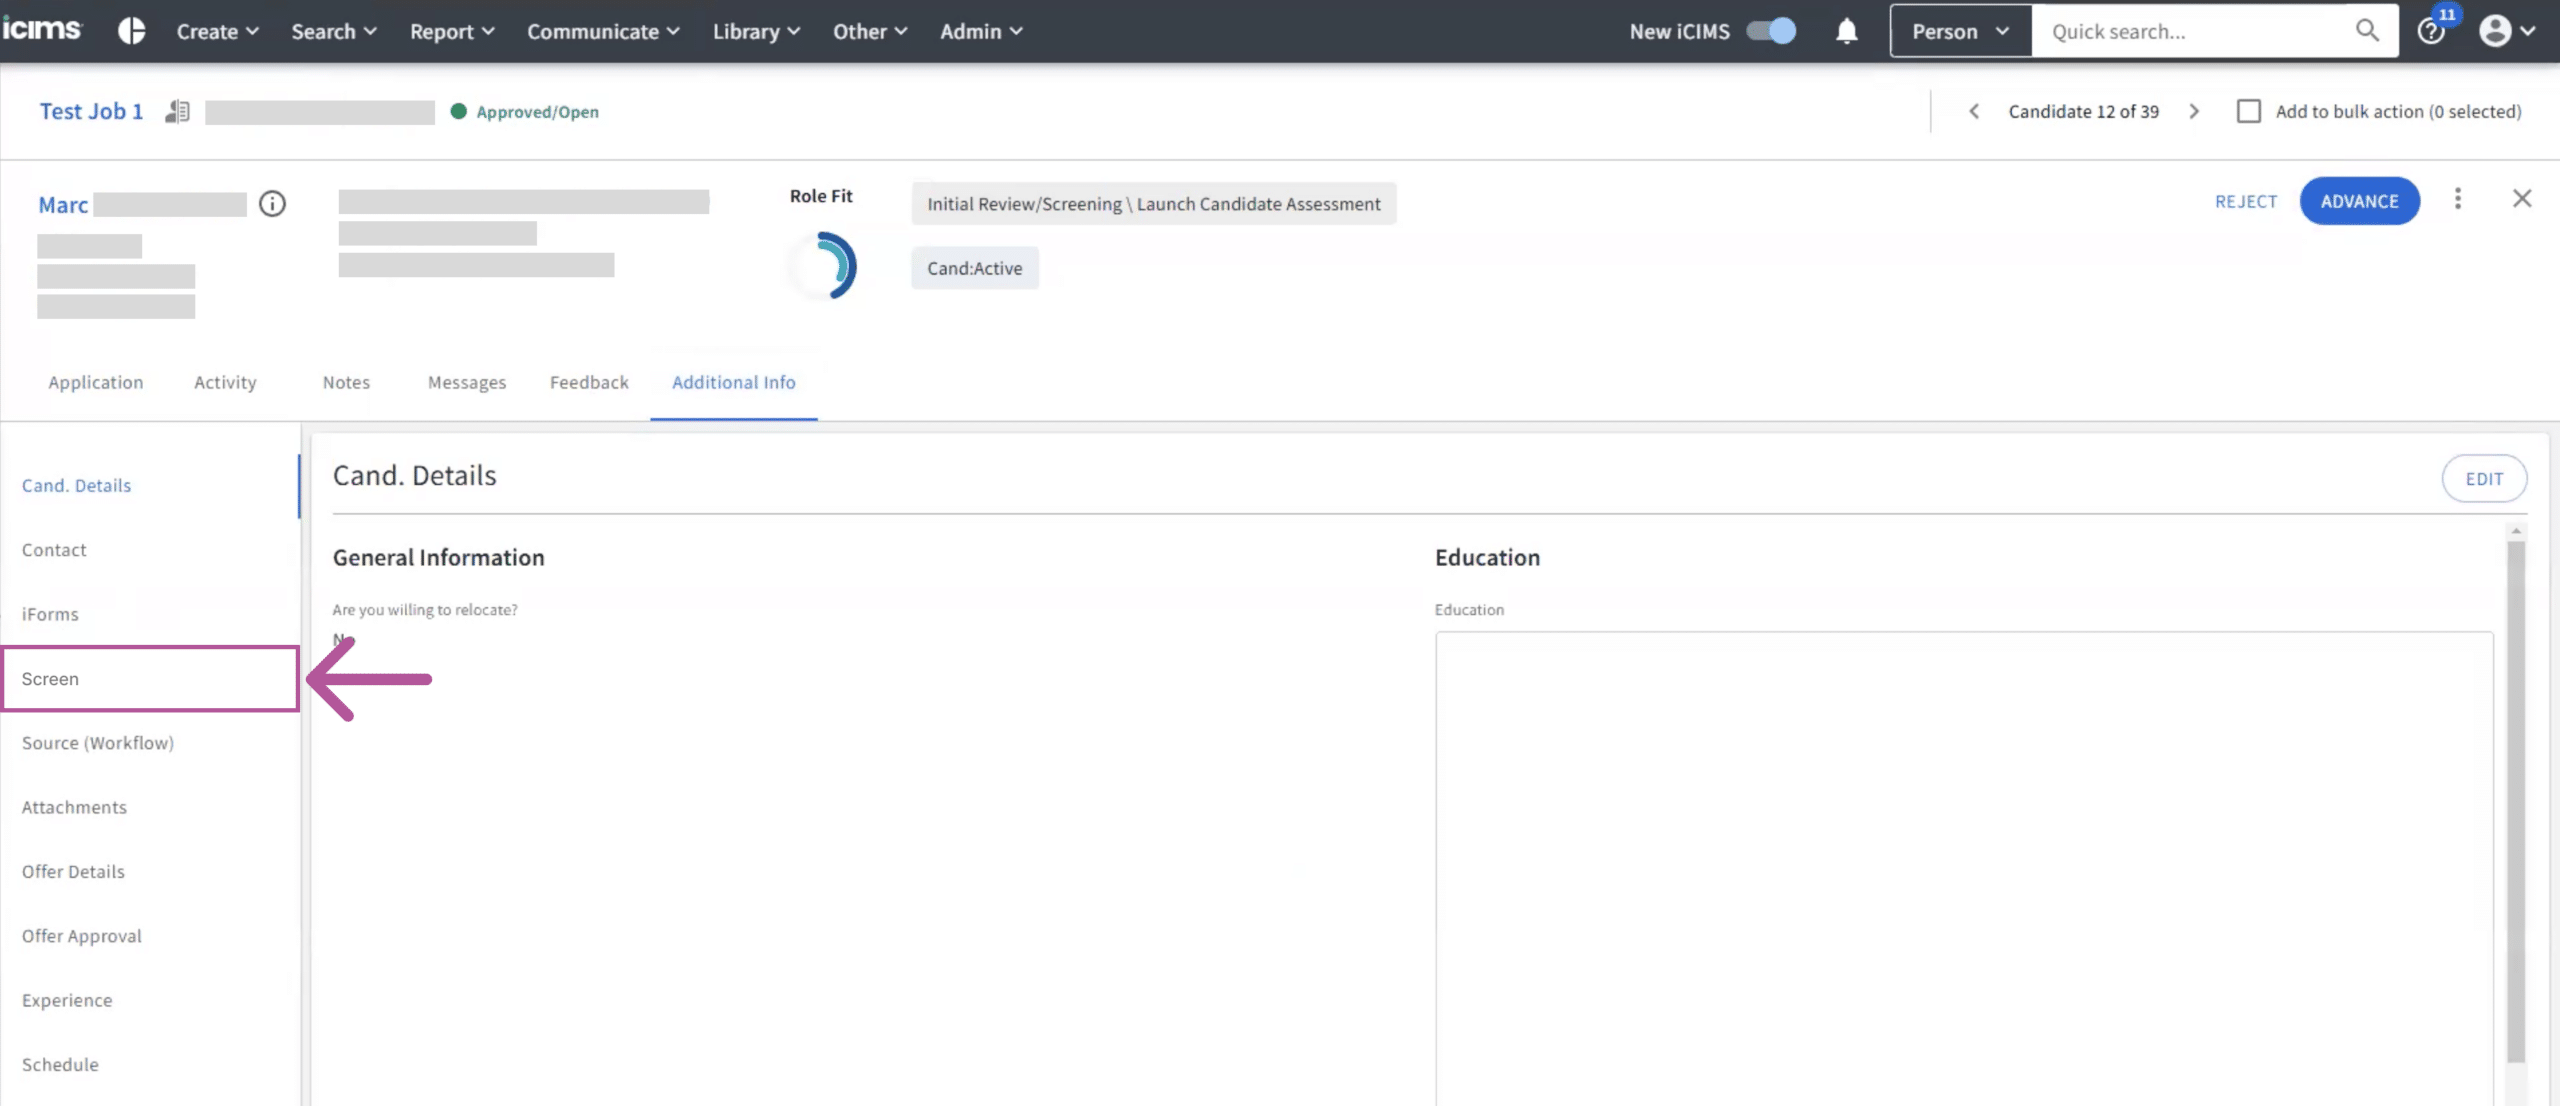
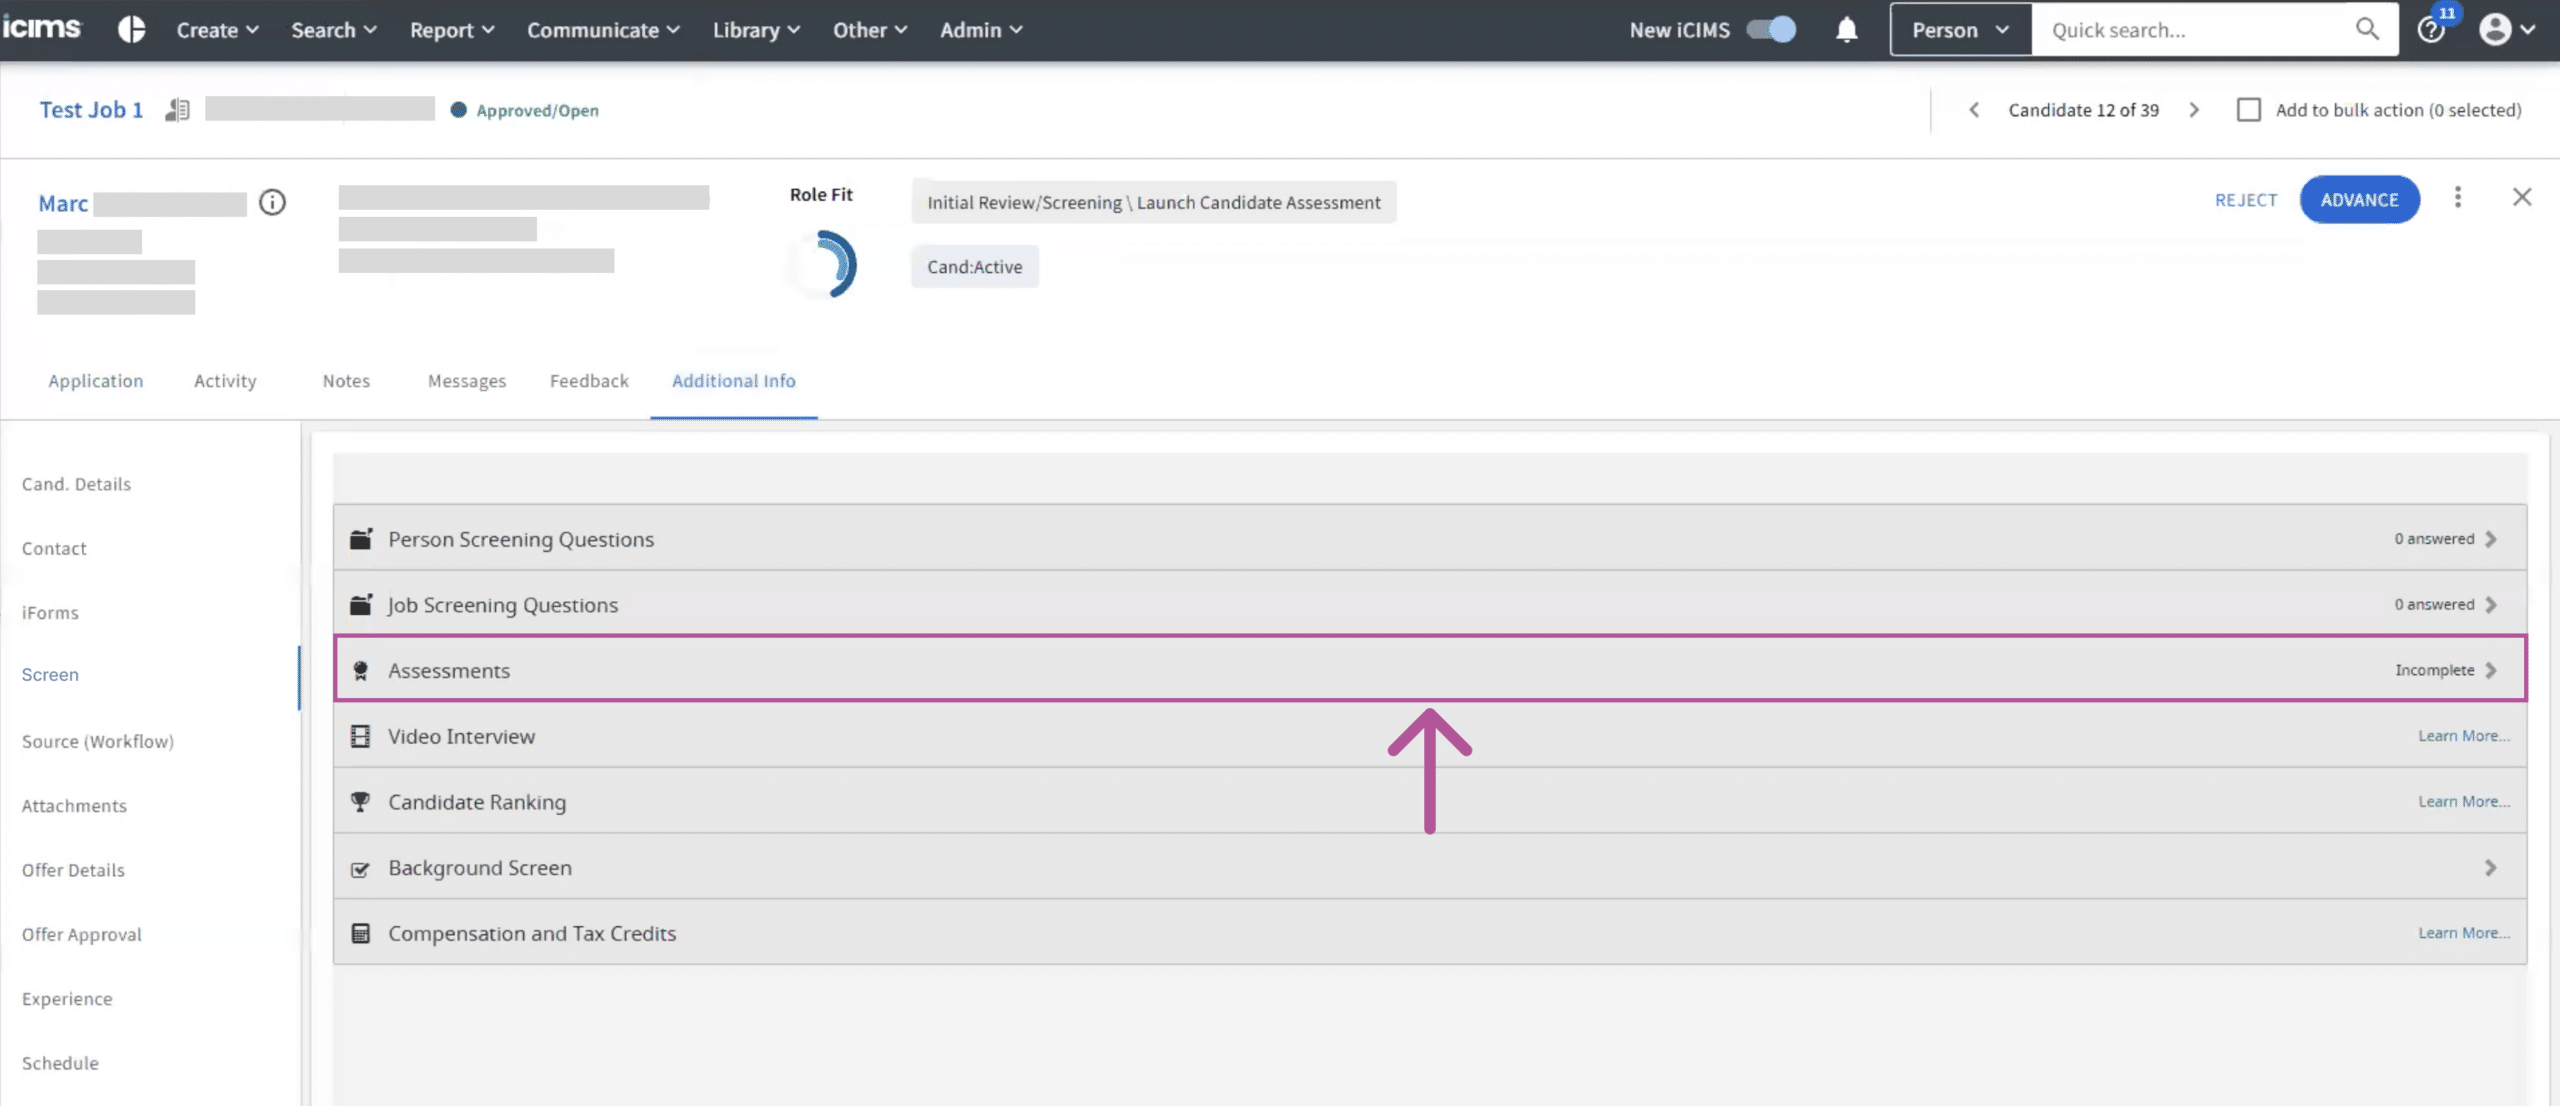
- Review the assessment’s status.
Step 8: Reviewing the Assessment Results and Report
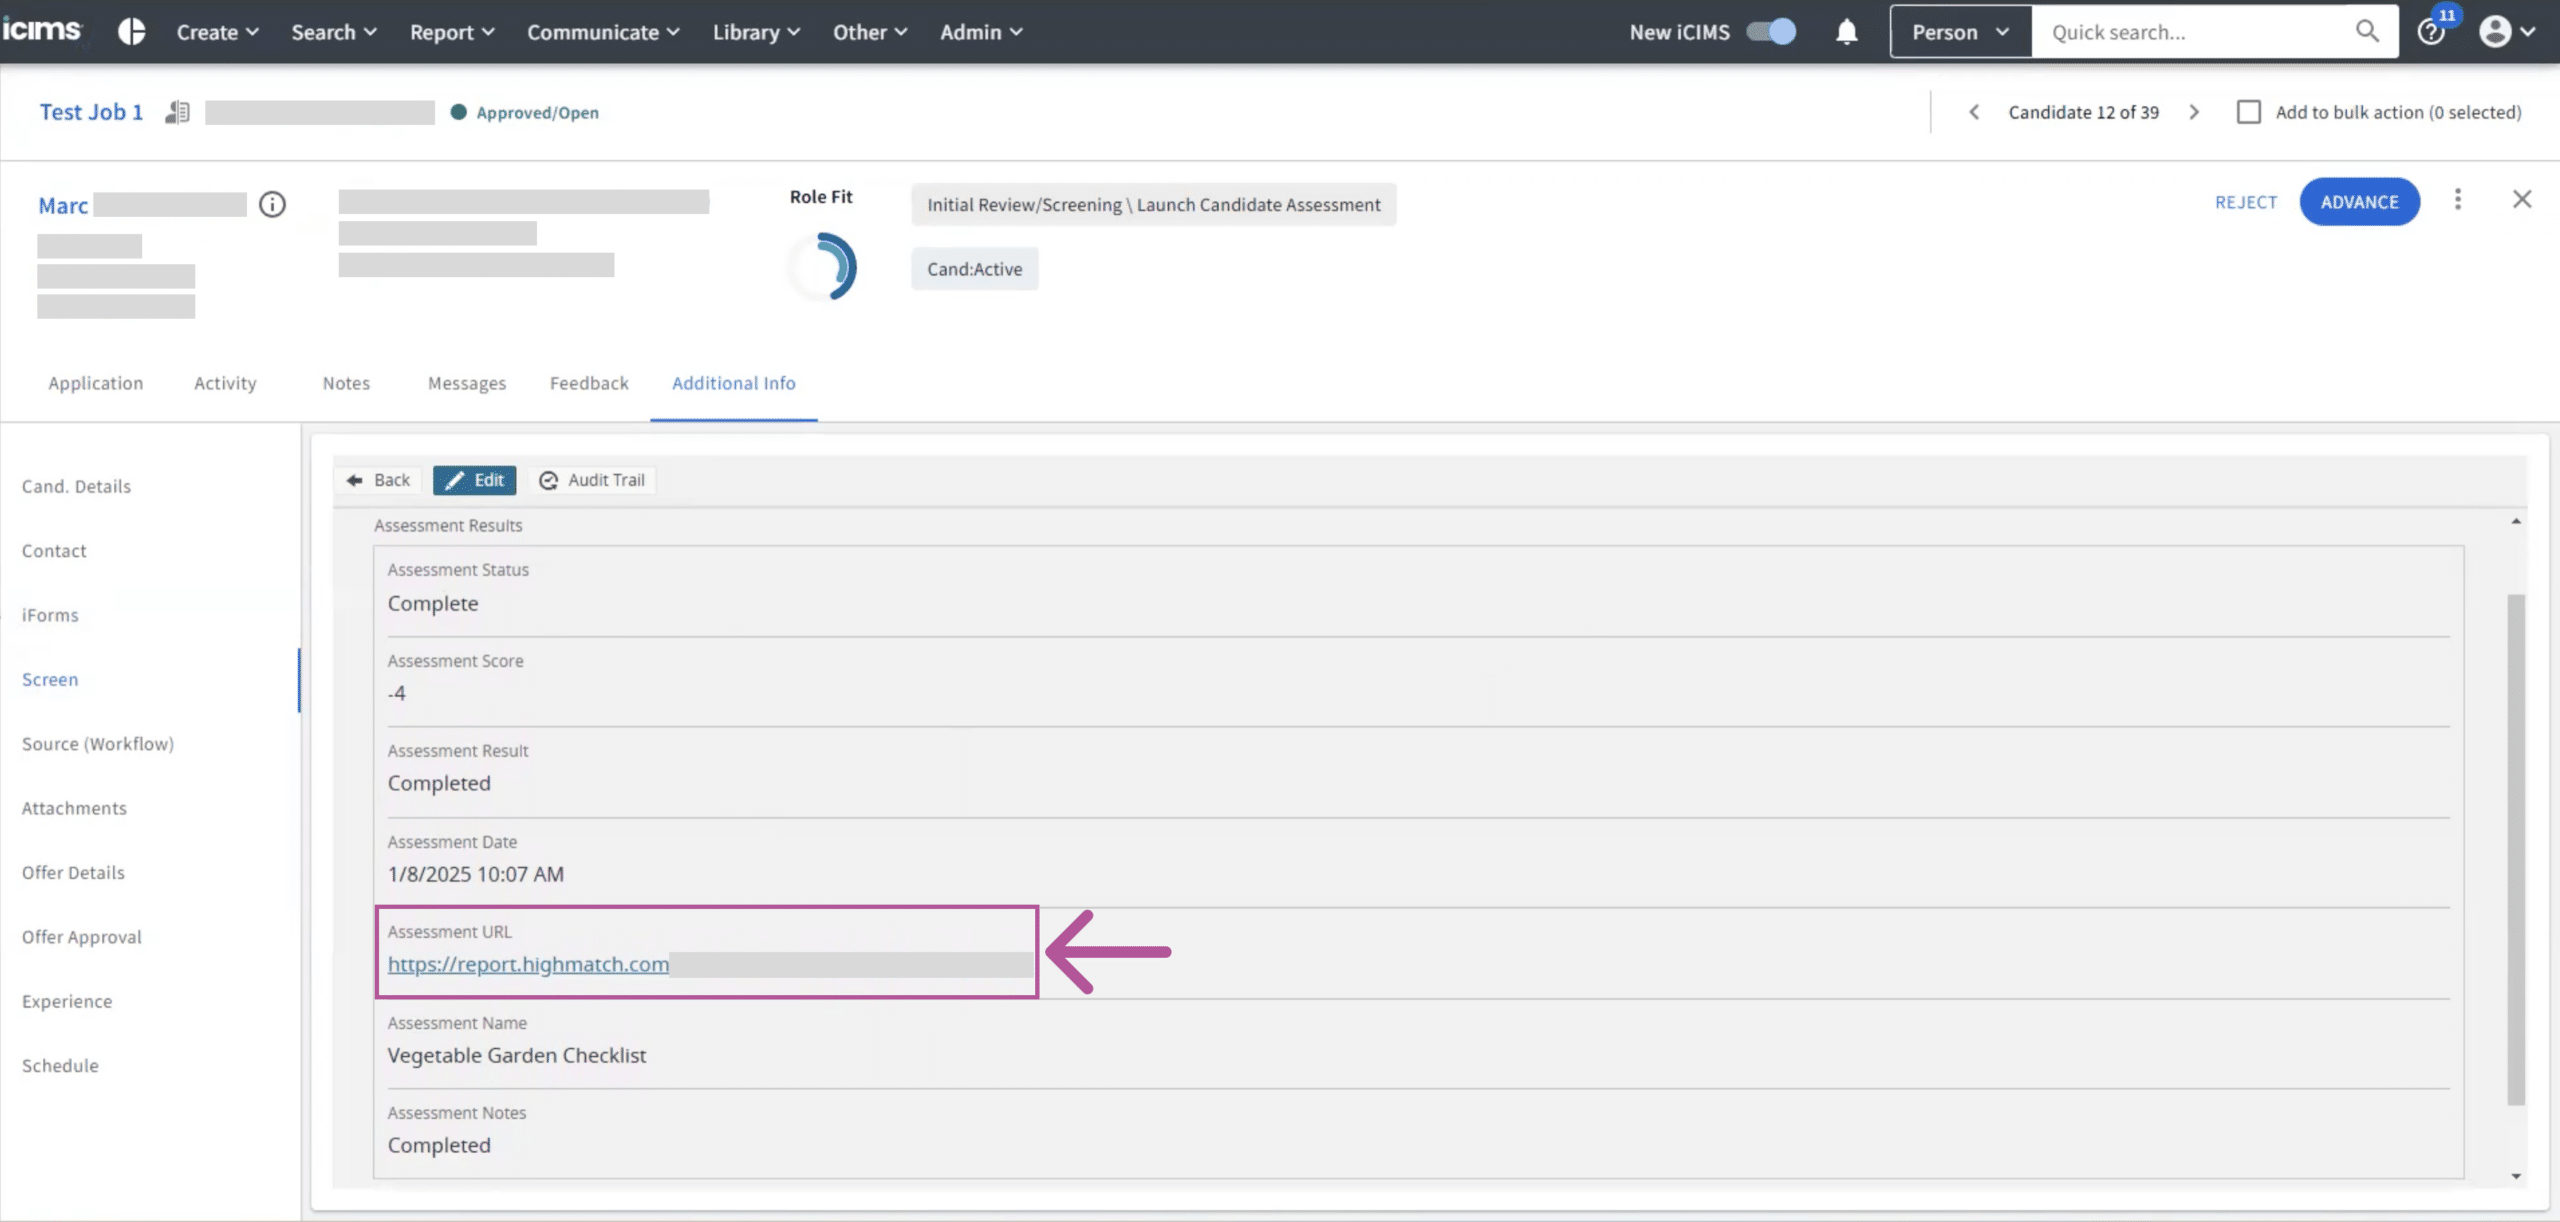
HighMatch will send the assessment results to a candidate’s profile after a candidate has completed the assessment. Included in the assessment results is the assessment score and a link to a detailed assessment report. To review a candidate’s assessment results:
- Go to the Candidate’s profile you wish to review.
- Click the Additional Info tab > Screen > Assessments.

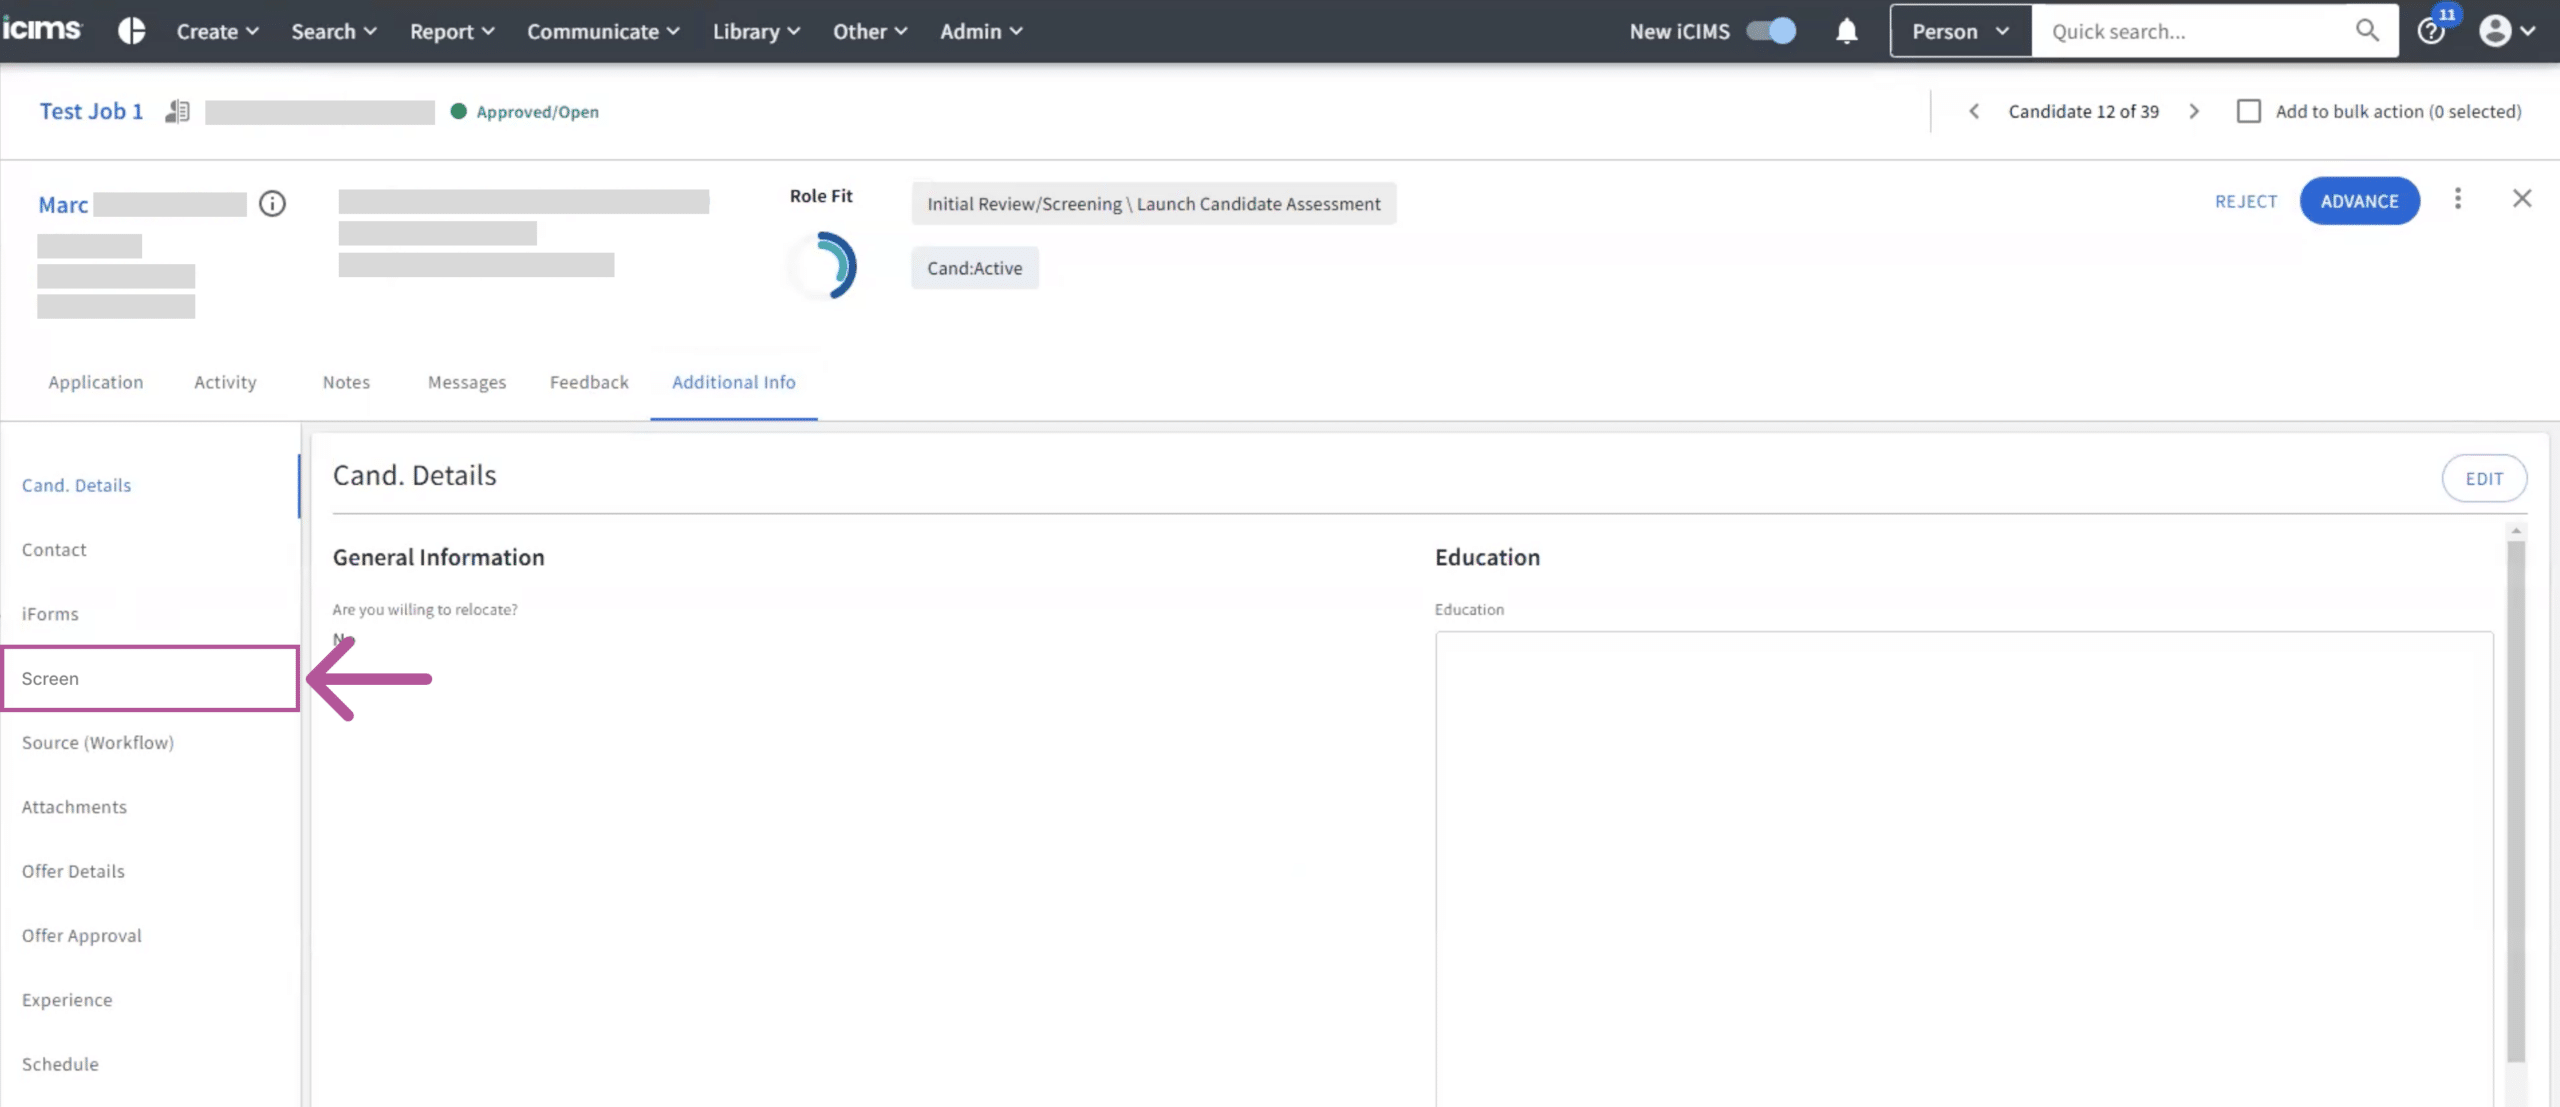
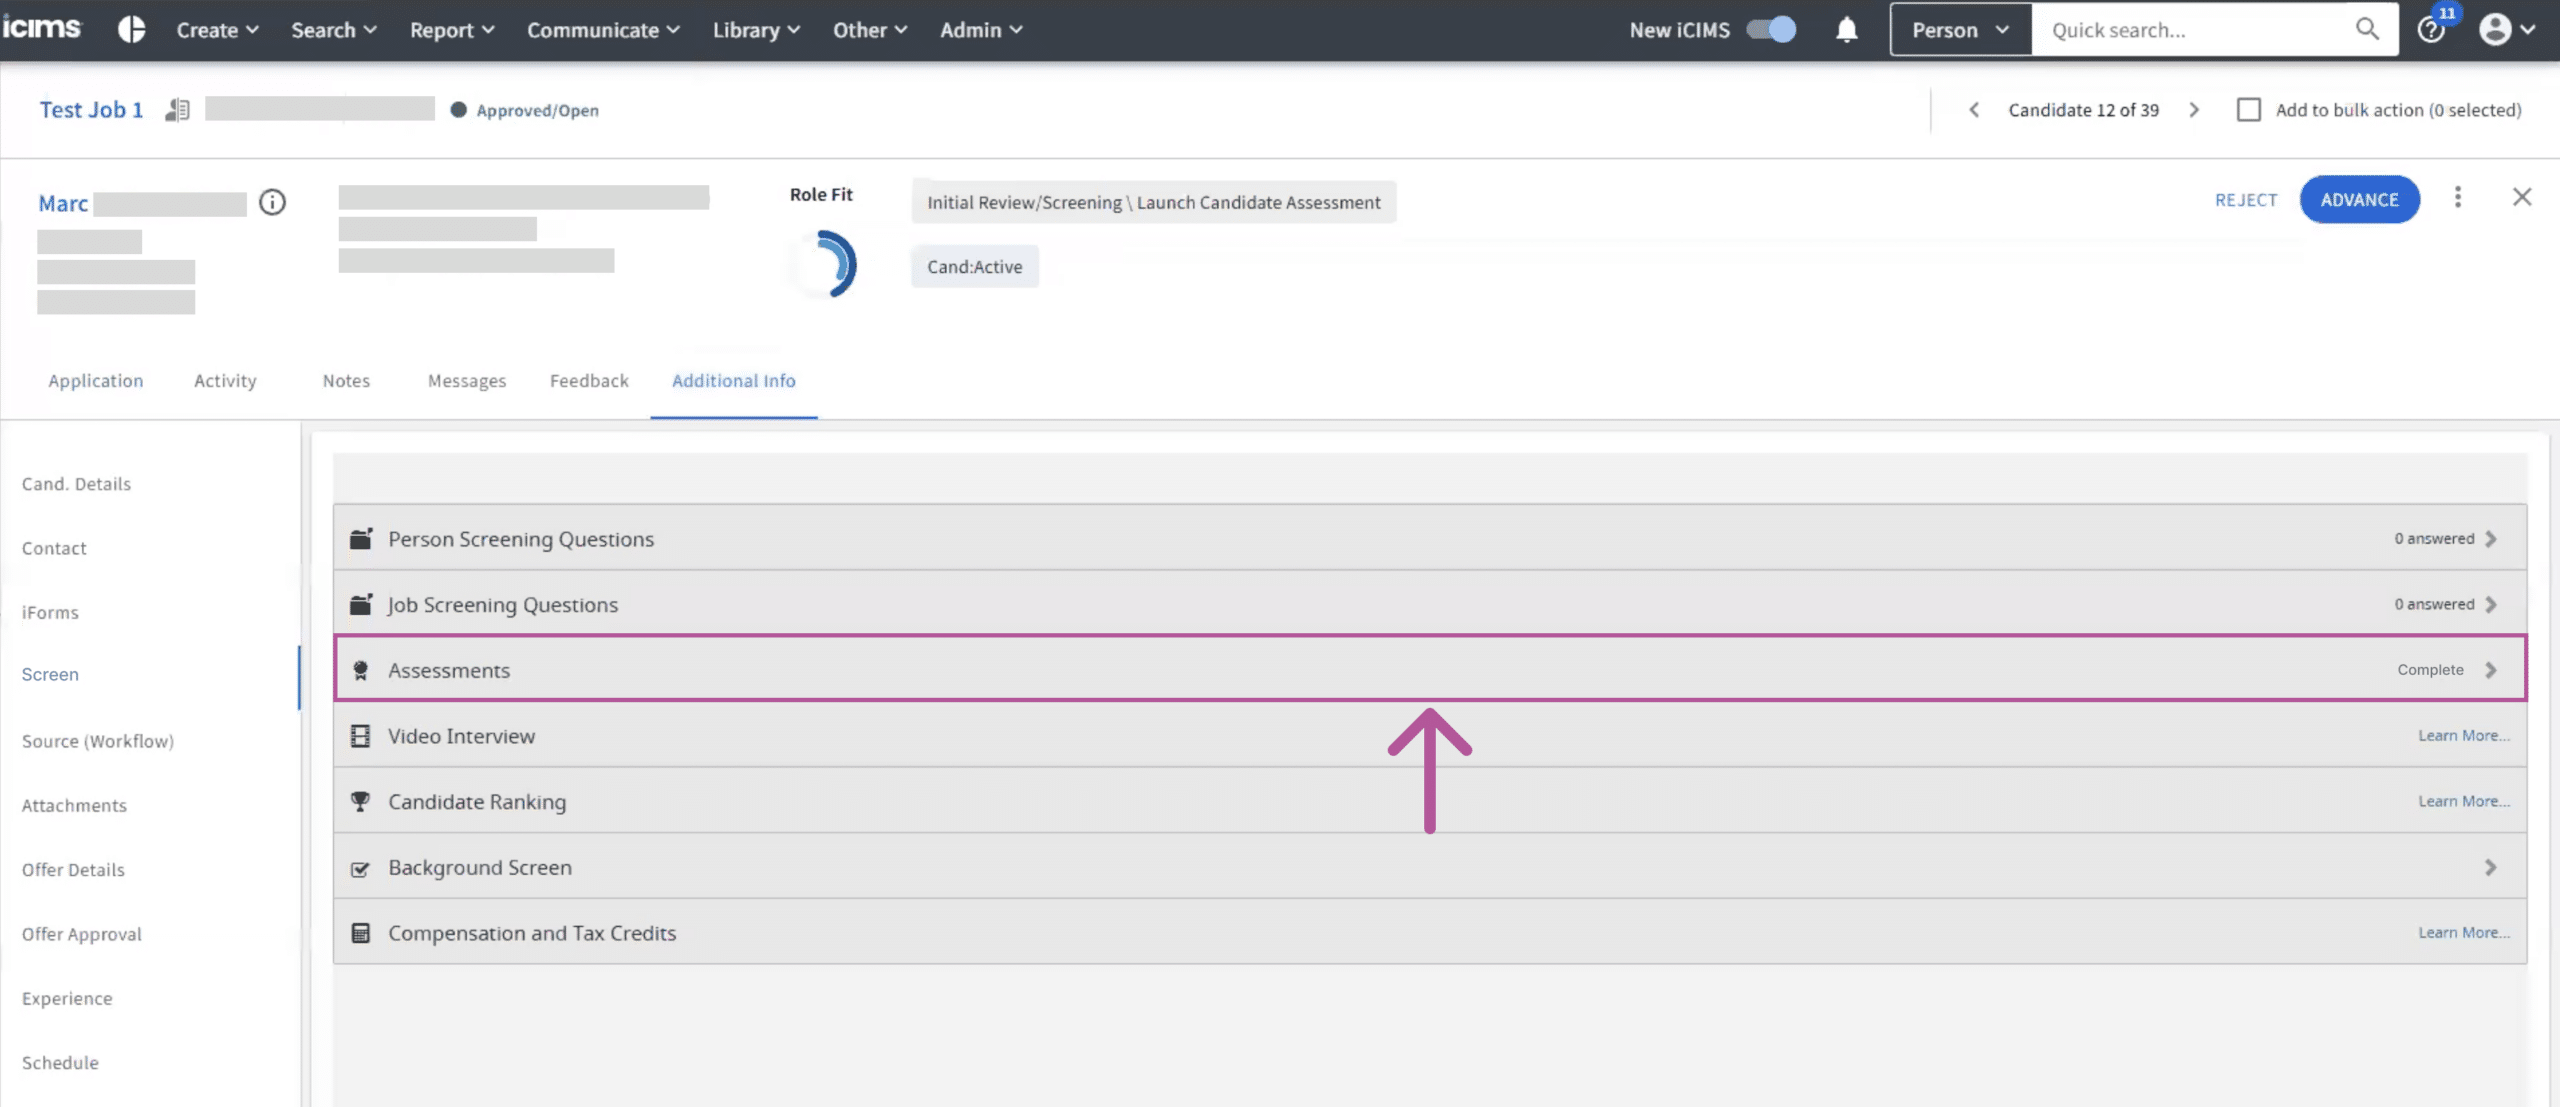
- Review the assessment results.
- A link to a detailed HighMatch assessment result will be linked under the Assessment URL section of the Assessments menu. Click this link to open the assessment report in a new tab.
Your integration is set up and ready to use! Please reach out to HighMatch’s Success team at support@highmatch.com if you have any questions or feedback regarding the HighMatch integration, assessments and assessment reports.