This integration deployment guide will help you quickly and seamlessly connect JazzHR with HighMatch.
Summary of the Integration Flow
- The integration looks for candidates in JazzHR who have been moved to the HighMatch stage and sends the invitation for the assessment to the candidate.
- HighMatch will display the assessment status in JazzHR.
- HighMatch will update the JazzHR HighMatch stage on the candidate profile if the link was successfully sent to the candidate or if it failed to send.
- When the candidate has completed the assessment, HighMatch will post the report to the Assessments tab on the candidate profile.
Summary of Steps
There are 5 steps to configure the integration before you can request and receive candidate assessment results from within JazzHR. HighMatch will guide you through the final testing steps to complete the integration.
You will complete Step 1 to receive API Credentials before you can enable and configure the HighMatch integration in JazzHR.
Step 1: Reach out to HighMatch’s Success Team.
When you have completed Step 1, please contact the HighMatch Success Team who will connect you with your HighMatch Integration Manager to guide you through Steps 2-5. We will help you:
Step 2: Connect to and Enable the HighMatch Integration.
Step 3: Add an Assessment to a Workflow Helper.
Step 4: Send the Assessment to the Candidate.
Step 5: View the Assessment Results and Report.
Process Details
Step 1: Reach out to HighMatch’s Success Team
To gain access and enable HighMatch on JazzHR, you must first reach out to HighMatch’s Success team at support@highmatch.com and ask them about acquiring API credentials for the HighMatch integration.
The API credentials are required before HighMatch can walk you through the Steps 2-5.
Note: Your JazzHR account must be live in production, and API access must be available to proceed with this integration.
HighMatch will work to configure the webhook and the API credentials will be provided to you within five business days after you first reach out so the integration can be enabled.
Once your setup is complete, it is time to book a call with your HighMatch Success Team Manager at support@highmatch.com with the information in Step 1 above. We will guide you through the remainder of the setup and testing process (Steps 2-5 below).
Step 2: Connect to and Enable the HighMatch Integration
Once you have received your API credentials, you can schedule a kickoff meeting with HighMatch’s Success team at support@highmatch.com for a walkthrough of Steps 2-5.
You may also perform any of the steps on your own before meeting with HighMatch. If you do so please mention which steps you have already performed during your meeting with HighMatch’s success team.
Follow these steps to connect and enable the HighMatch integration on JazzHR:
- Find the list of integrations by clicking on Settings > Integrations.
- Scroll down until you find the HighMatch integration.
- Once the HighMatch integration is found, click More Details.
- Click the Connect button.
- Paste the API credentials in the Assessment Credentials window that pops up and click Save Credentials.
The HighMatch integration should now be connected and enabled.
Note: If you do not see the HighMatch integration listed or the Connect button does not appear, please contact JazzHR’s support team.
Step 3: Add an Assessment to the Workflow Helper
Once the HighMatch integration is connected and enabled in JazzHR, you can add an assessment into your workflow for a specific job to automate requests.
Note: We recommend testing the following steps on a test job and test candidate.
- Go to Jobs.
- Select the test job you want to use the assessment with.
- Click Edit Job.
- Click the Workflow tab > Find the stage to which you would like to add an assessment.
- Click Add > Select Assessment in the drop-down menu.
- Select the email template you would like to be included with the assessment invitation.
- Click the Assessment to Send drop-down menu button and select the specific assessment.
- Click Add Assessment.
Step 4: Send the Assessment to a Candidate
To learn how to send assessments to candidates, first:
- Go to a test Candidate’s Profile.
- Click the Assessments tab.
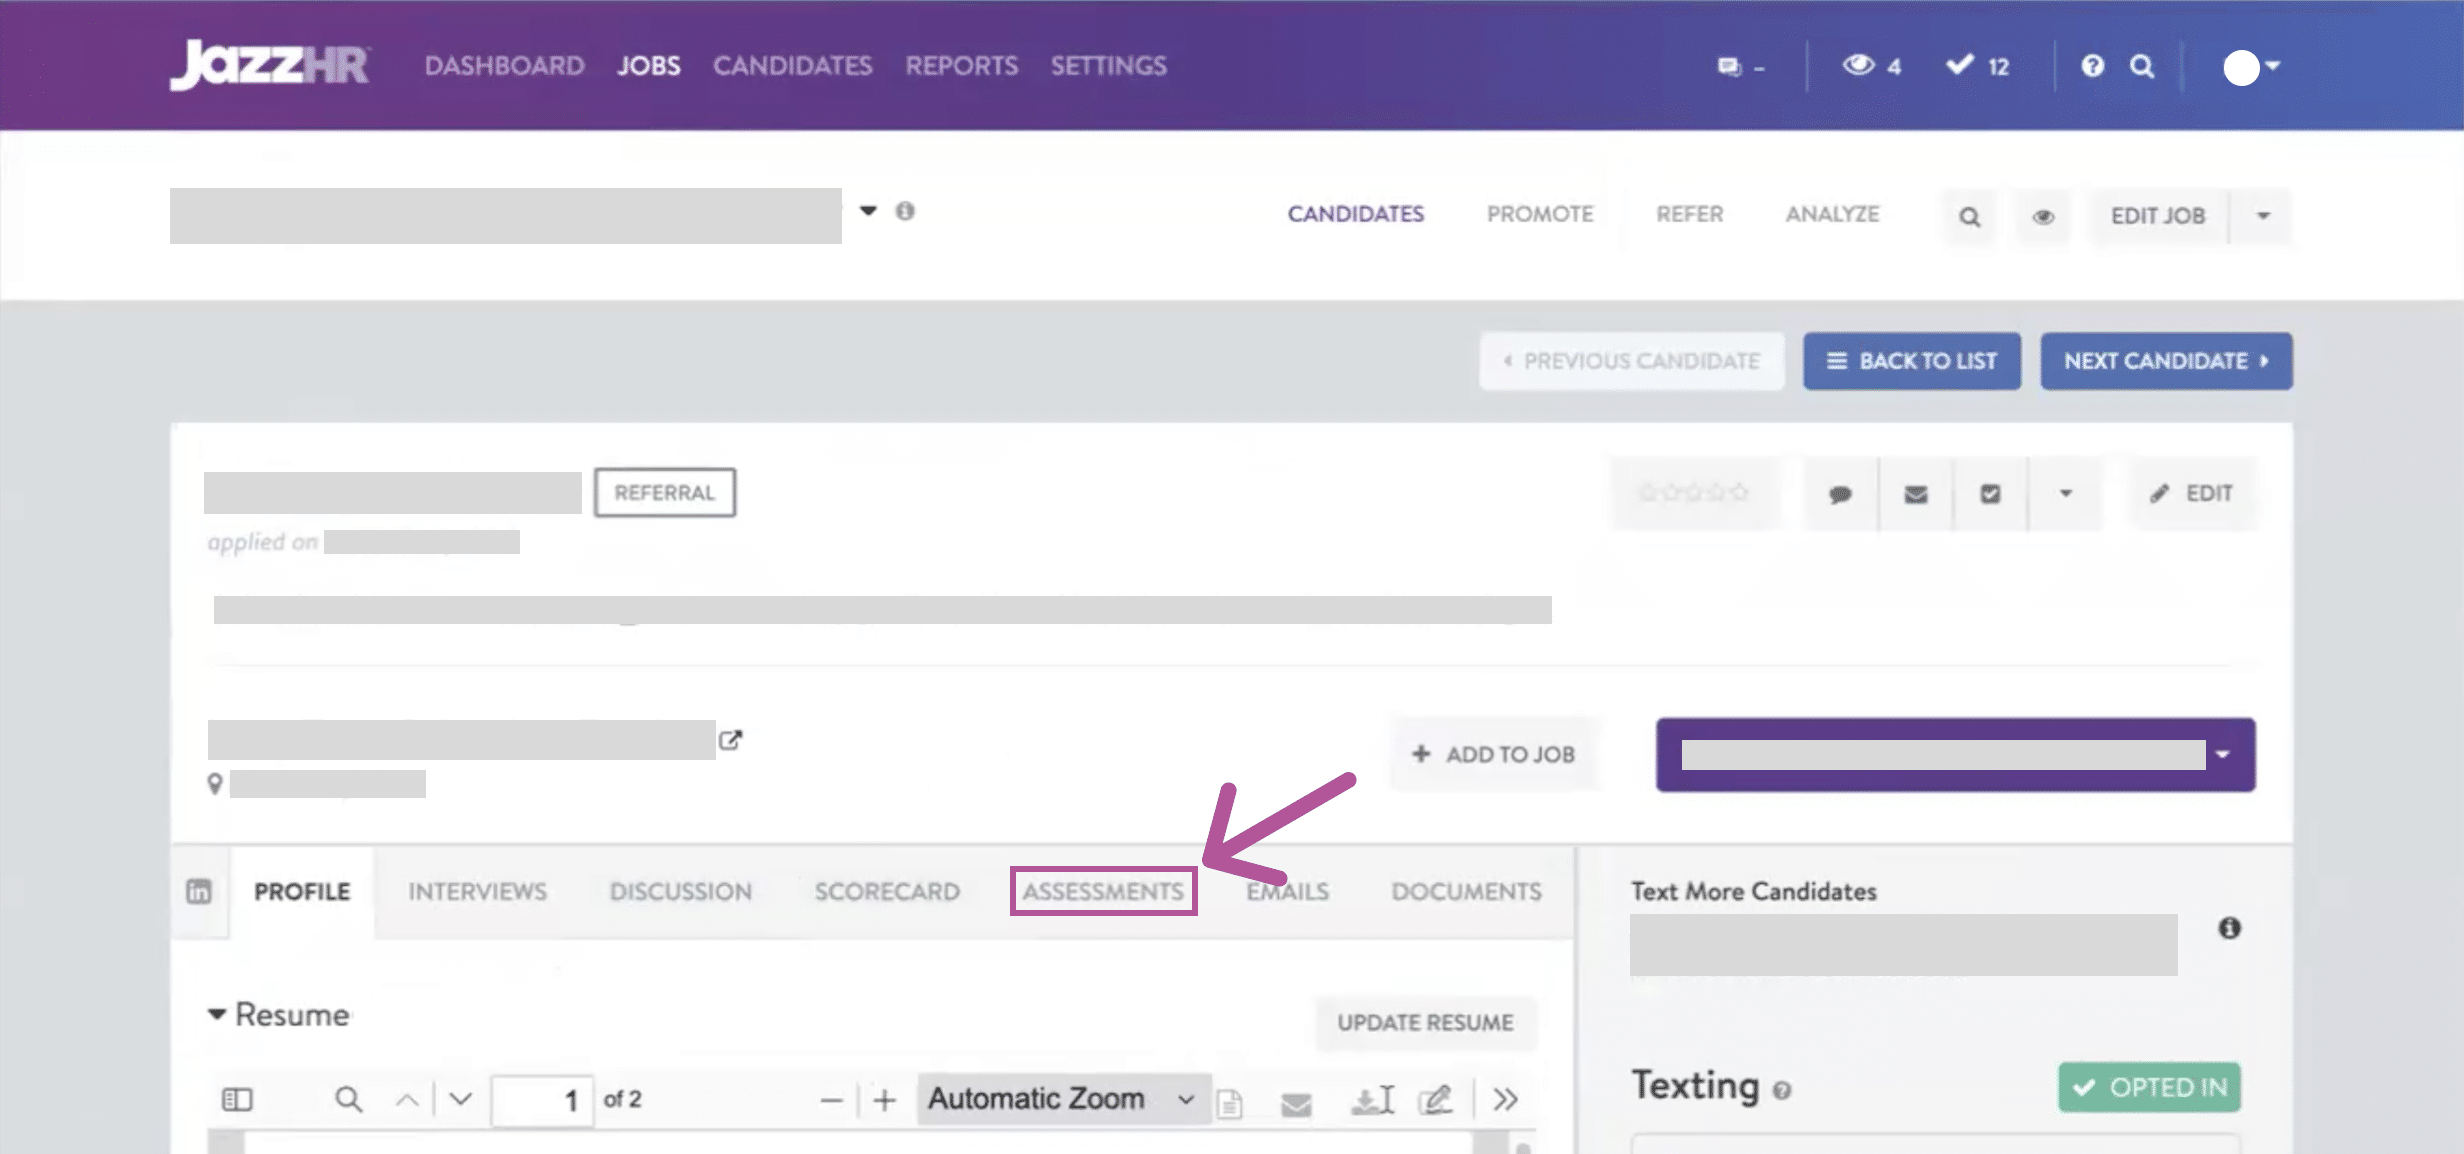
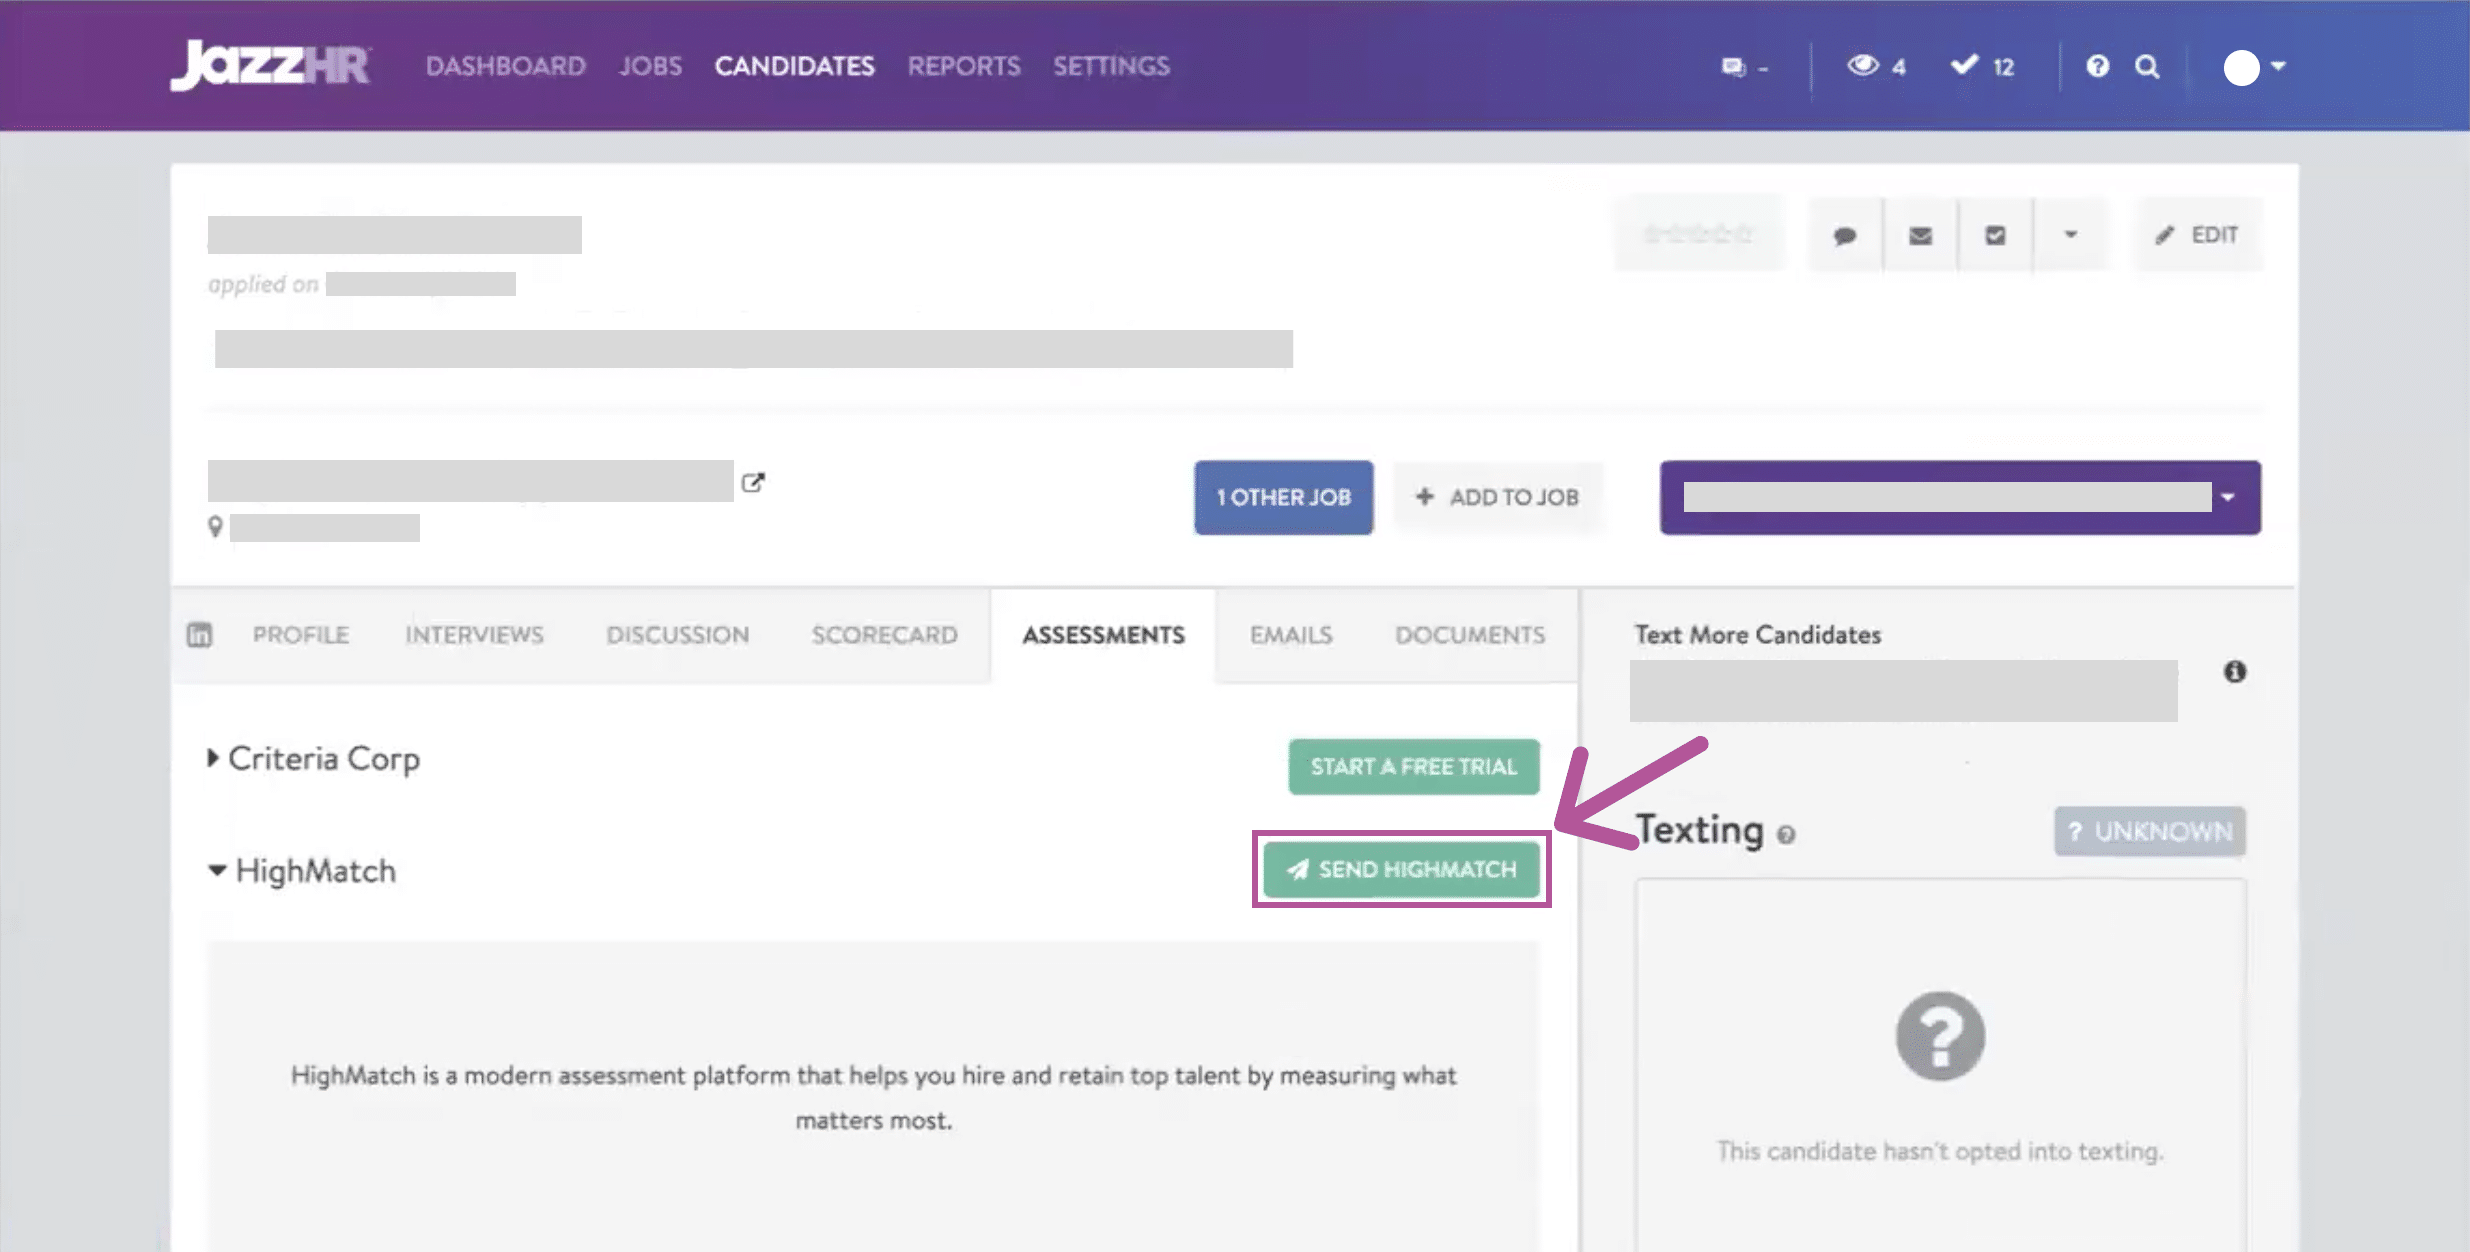
- Scroll to the HighMatch section.
- Click Send HighMatch.
- Select the specific assessment (if applicable) from the Select Test drop-down menu in the popup.
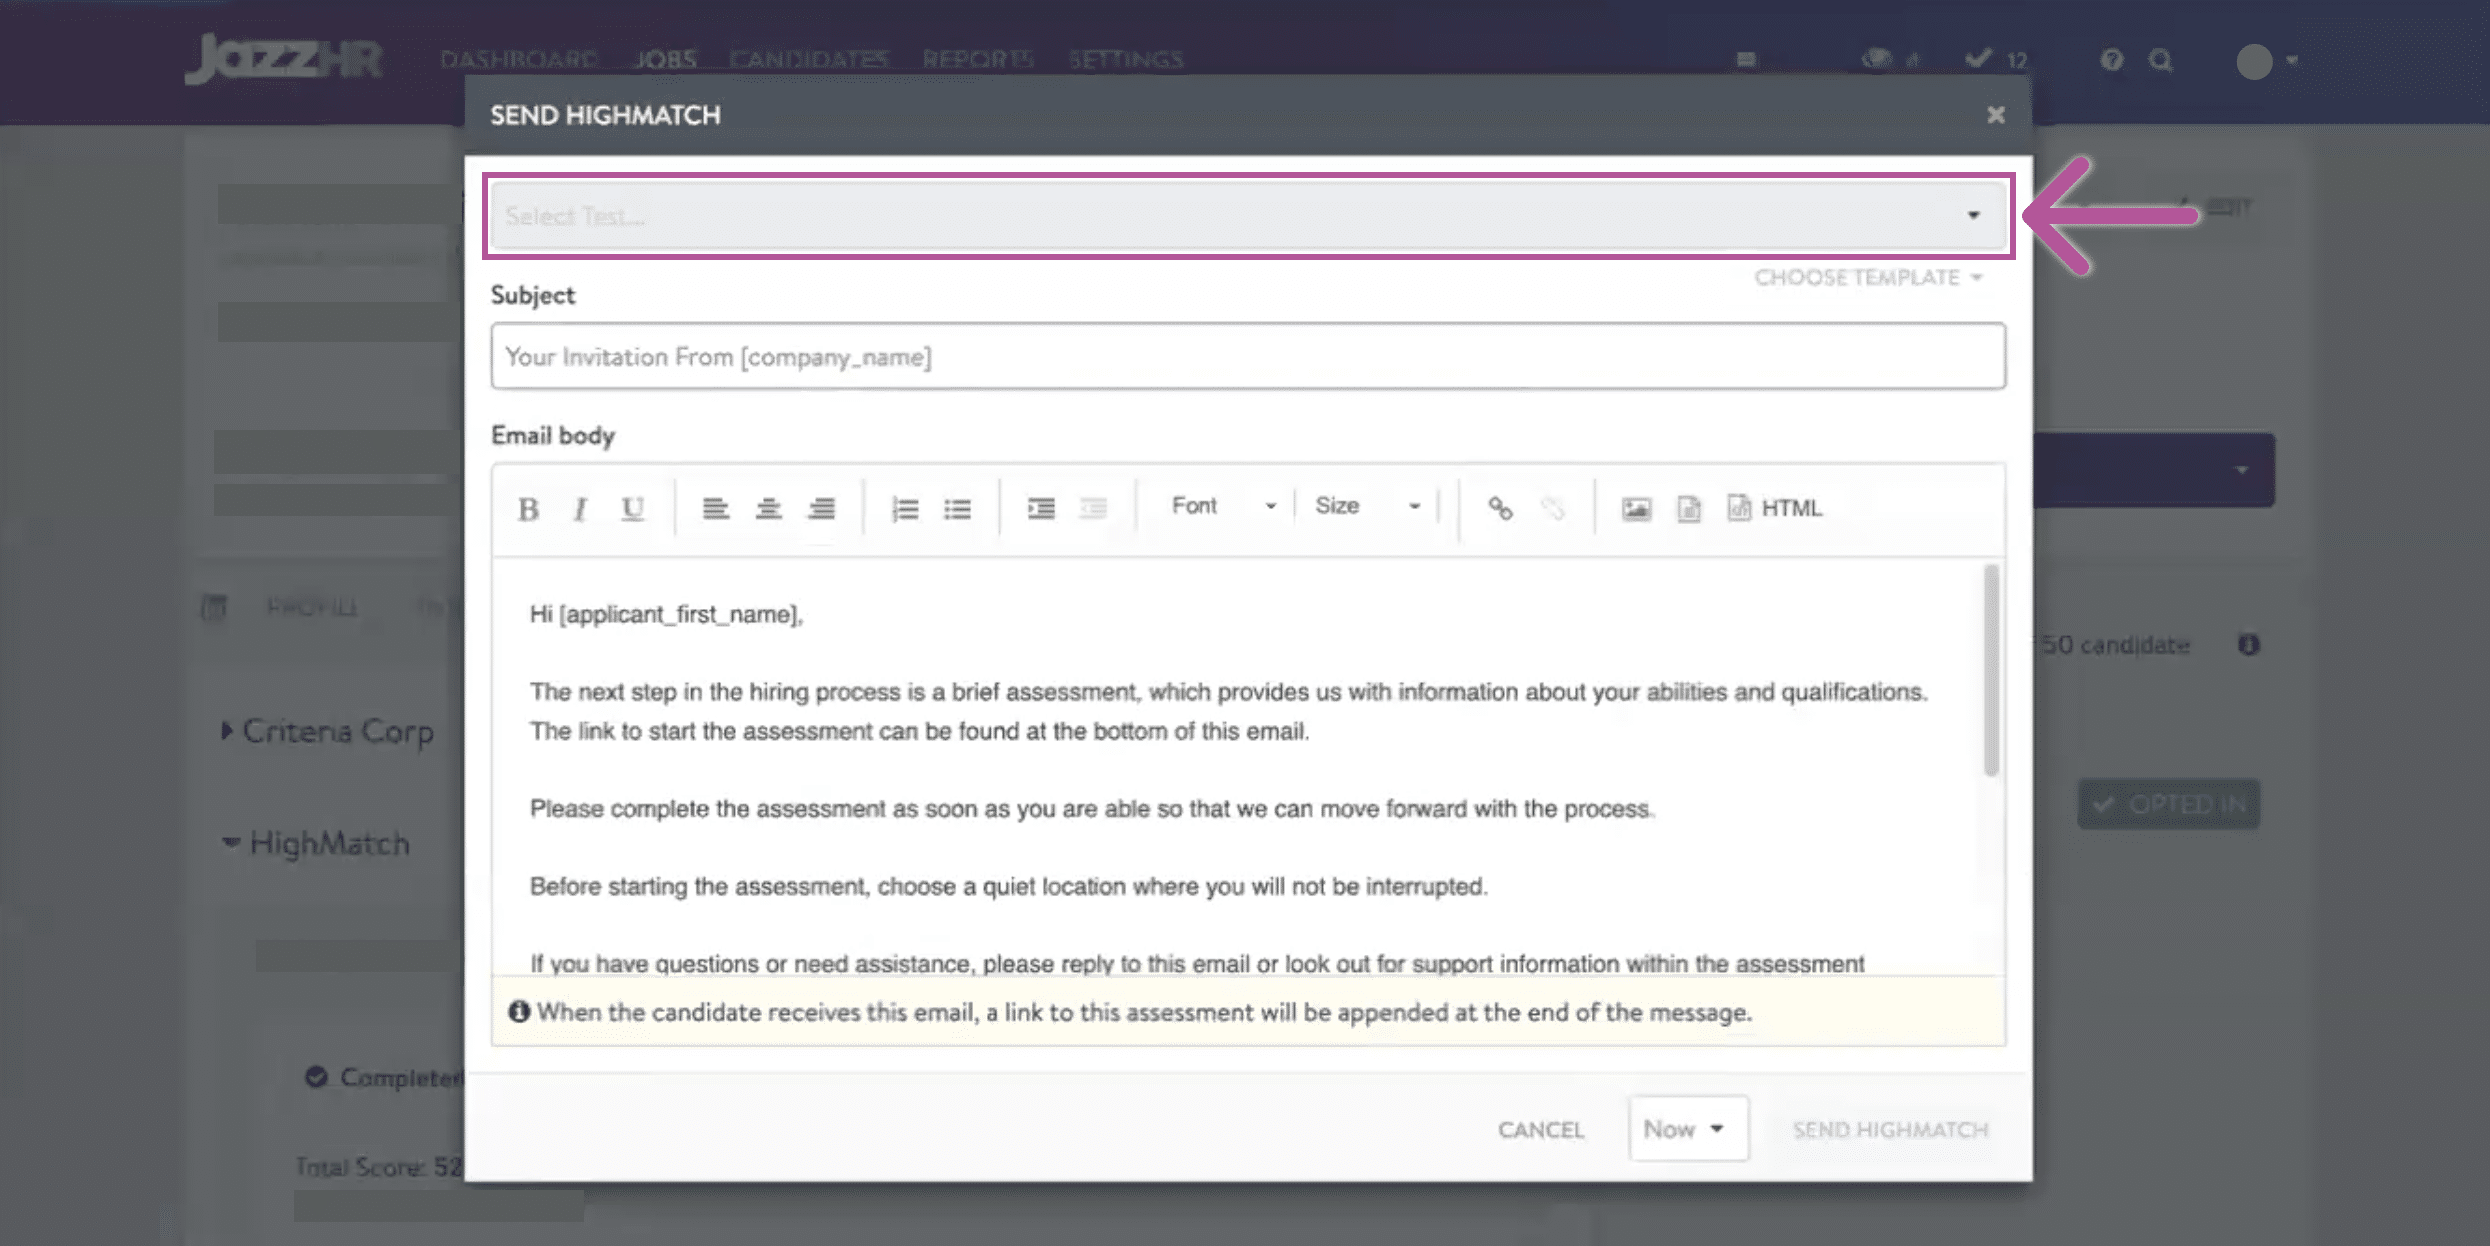
- Enter a Subject Line and Email Body for the assessment’s invitation email or use the default email template.
- Note: that the link to the assessment will be located at the bottom of the message.
- Click Send HighMatch in the popup once done.
Note: Keep in mind that all configurations of the assessment itself, as well as the email template, can be edited in the assessment settings.
Step 5: View the Assessment Results and Report
Once a candidate has completed the assessment, the assessment’s score and report will be displayed on the Assessments tab on the Candidate Profile. From here:
- Click View Details to view the assessment results.
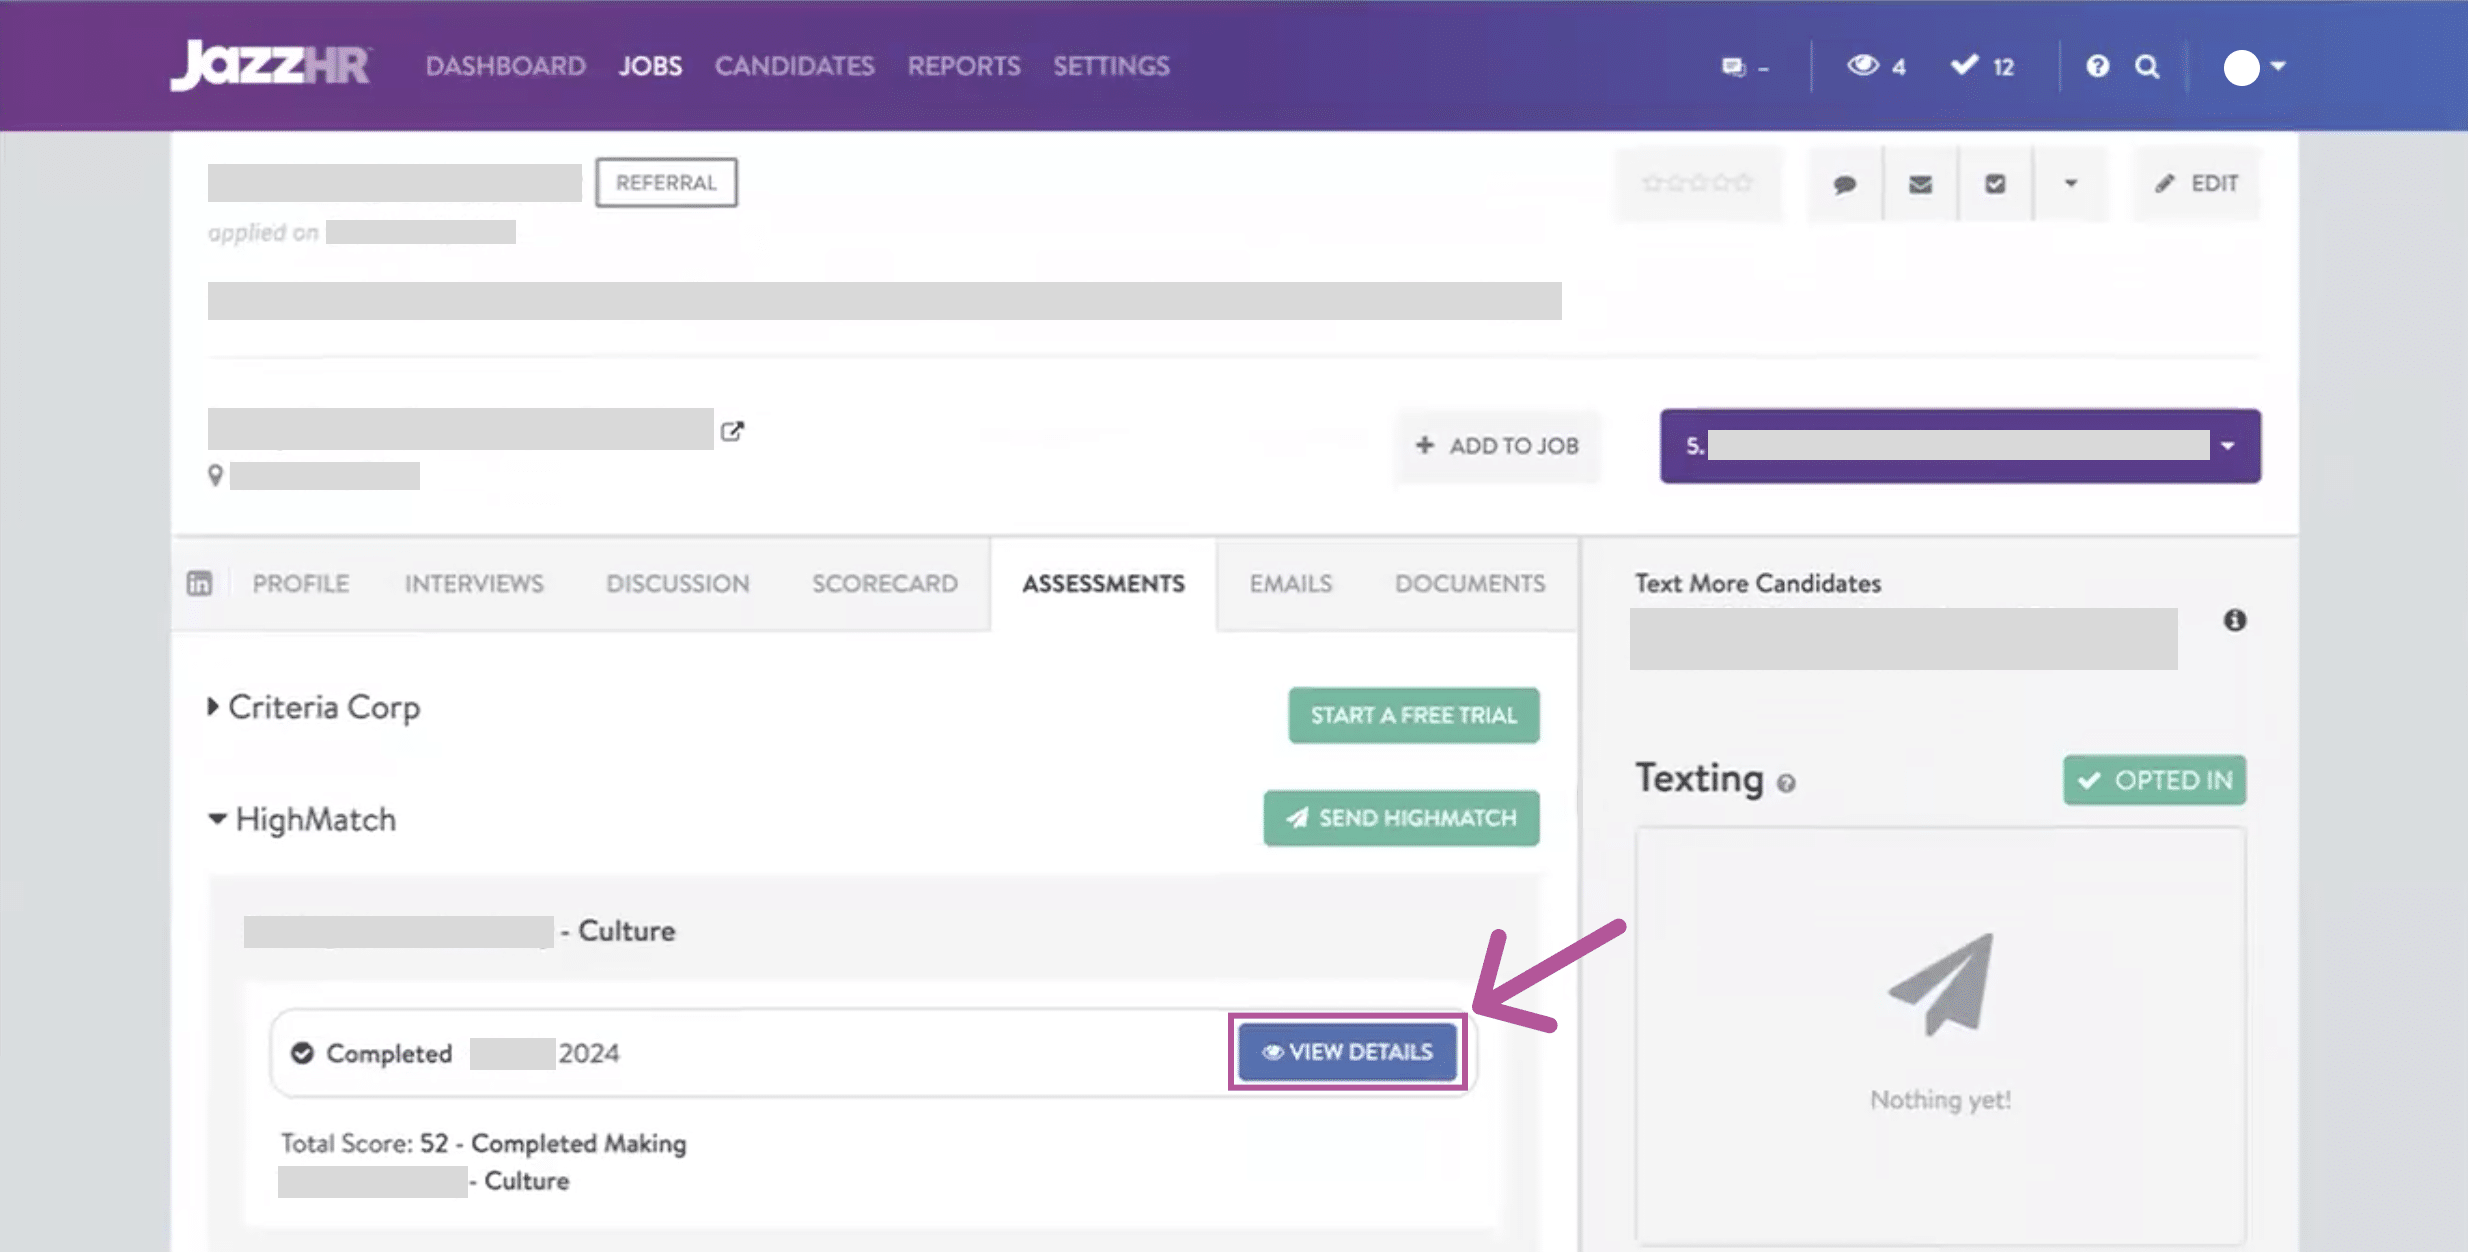
- Results may be in the form of a downloaded PDF or a link that opens a new tab to the assessment’s report. Here you can view a detailed explanation of the candidate’s assessment results.
Your integration is set up and ready to use! Please reach out to HighMatch’s Success team at support@highmatch.com if you have any questions or feedback regarding the HighMatch integration, assessments and assessment reports.