
This integration user guide will help you quickly and easily send candidates a HighMatch assessment invitation and receive those results in Paylocity.
Summary of the Integration Flow
- The integration is either triggered automatically as part of the application process or is manually triggered by a recruiter or hiring manager.
- The candidate will complete the assessment via the invitation email they received that was either automatically sent during the application process or sent when an assessment was manually ordered by a recruiter or hiring manager.
- HighMatch will update the assessment status on Paylocity when the assessment is sent, in progress and completed.
- When the candidate has completed the assessment, HighMatch will post the assessment results as well as a link to a detailed HighMatch assessment report on the candidate’s profile.
Process Details
Step 1: Add Assessments to a New or Existing Job
Assessments can be added to existing jobs or added when a new job is created. We do not recommend adding an assessment to an existing job as this may skew hiring results for candidates who are far into the hiring process and have not taken an assessment.
When creating a new job, users with appropriate permission can follow the steps below to add the assessment requirement to their job:
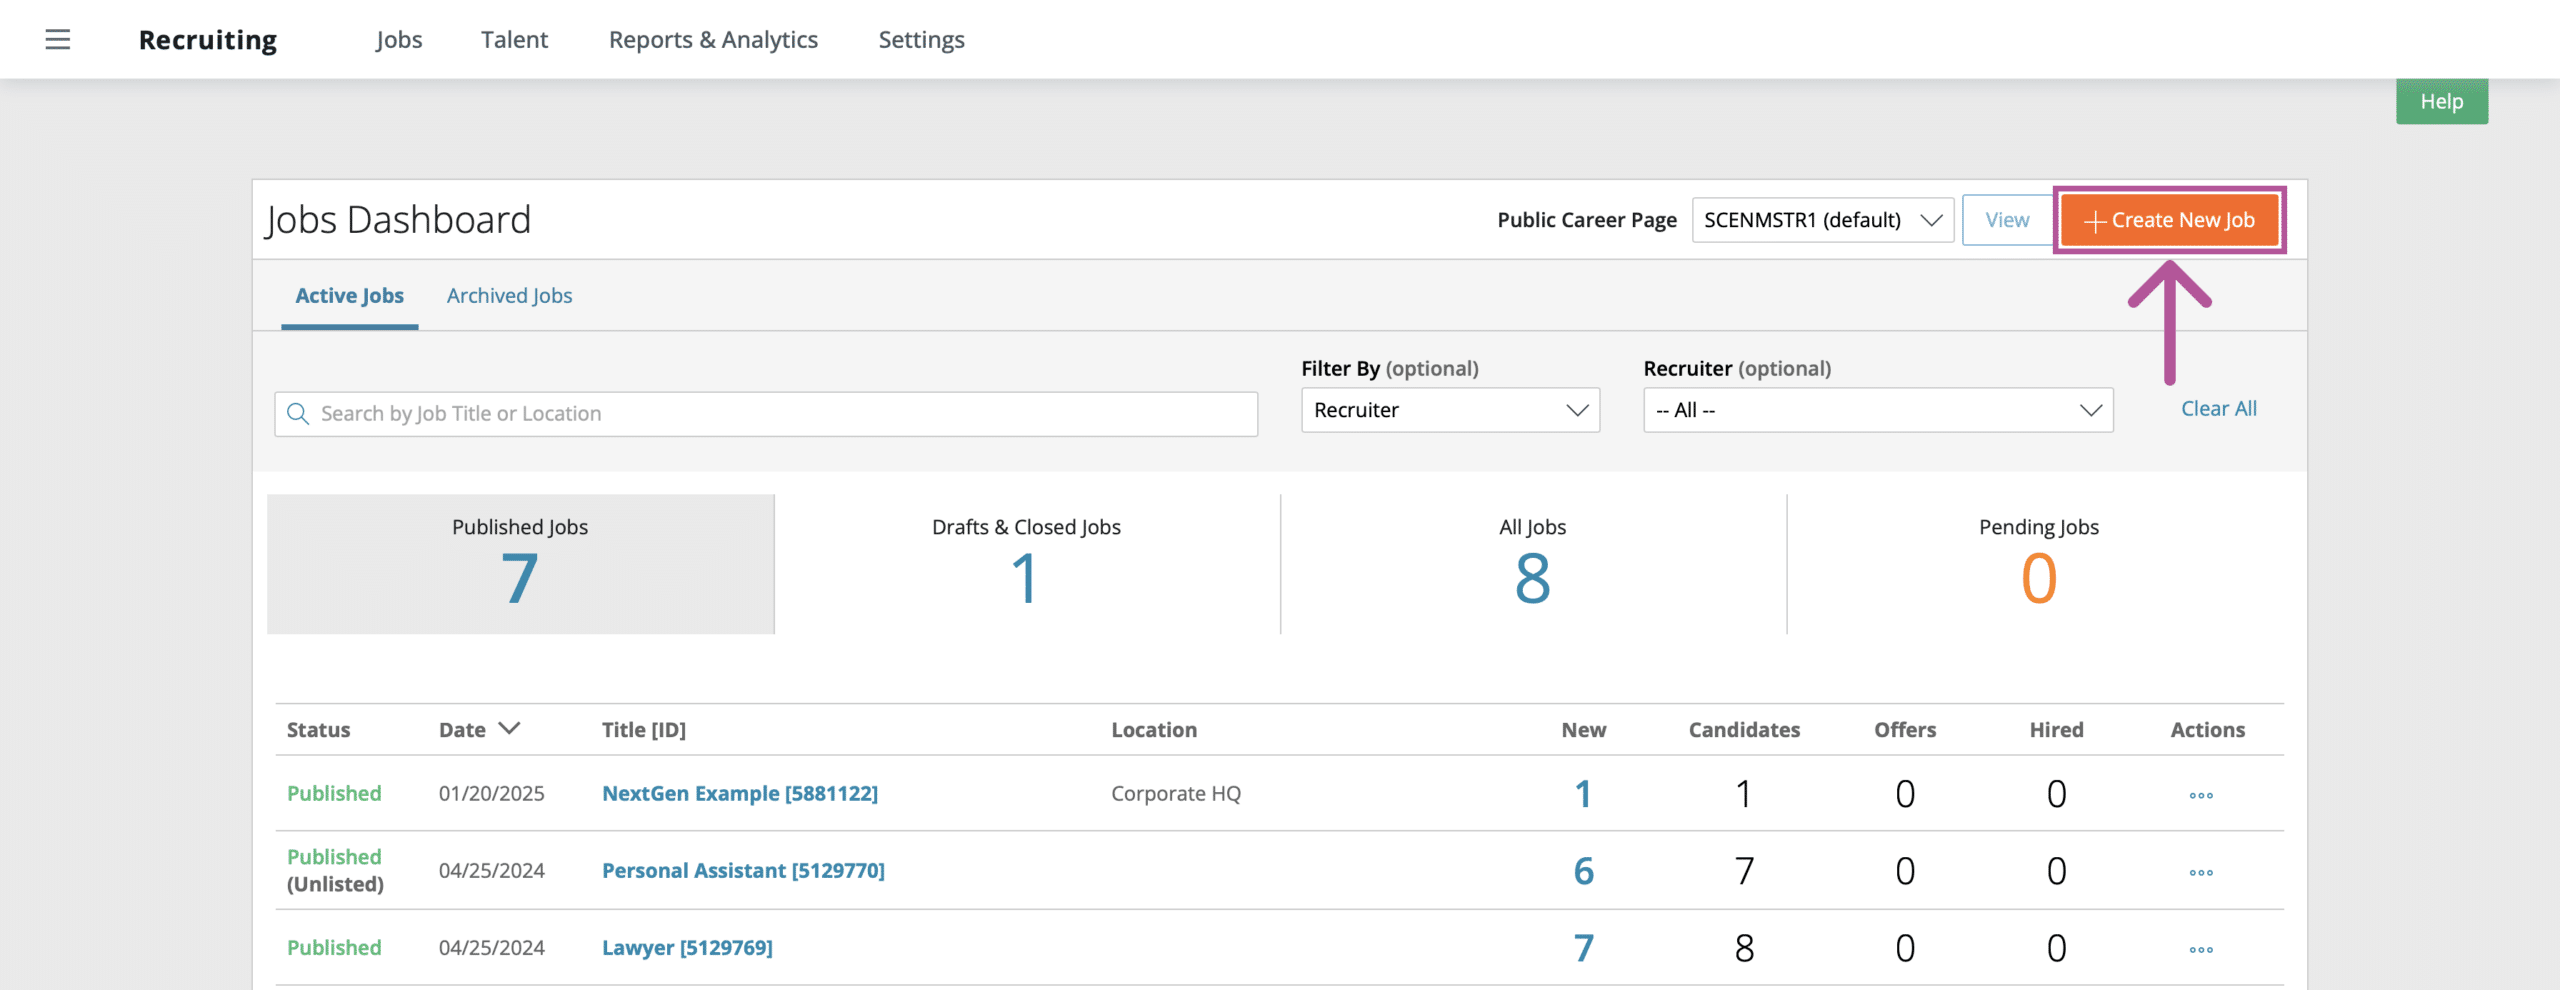
- Open the main navigation menu (located at the top-right of the screen), and click Recruiting > Jobs.
- Click Create New Job.
- Fill out the required information for each step in the job creation process until you reach the Assessments step.
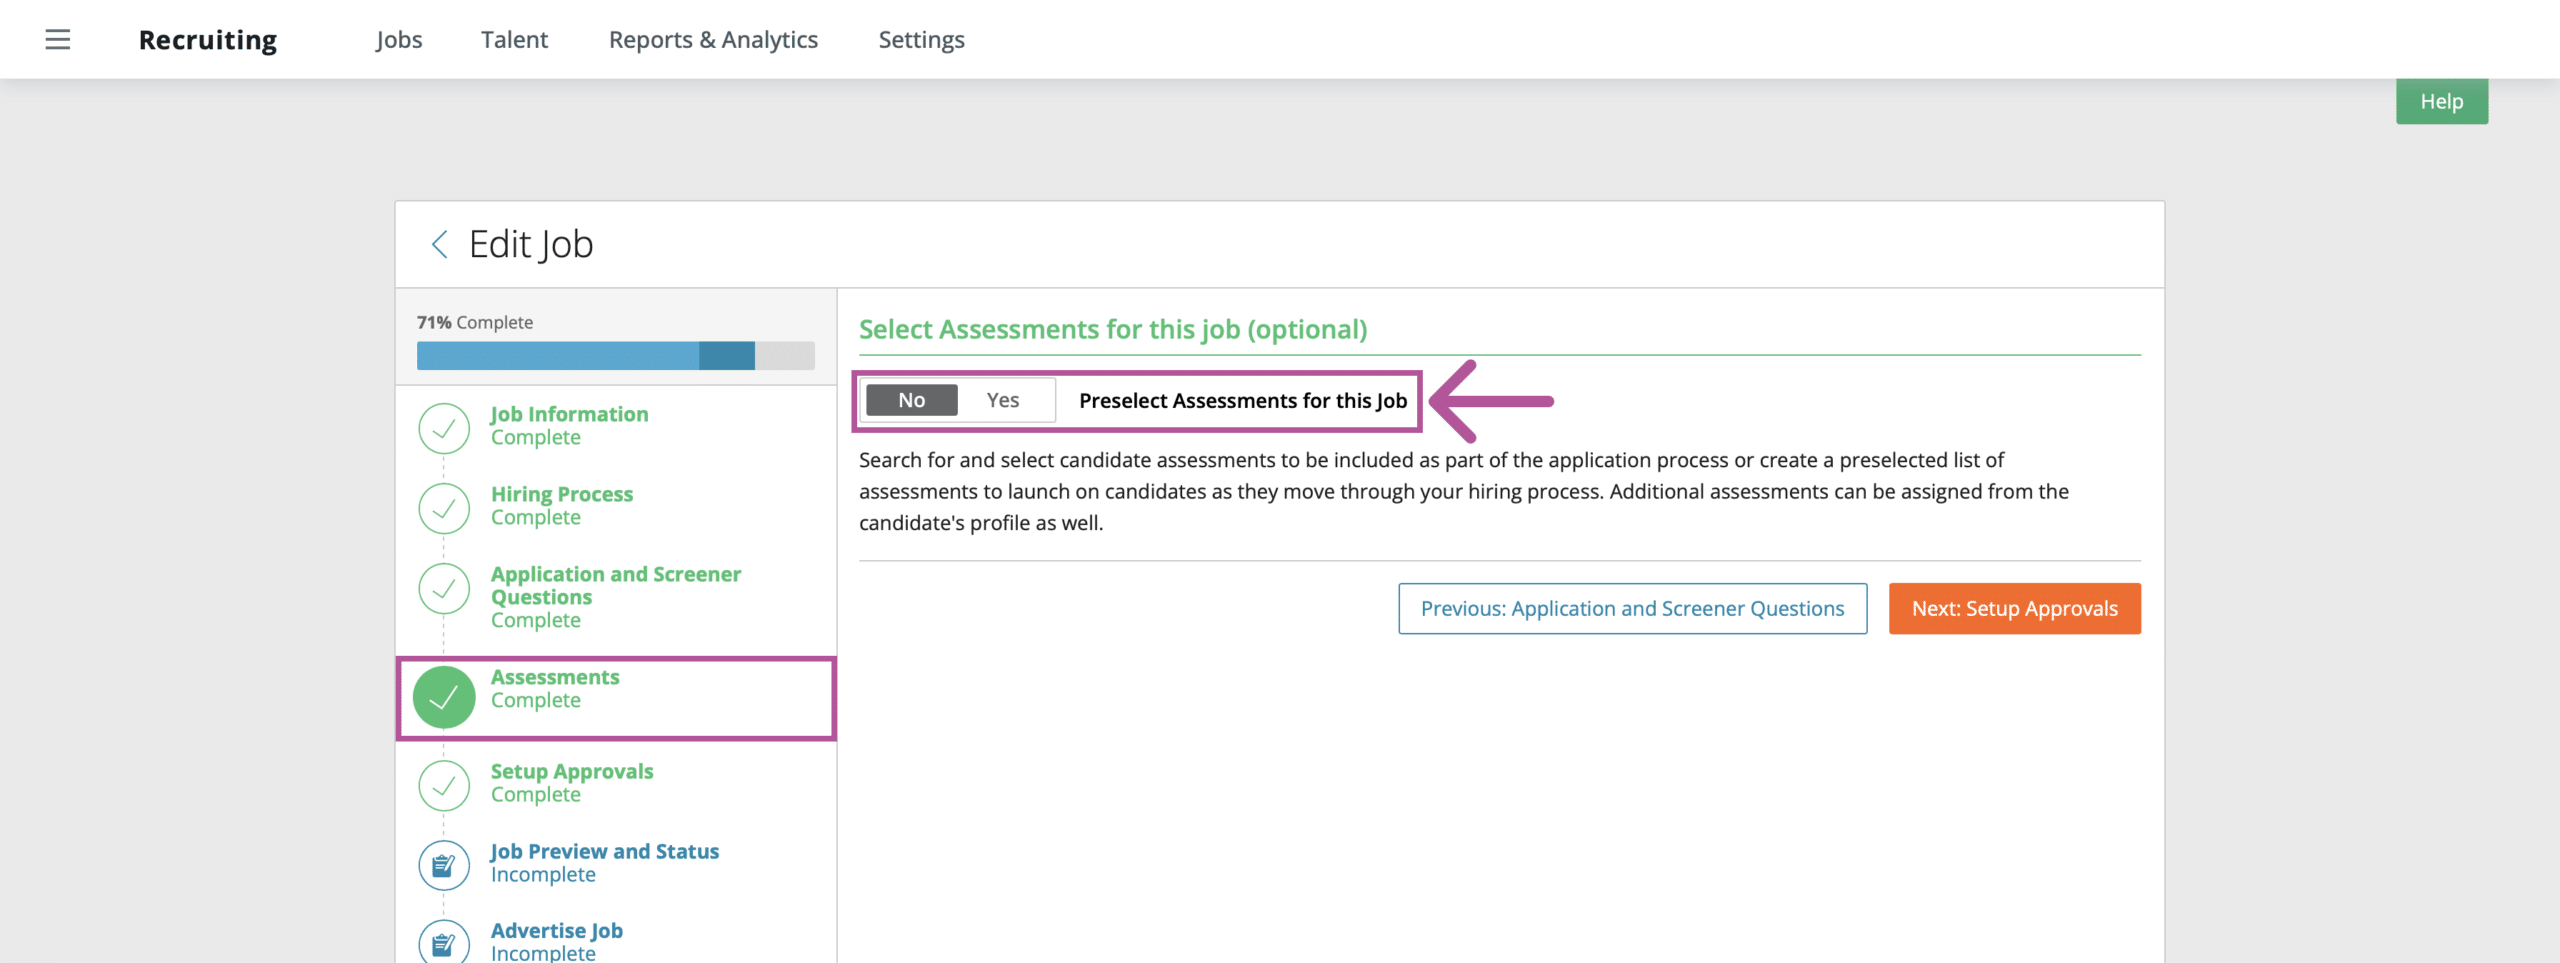
- Toggle Yes for the Preselect Assessments for this Job section.

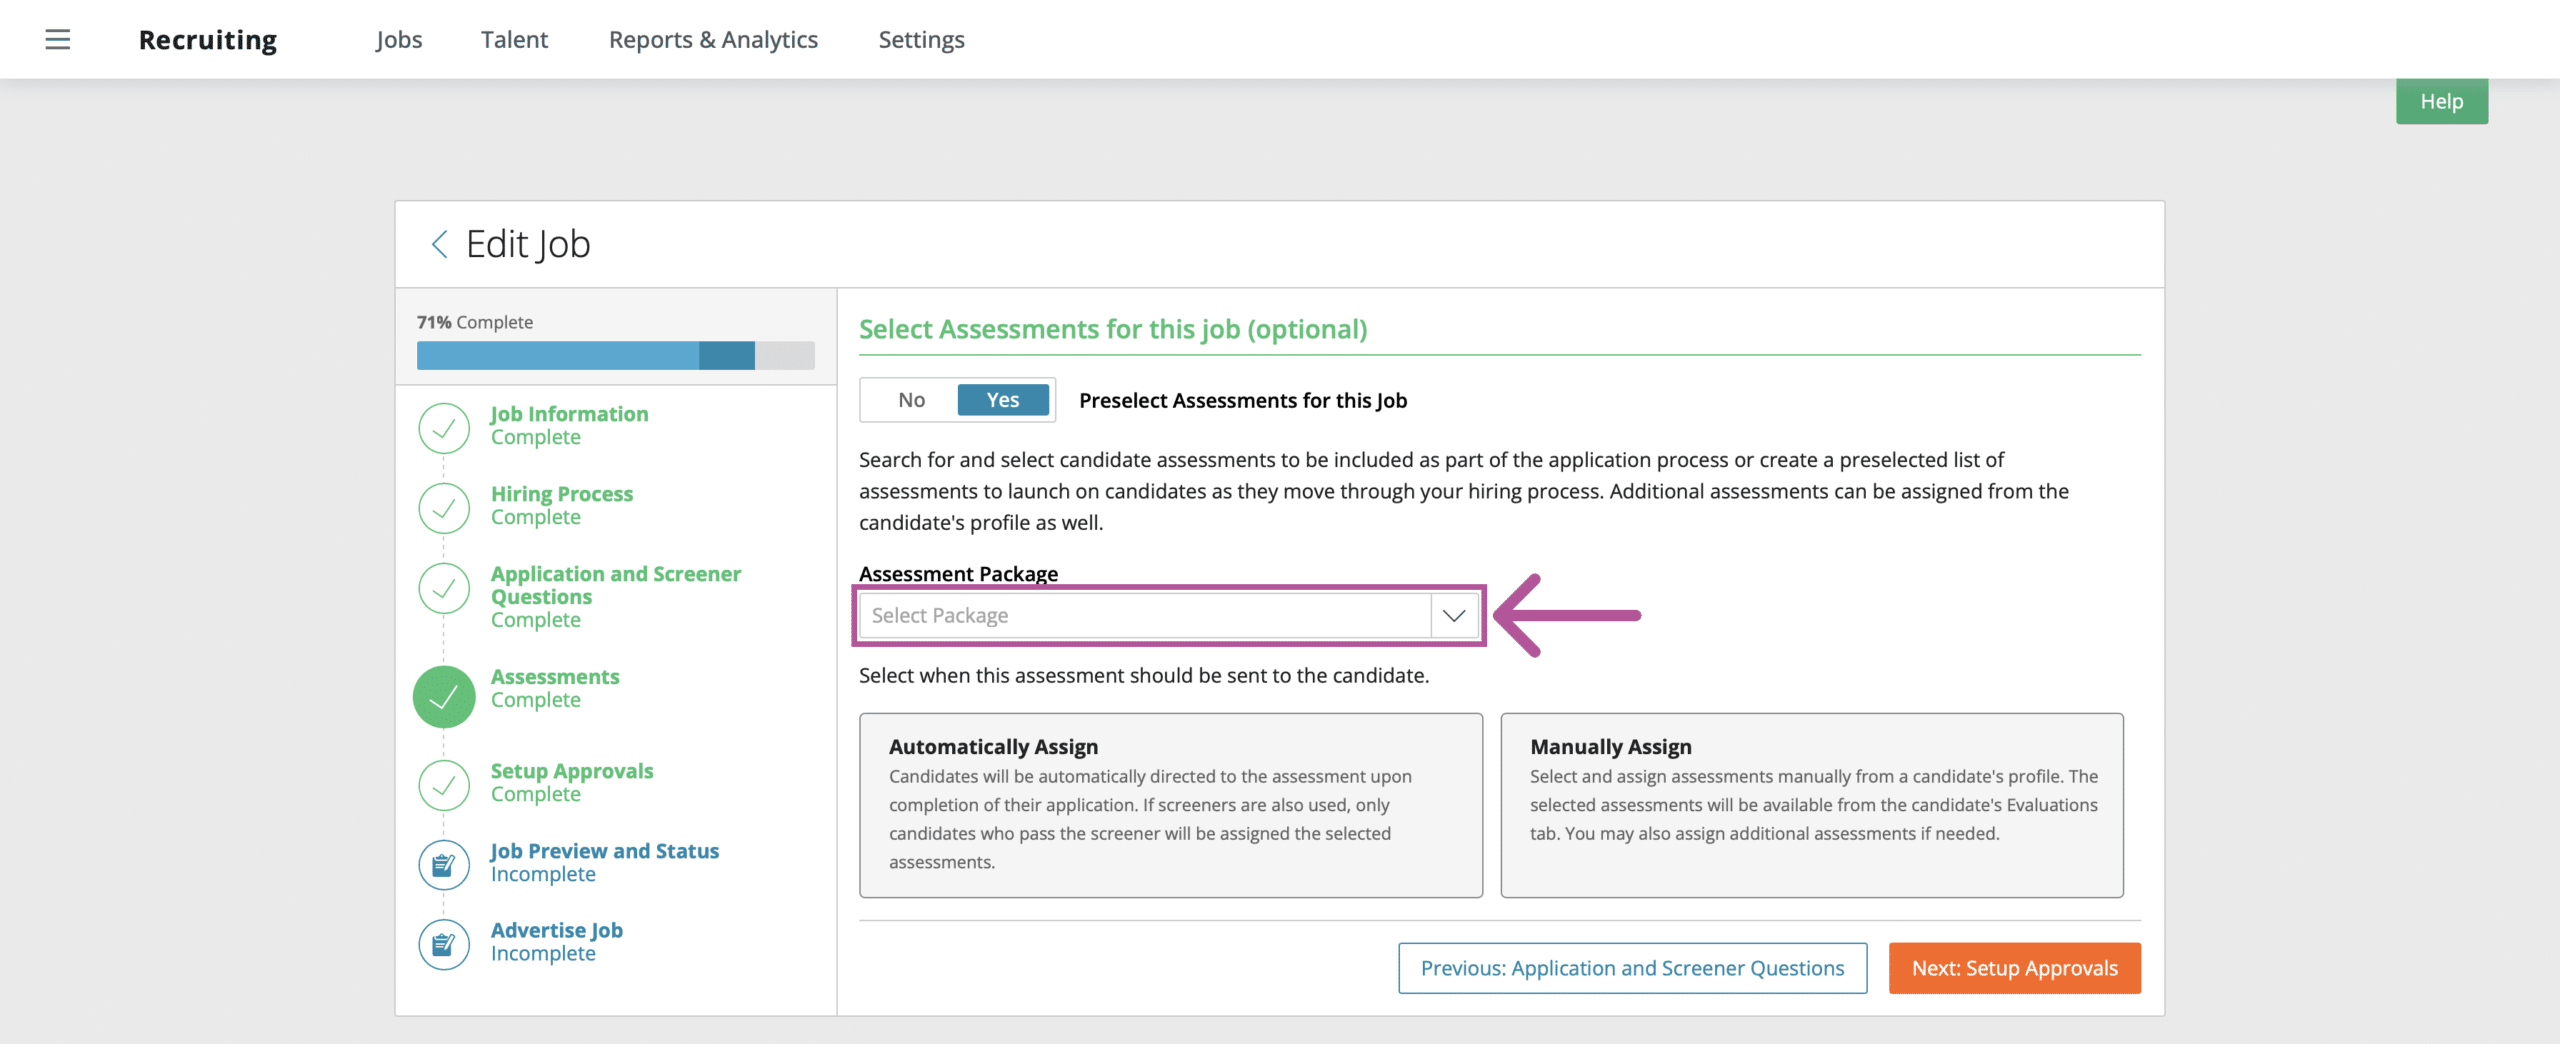
- All available assessment packages that have been synced by HighMatch via the API will be available in the Assessment Package drop-down menu for you to select which assessment applies to this job.

- Select the option in how the candidate will be sent the assessments.
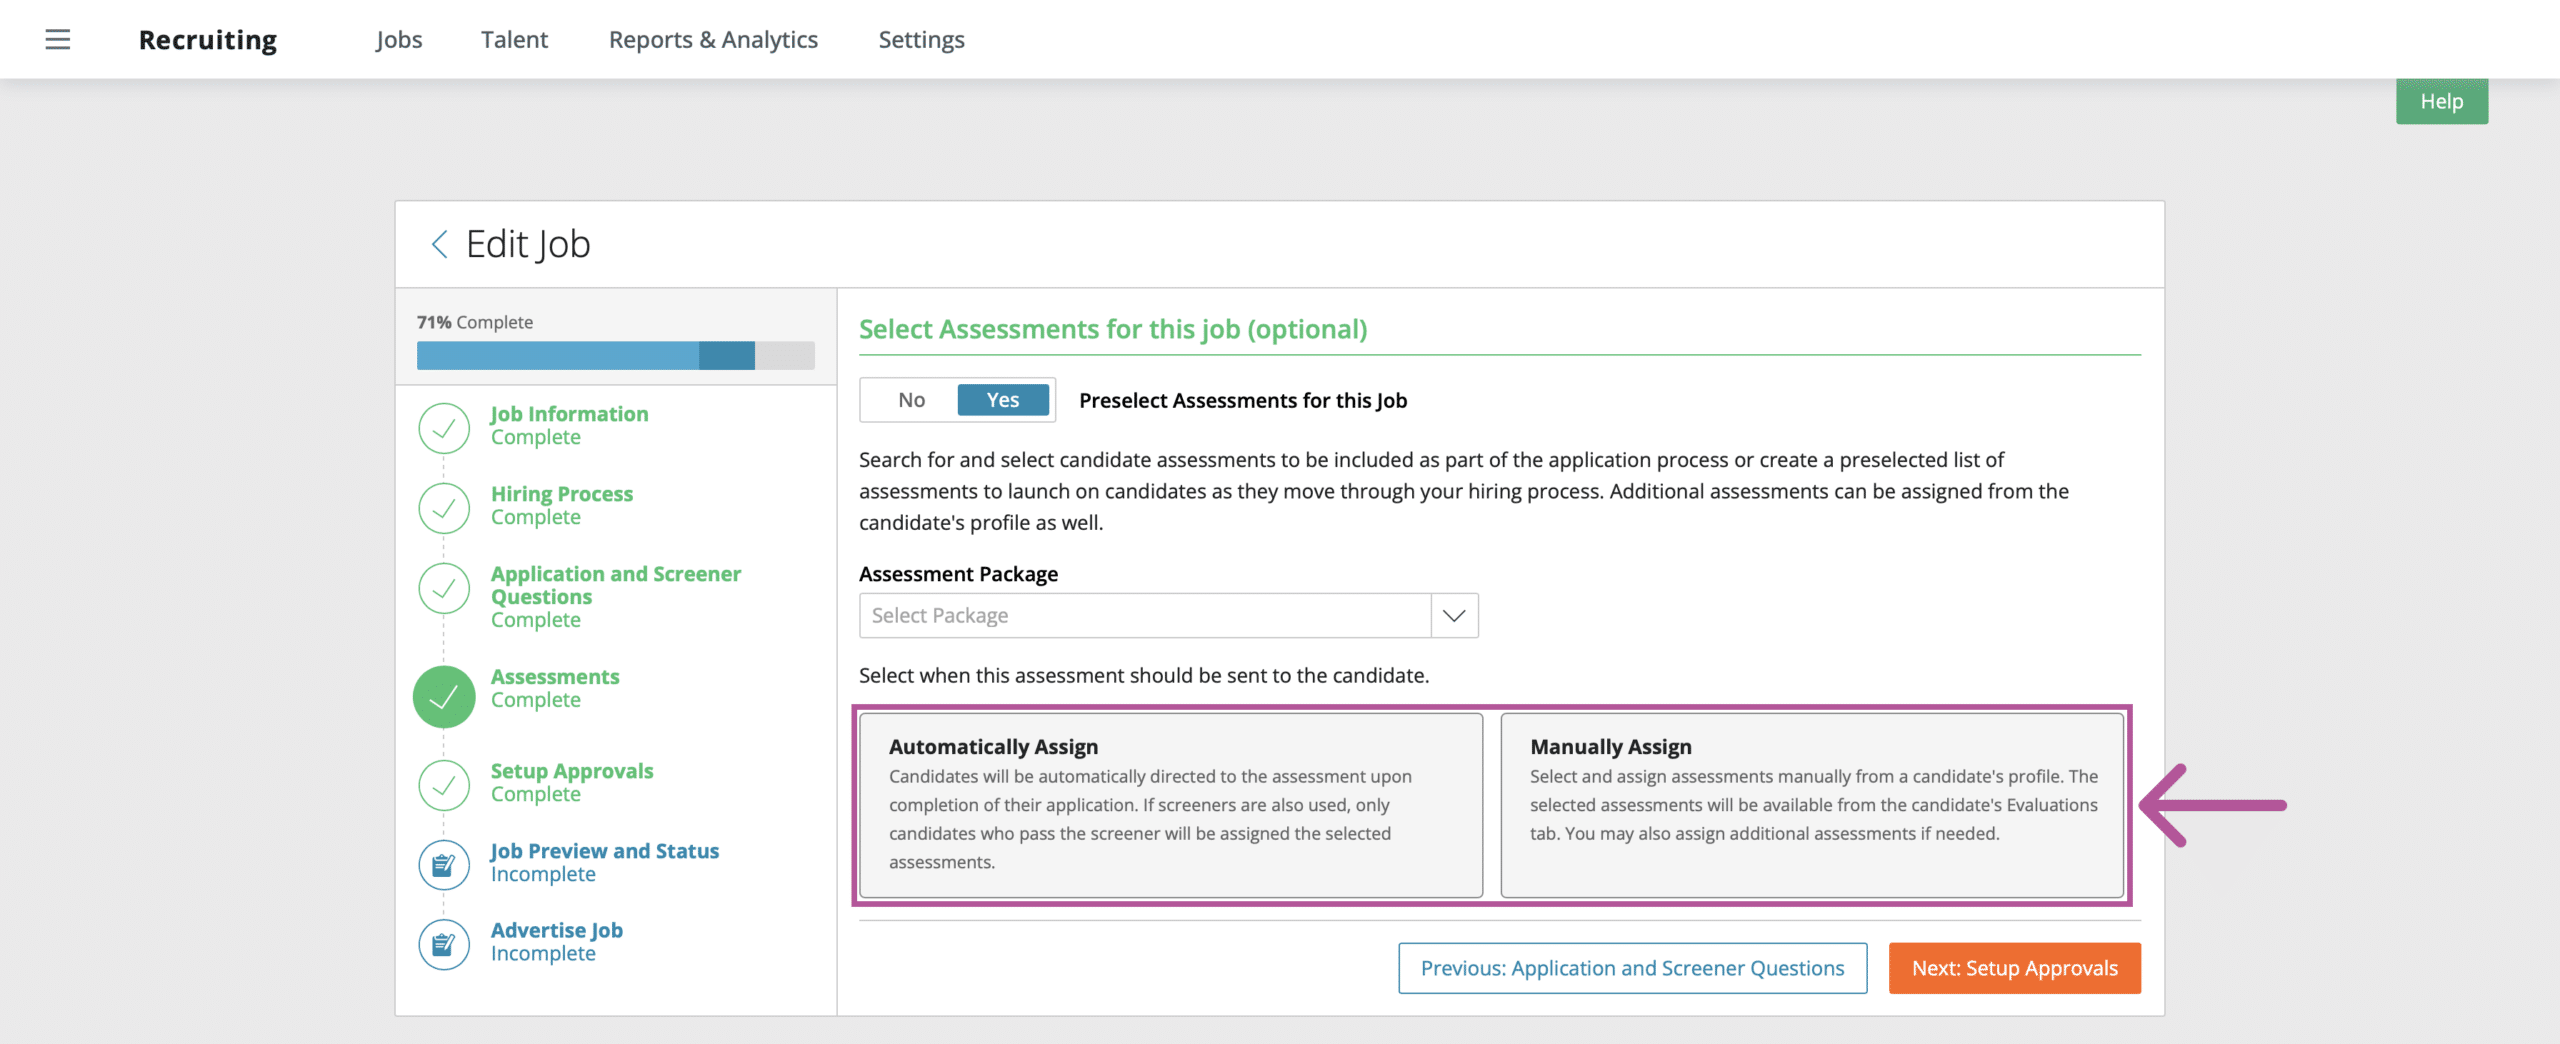
- Automatically Assign: this will trigger once the application is completed by a candidate or by a candidate who passes a screener taken during the application process. HighMatch will receive the request and send an invitation email to the candidate. The candidate will receive a Thank You message upon completion which will provide a link to the assessment or tell candidates to check their email for a link to the assessment from HighMatch (language used in the message can be customized).
- Note: If you have a screener in your application process and the candidate does not pass it, they will receive a Thank You message but will not be sent an assessment.
- Manually Assign: this will be up to the recruiter to manually order the assessments for candidates. This is good to use when you only want to assess candidates after a certain step in the hiring process.
- Automatically Assign: this will trigger once the application is completed by a candidate or by a candidate who passes a screener taken during the application process. HighMatch will receive the request and send an invitation email to the candidate. The candidate will receive a Thank You message upon completion which will provide a link to the assessment or tell candidates to check their email for a link to the assessment from HighMatch (language used in the message can be customized).

- Once done, go on to the next step to save and finish filling out the rest of the steps in the job creation process.
Optional: If you have determined adding an assessment to an existing job is necessary, follow these steps:
- Open the main navigation menu (located at the top-right of the screen), and click Recruiting > Jobs.
- Go to the job that you wish to add an assessment to.
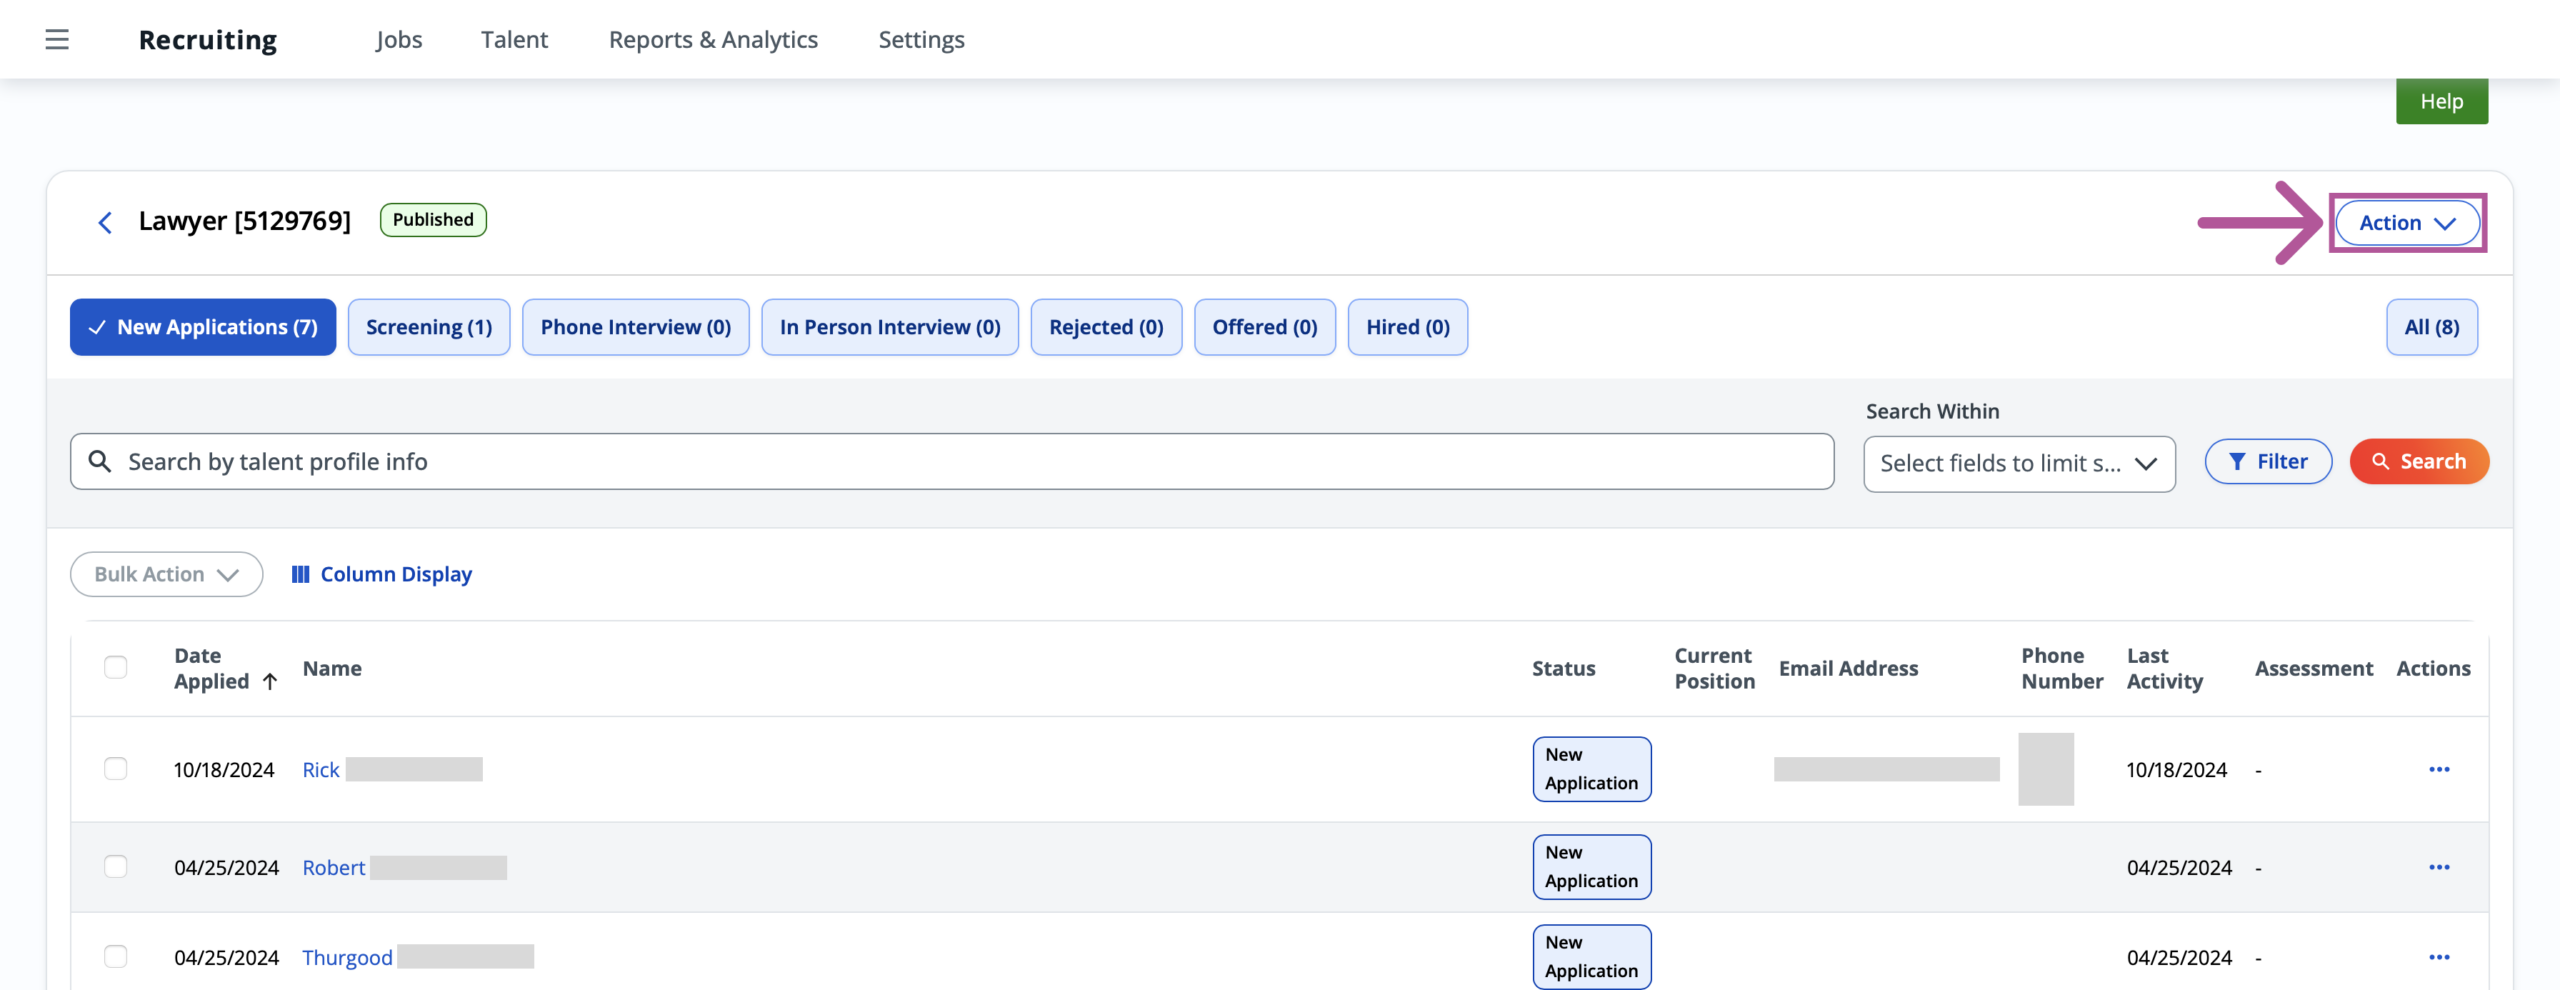
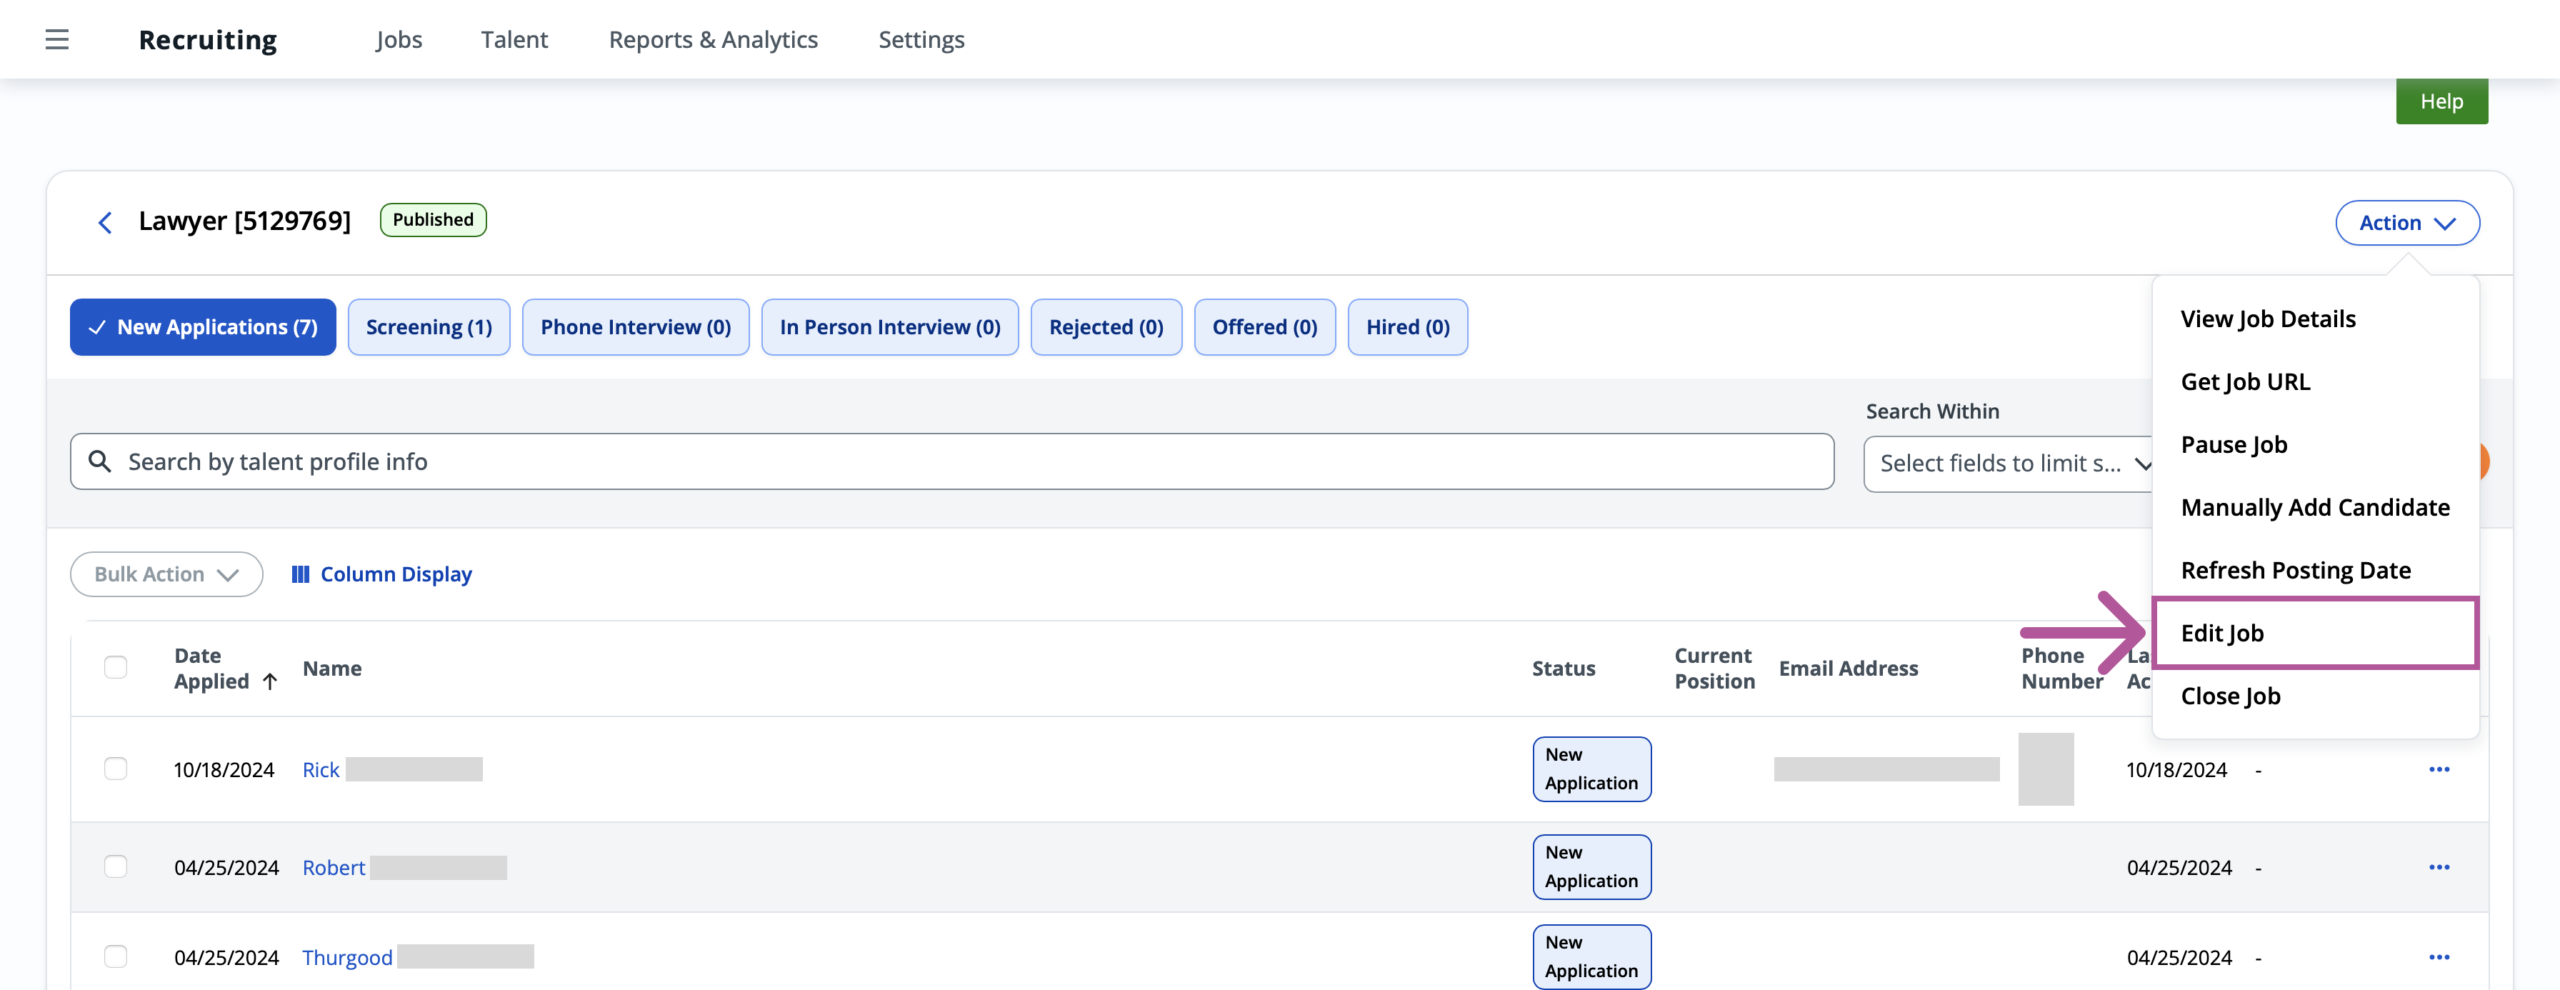
- Once in the job, click the Action dropdown menu > Edit Job.
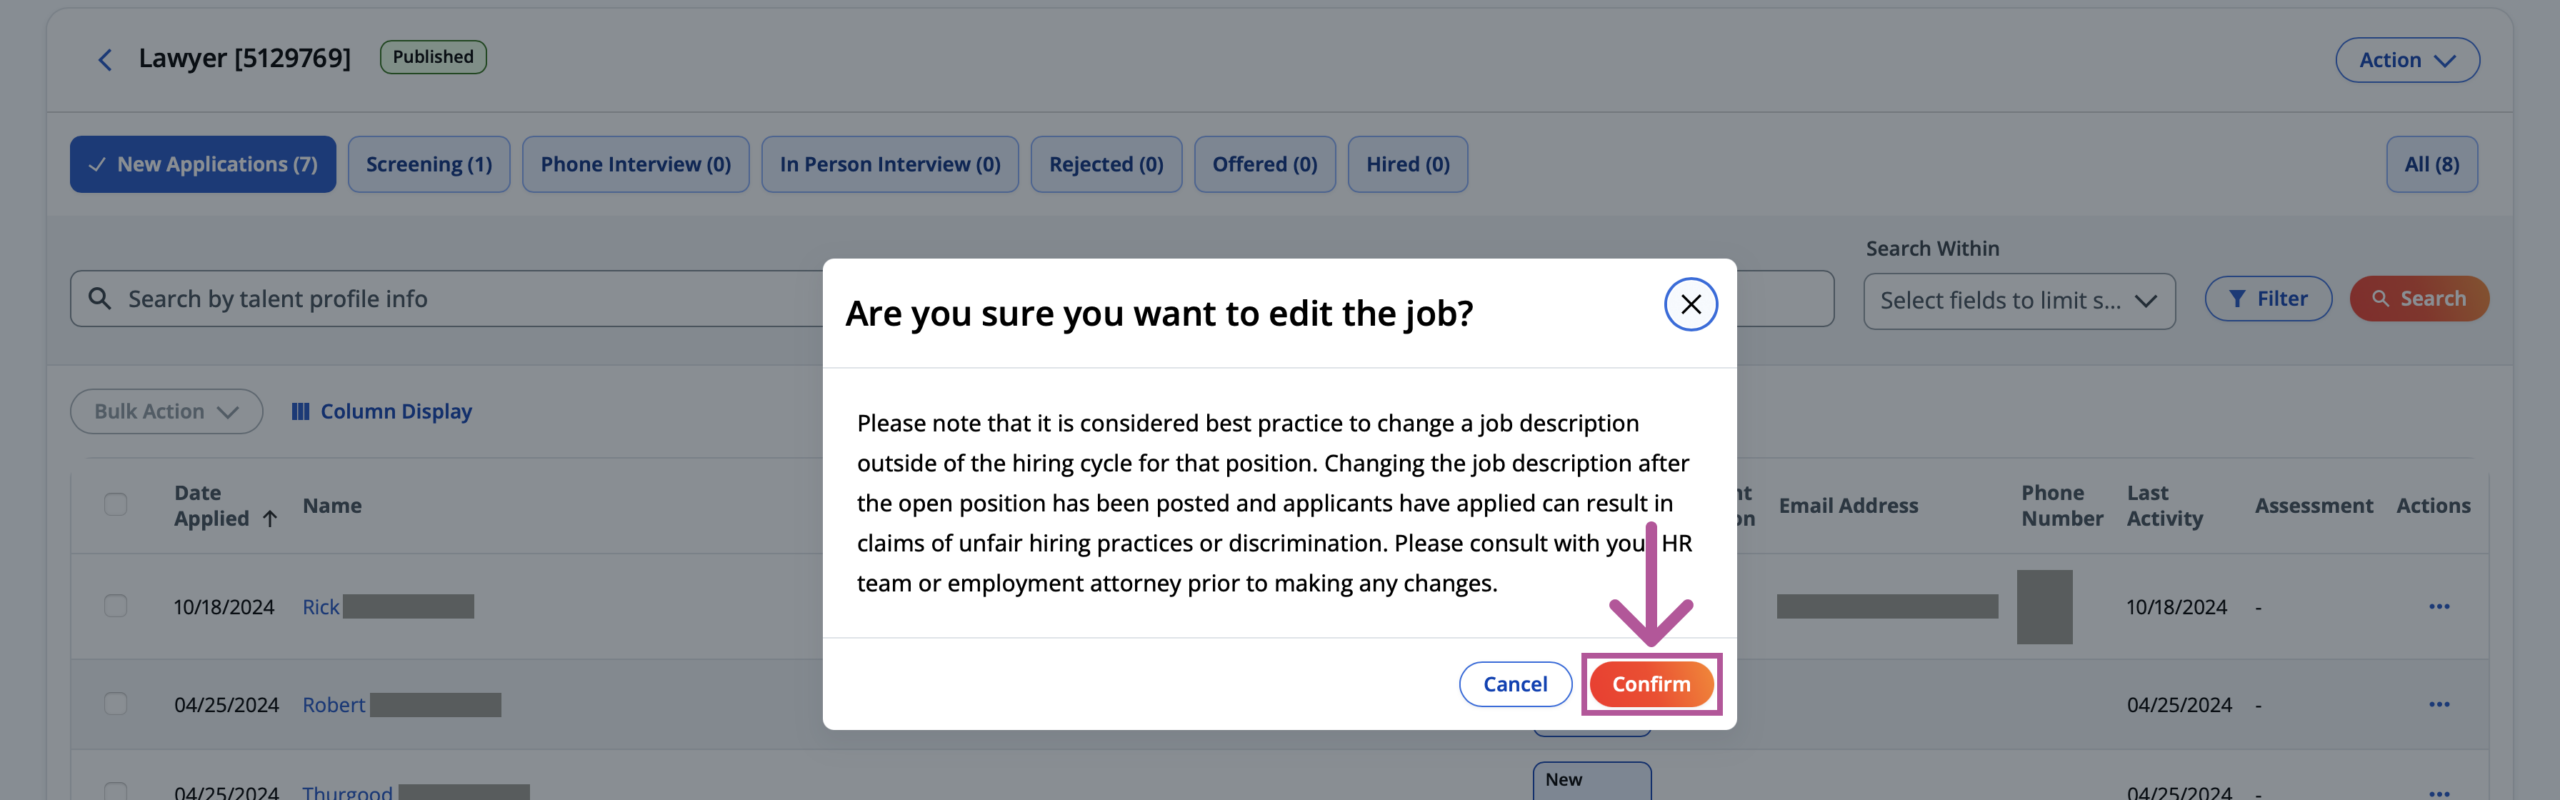
- Review the “Are you sure you want to edit the job” popup and click Confirm.
- Update the necessary information for each step from the job creation process or skip each step until you reach the Assessments step.
- Toggle Yes for the Preselect Assessments for this Job section.
- All available assessment packages that have been synced by HighMatch will be available in the Assessment Package drop-down menu for you to select which assessment applies to this job.
- Select the option in how the candidate will be sent the assessments.
- Automatically Assign: this will trigger once the application is completed by a candidate or by a candidate who passes a screener taken during the application process (if applicable). HighMatch will receive the request and send an invitation email to the candidate. The candidate will receive a Thank You message upon completion which will provide a link to the assessment or tell candidates to check their email for a link to the assessment from HighMatch (language used in the message can be customized).
- Note: If you have a screener in your application process and the candidate does not pass it, they will receive a Thank You message but will not be sent an assessment.
- Manually Assign: this will be up to the recruiter to manually order the assessments for candidates. This is good to use when you only want to assess candidates after a certain step in the hiring process.
- Automatically Assign: this will trigger once the application is completed by a candidate or by a candidate who passes a screener taken during the application process (if applicable). HighMatch will receive the request and send an invitation email to the candidate. The candidate will receive a Thank You message upon completion which will provide a link to the assessment or tell candidates to check their email for a link to the assessment from HighMatch (language used in the message can be customized).
- Once done, continue to the end of this process to save your changes.
Step 2: Ordering and Sending Assessments Manually
This step is optional. If Automatically Assign was selected in the Assessments step during the job creation process or if you do not wish to learn how to manually order and send assessments to candidates, please move on to Step 3.
We recommend reviewing this step even if Automatically Assign was selected since there may be situations where assessments may still need to be ordered and sent manually to a candidate.
It is important to note that there are two methods for manually ordering and sending assessments to candidates.
Method 1:
This method is best for selecting multiple candidates within a job and/or multiple candidates in a certain hiring stage within a job:
- Go to the job that contains the candidate(s) you wish to send the assessment(s) to.
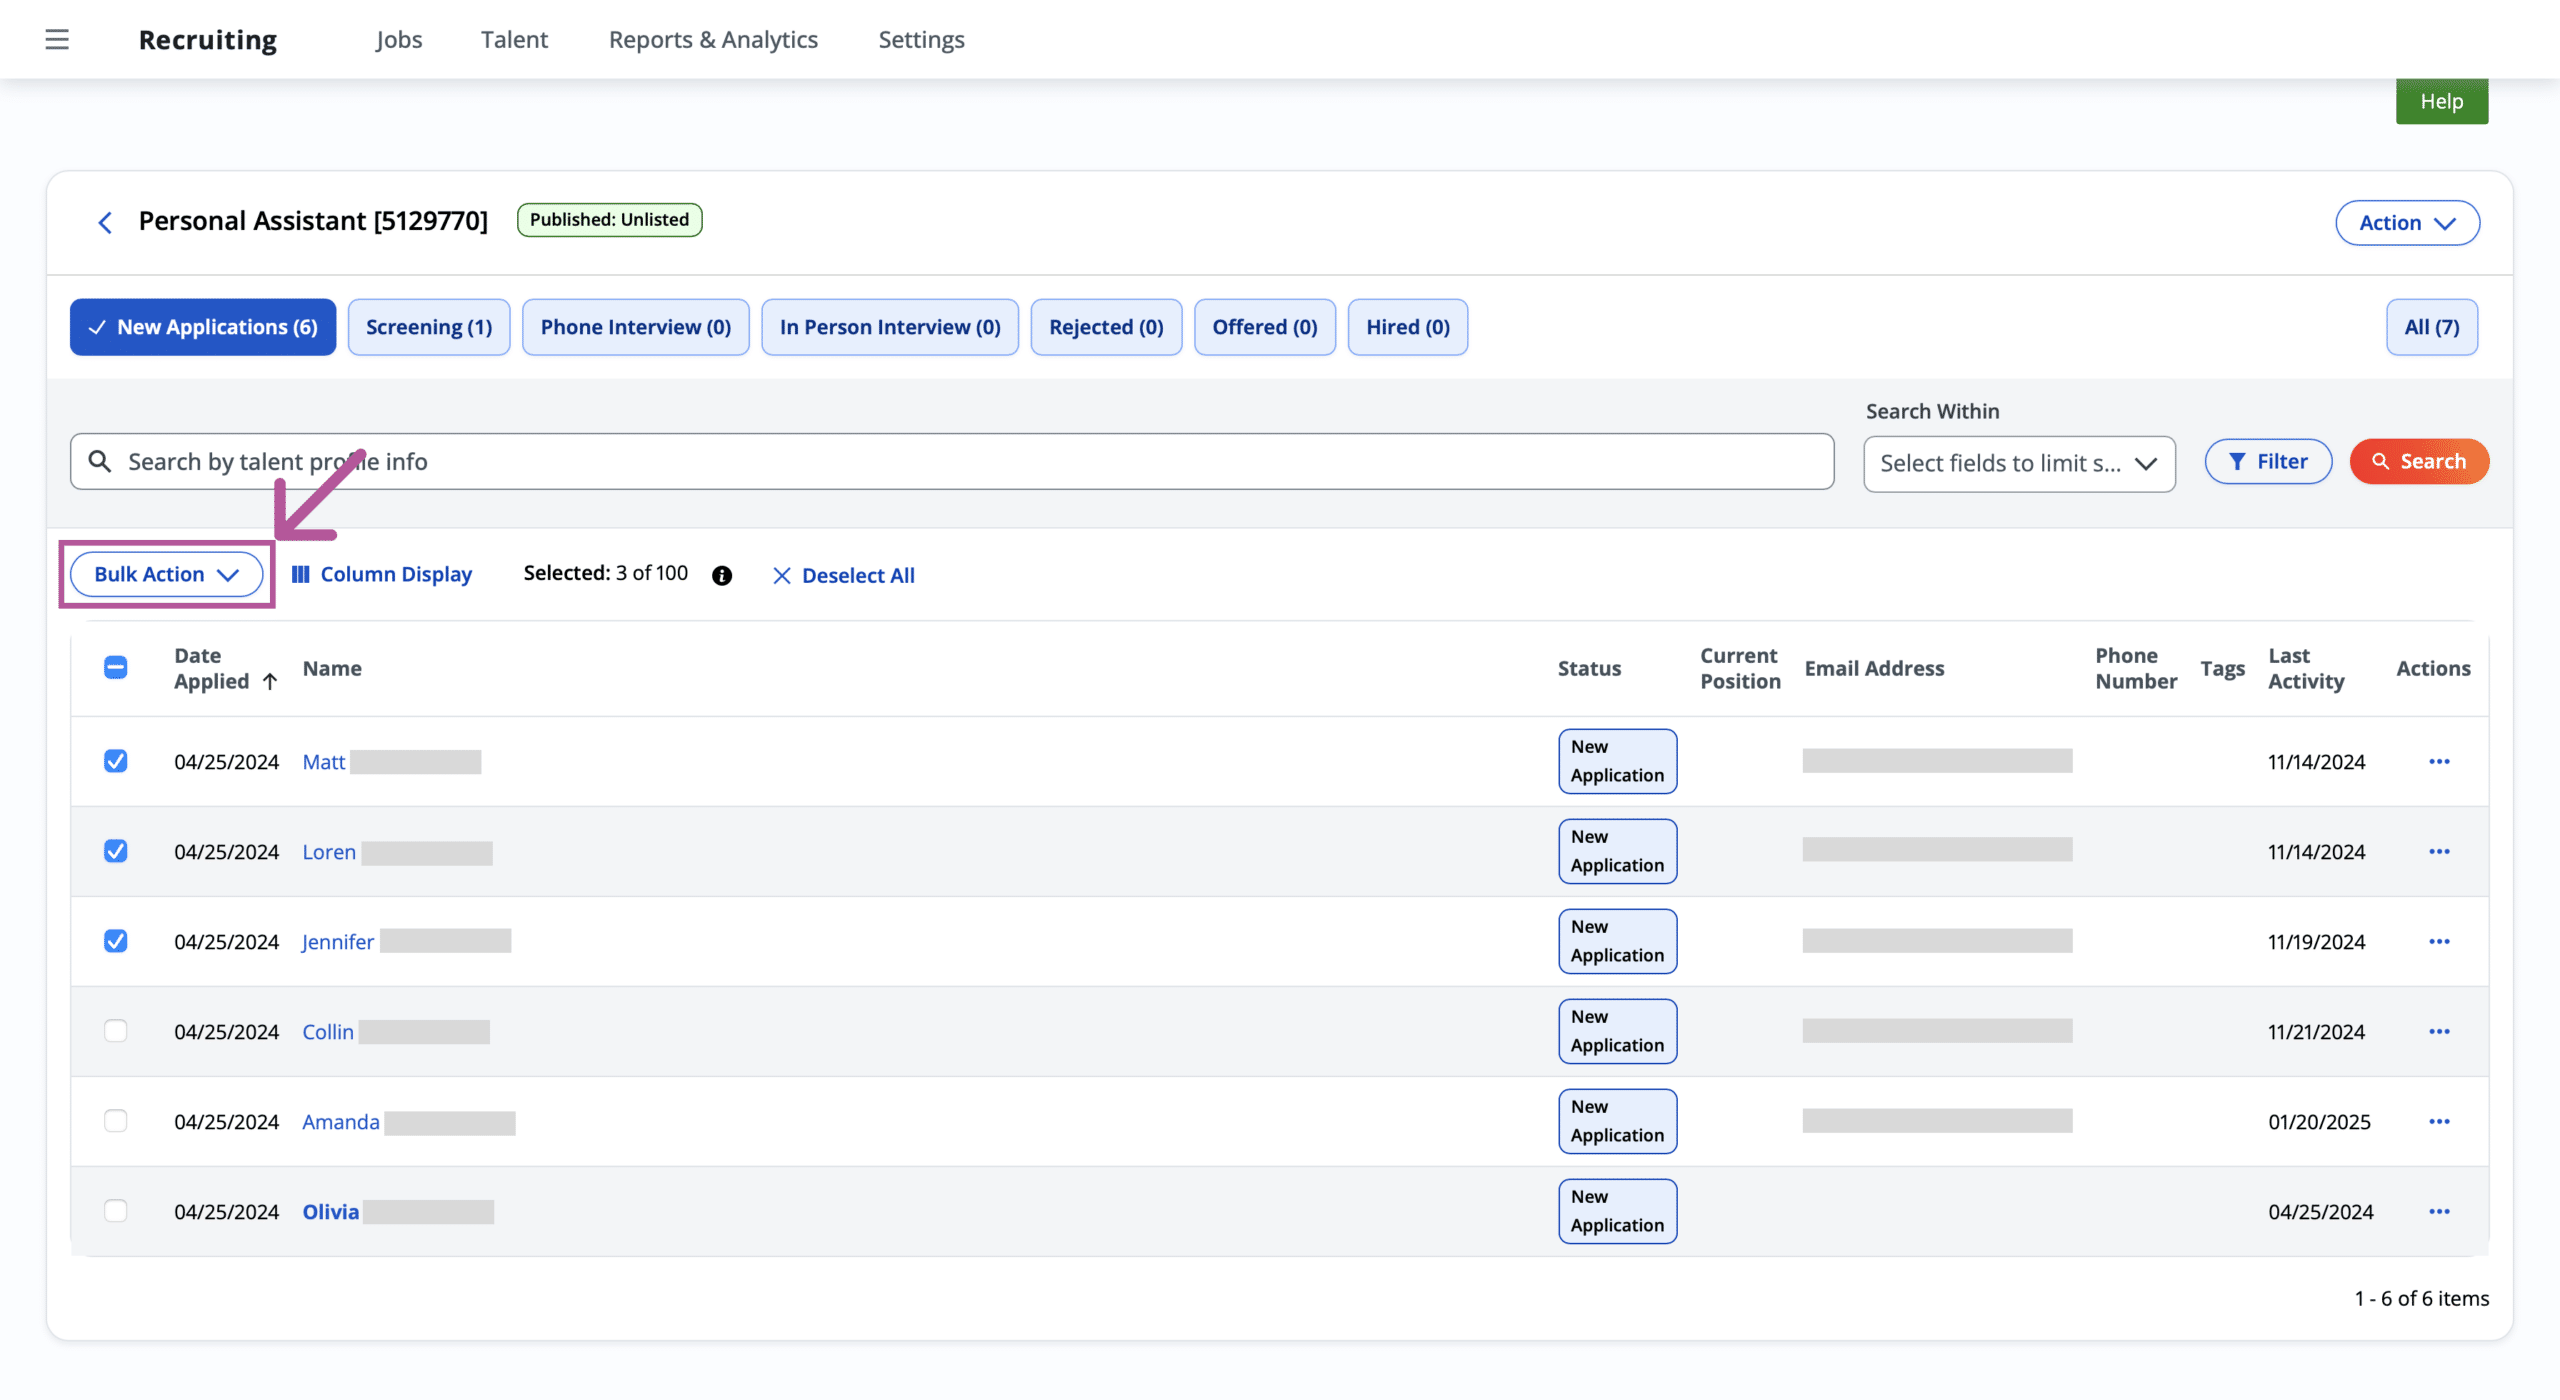
- Select the candidate(s) using the bulk selection tool.

- Once the candidate(s) have been selected, click the Bulk Action dropdown menu > Assign Assessment.

- Select the assessment you wish to send to the candidate.
- Note: By default the assessment package that was selected in the Assessment step in the job creation process will automatically be selected but you can select any assessment you have synced with your account using the Package dropdown menu.
- Tip: Paylocity will alert you if a candidate has already taken an assessment.

- Click Assign.
- The assessment has now been ordered and HighMatch will send an email invitation to the candidate(s) that were selected.
- Note: The bulk selection tool can be used in any hiring stage you wish. For example, if you wish to send an assessment to candidates who have entered a Screening stage for your hiring process, you can go to that hiring stage, bulk select all candidates currently in that stage and manually send them all assessments. Paylocity will alert you if a candidate has already taken an assessment.
Method 2:
This is best if you wish to send an assessment to a single specific candidate:
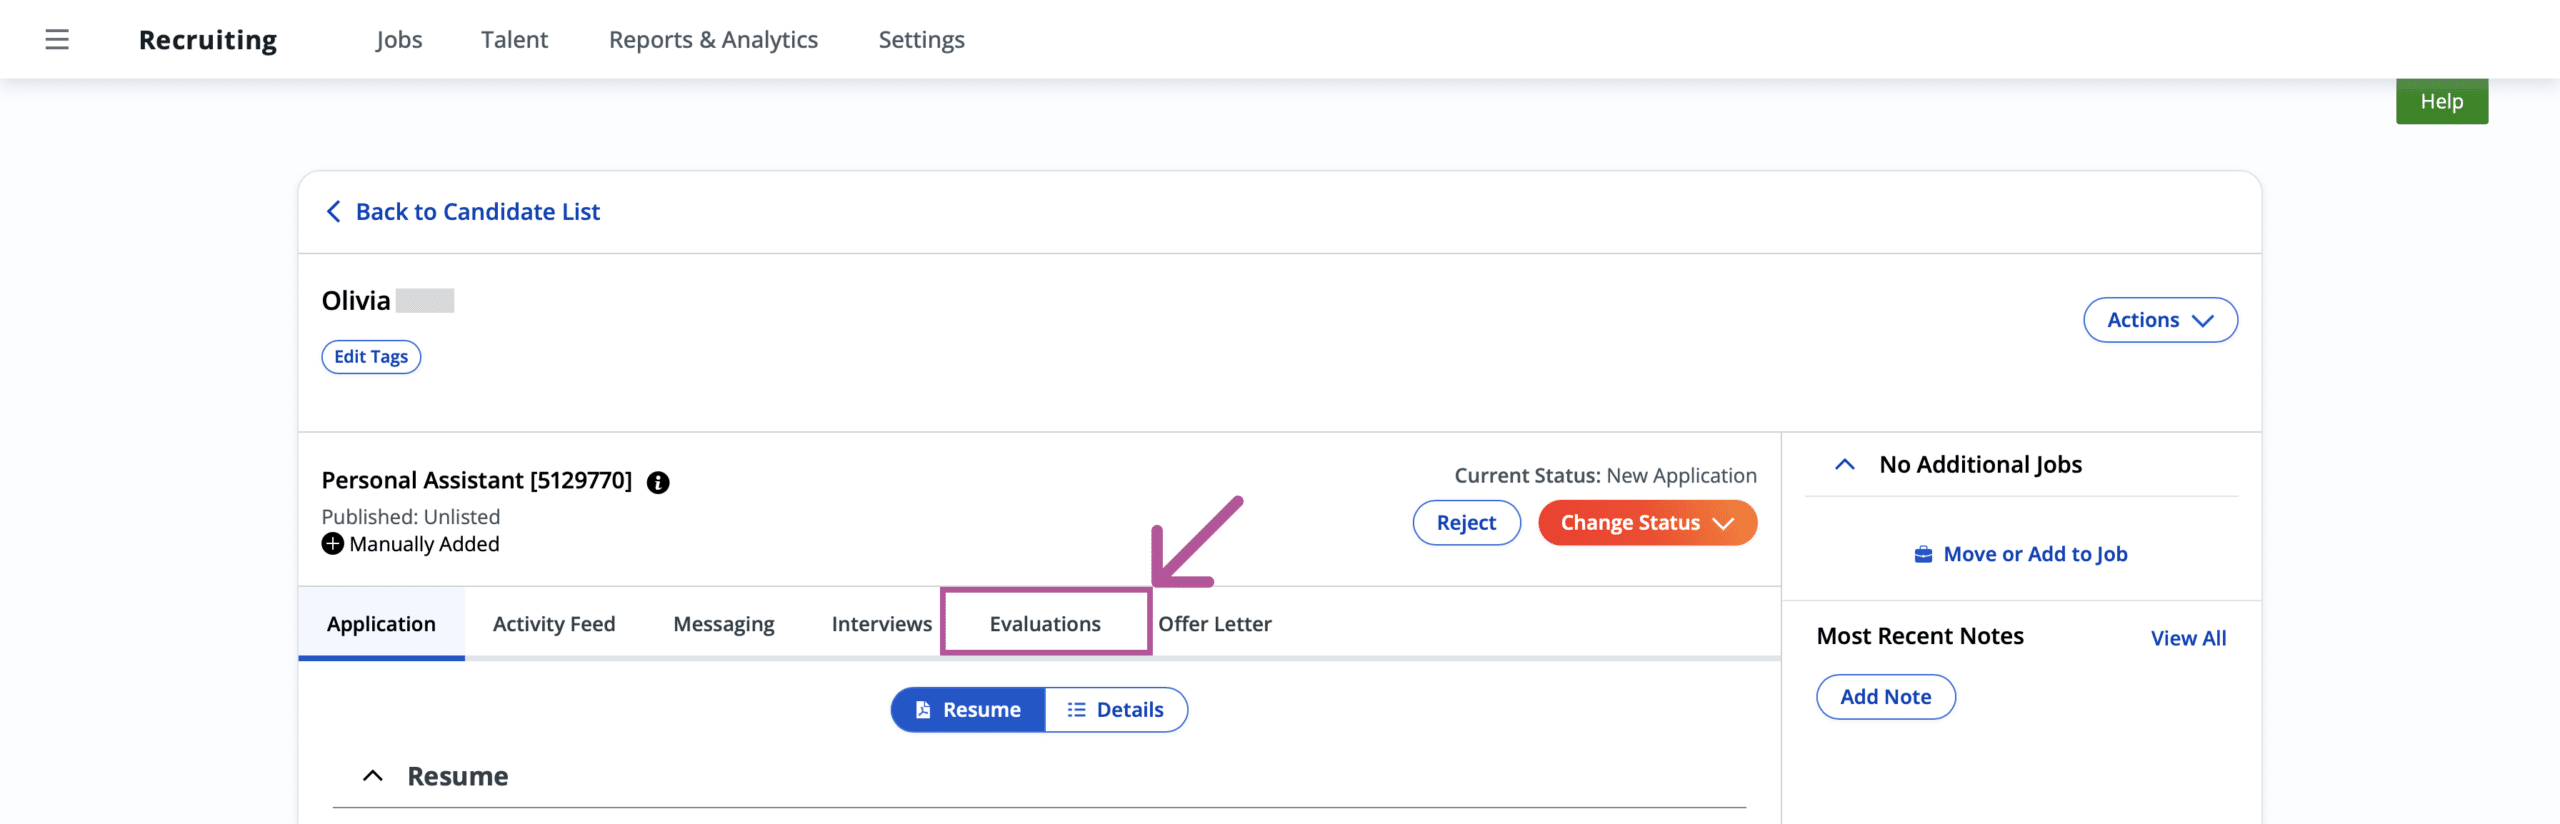
- Go to the candidate’s profile in the Talent menu of who you wish to send the assessment(s) to.
- Click the Evaluation tab > Assessment button.
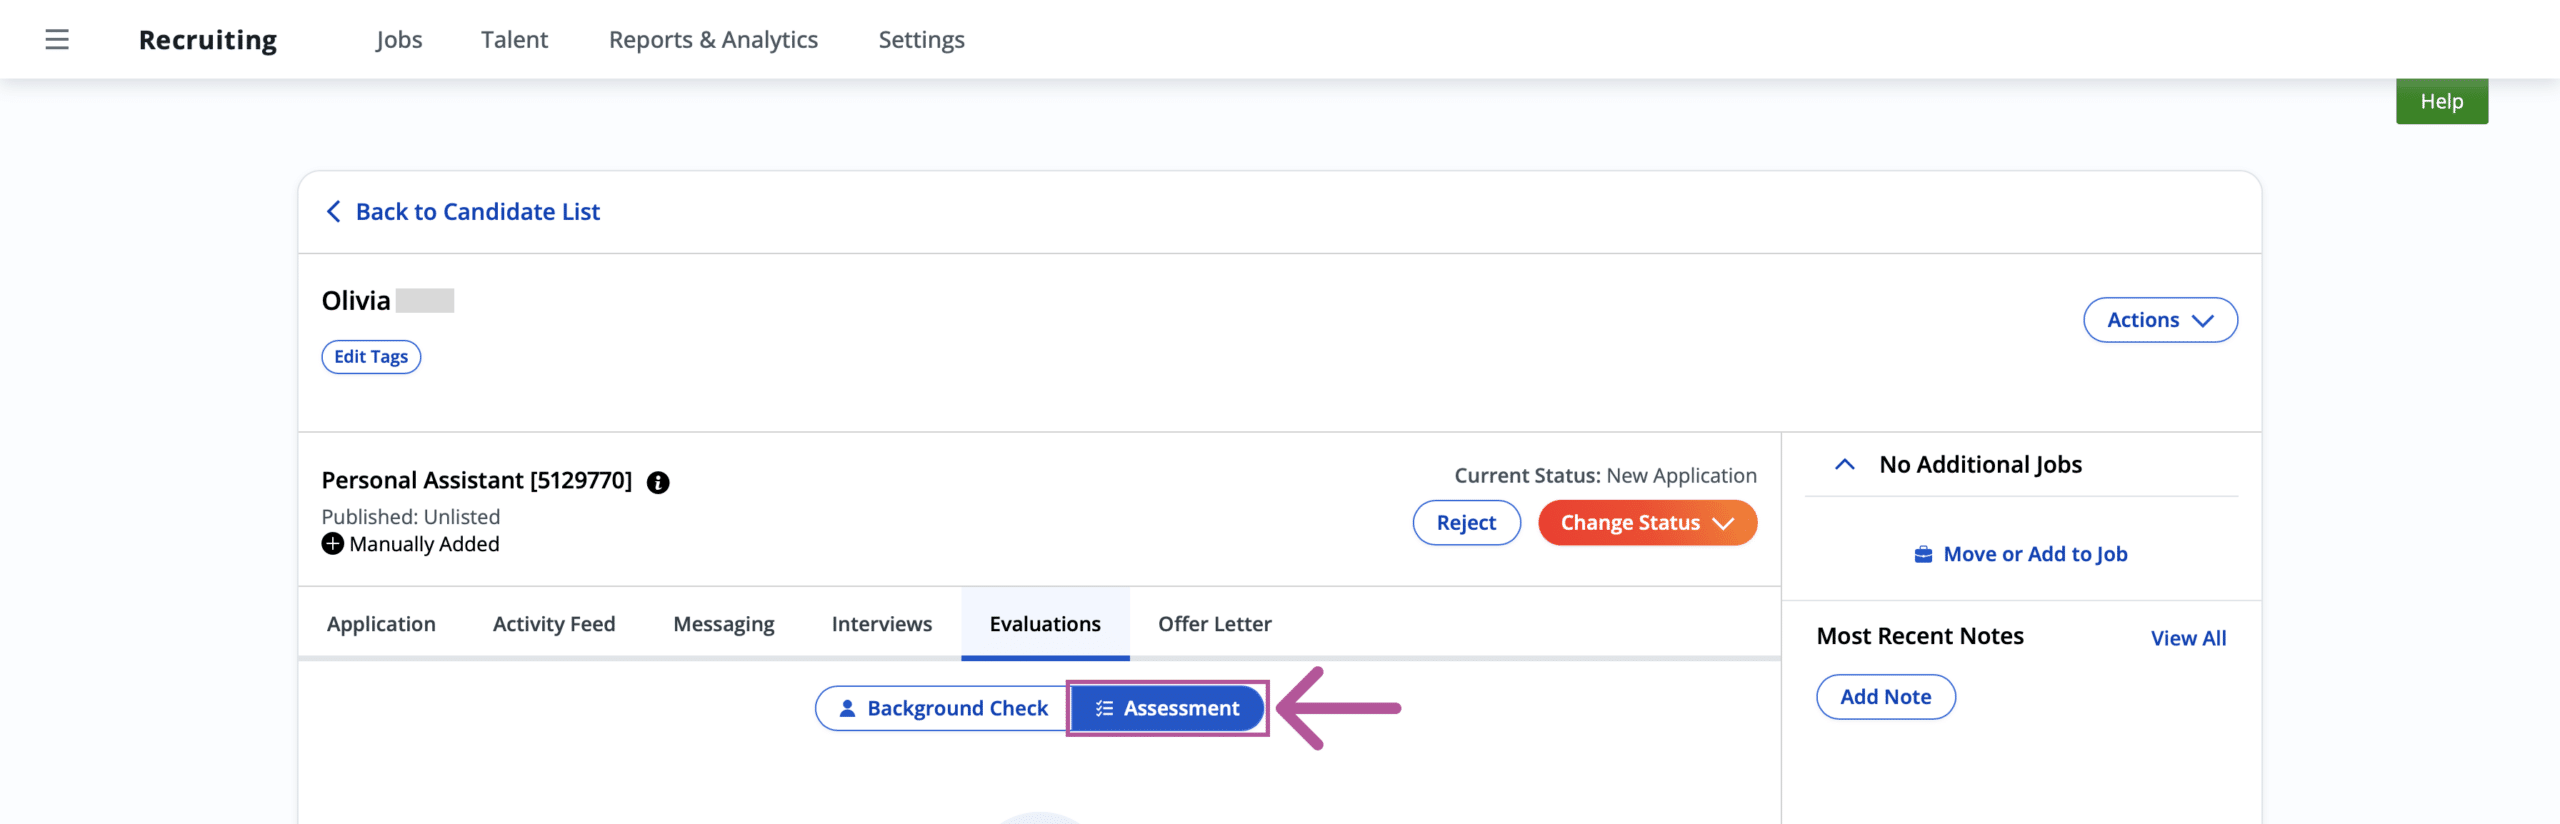
- Click Assign Assessment.
Note: The Assign Assessment button is available on both:
A candidate’s profile that has not been sent an assessment before.

A candidate’s profile that has been sent and has taken assessments before.
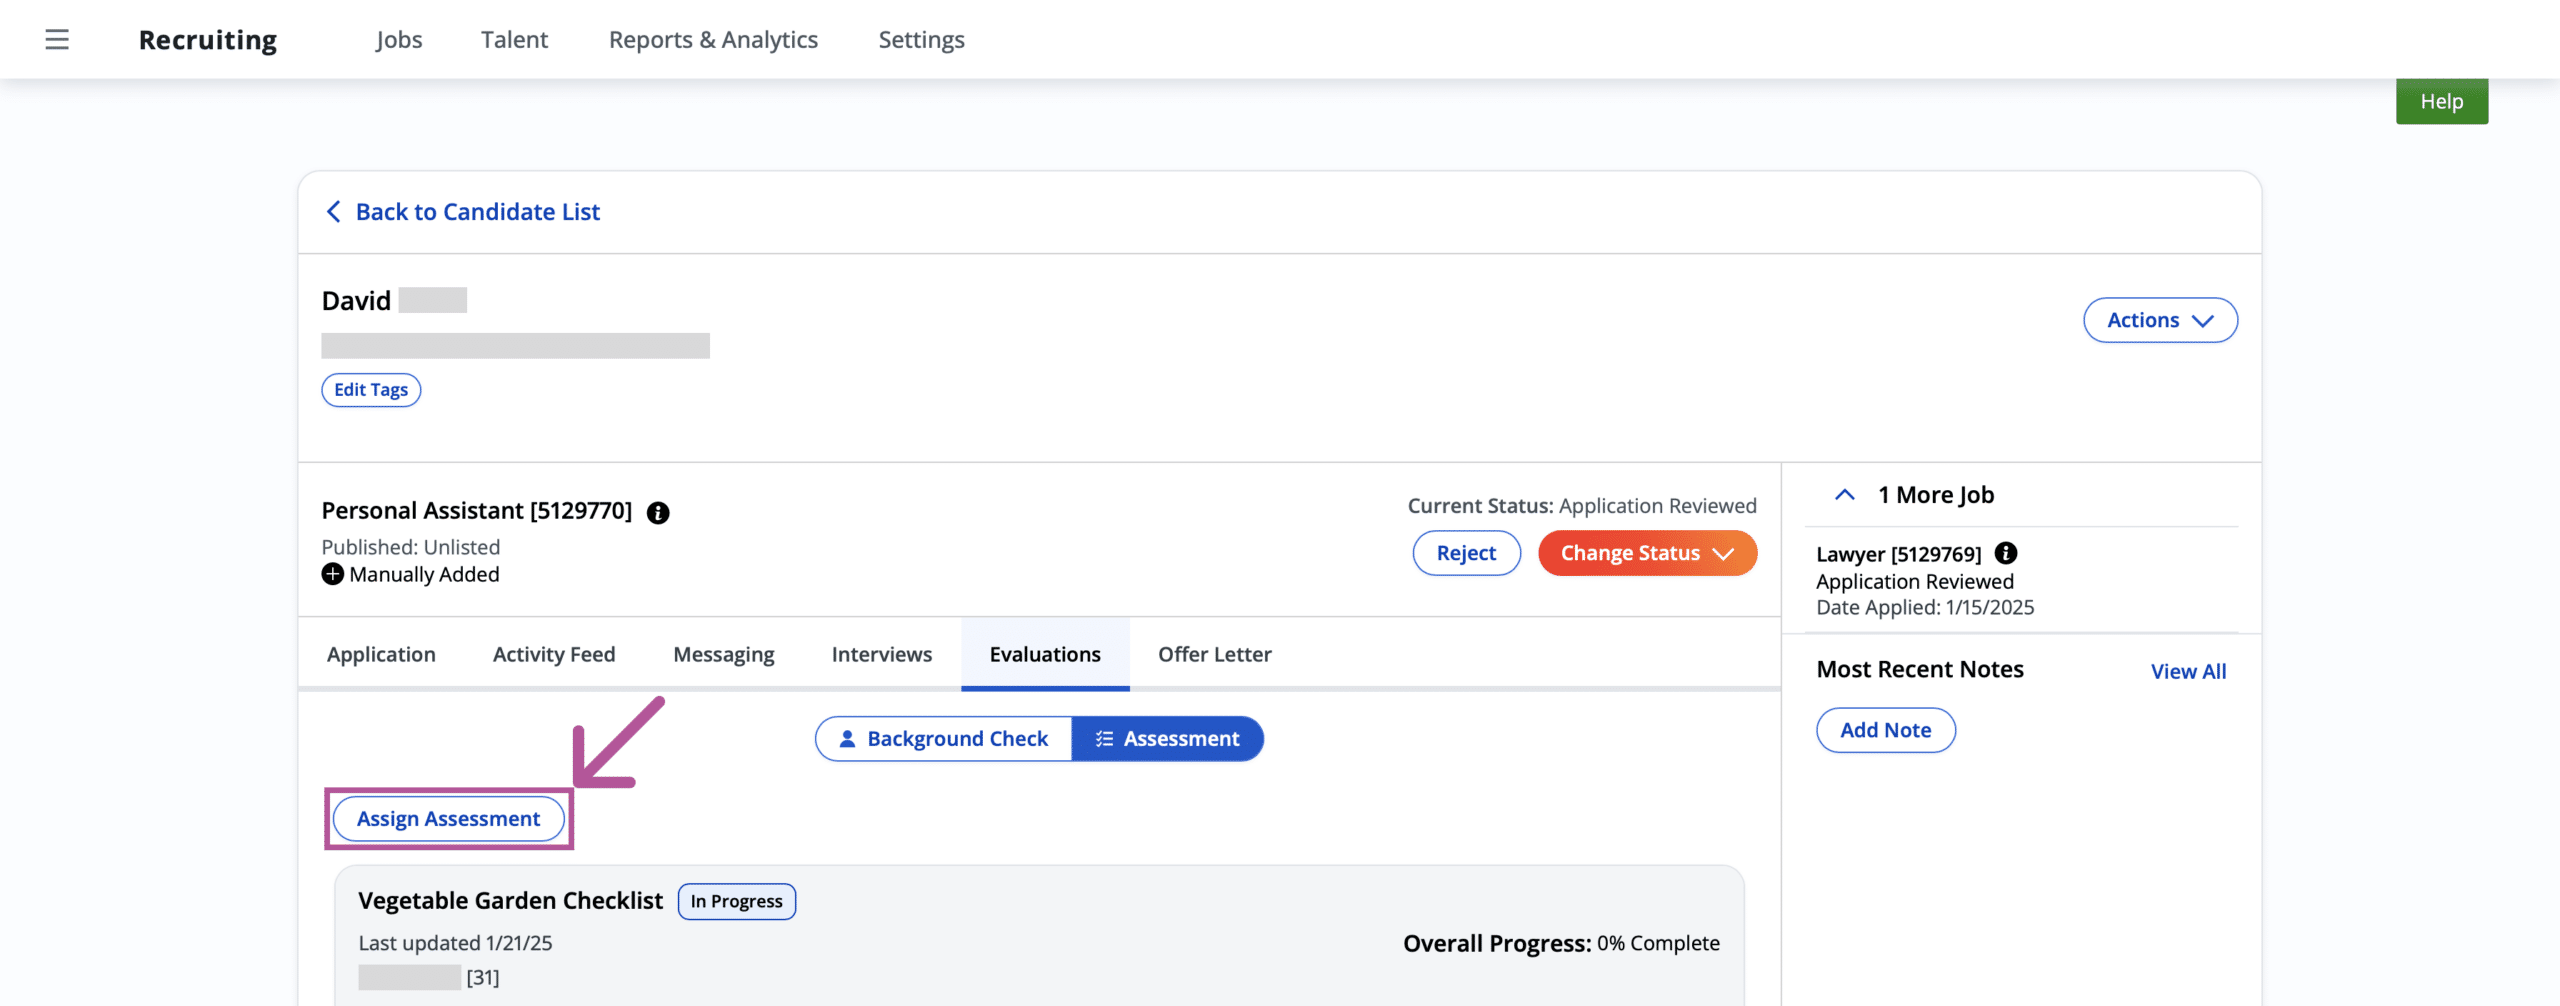
- Select the assessment you wish to send to the candidate.
- Note: By default the assessment package that was selected in the Assessment step in the job creation process will automatically be selected but you can select any assessment you have synced with your account using the Package dropdown menu.
- Click Assign.
- The assessment has now been ordered and HighMatch will send an email invitation to the candidate.
Step 3: Viewing the Candidate’s Assessment Status
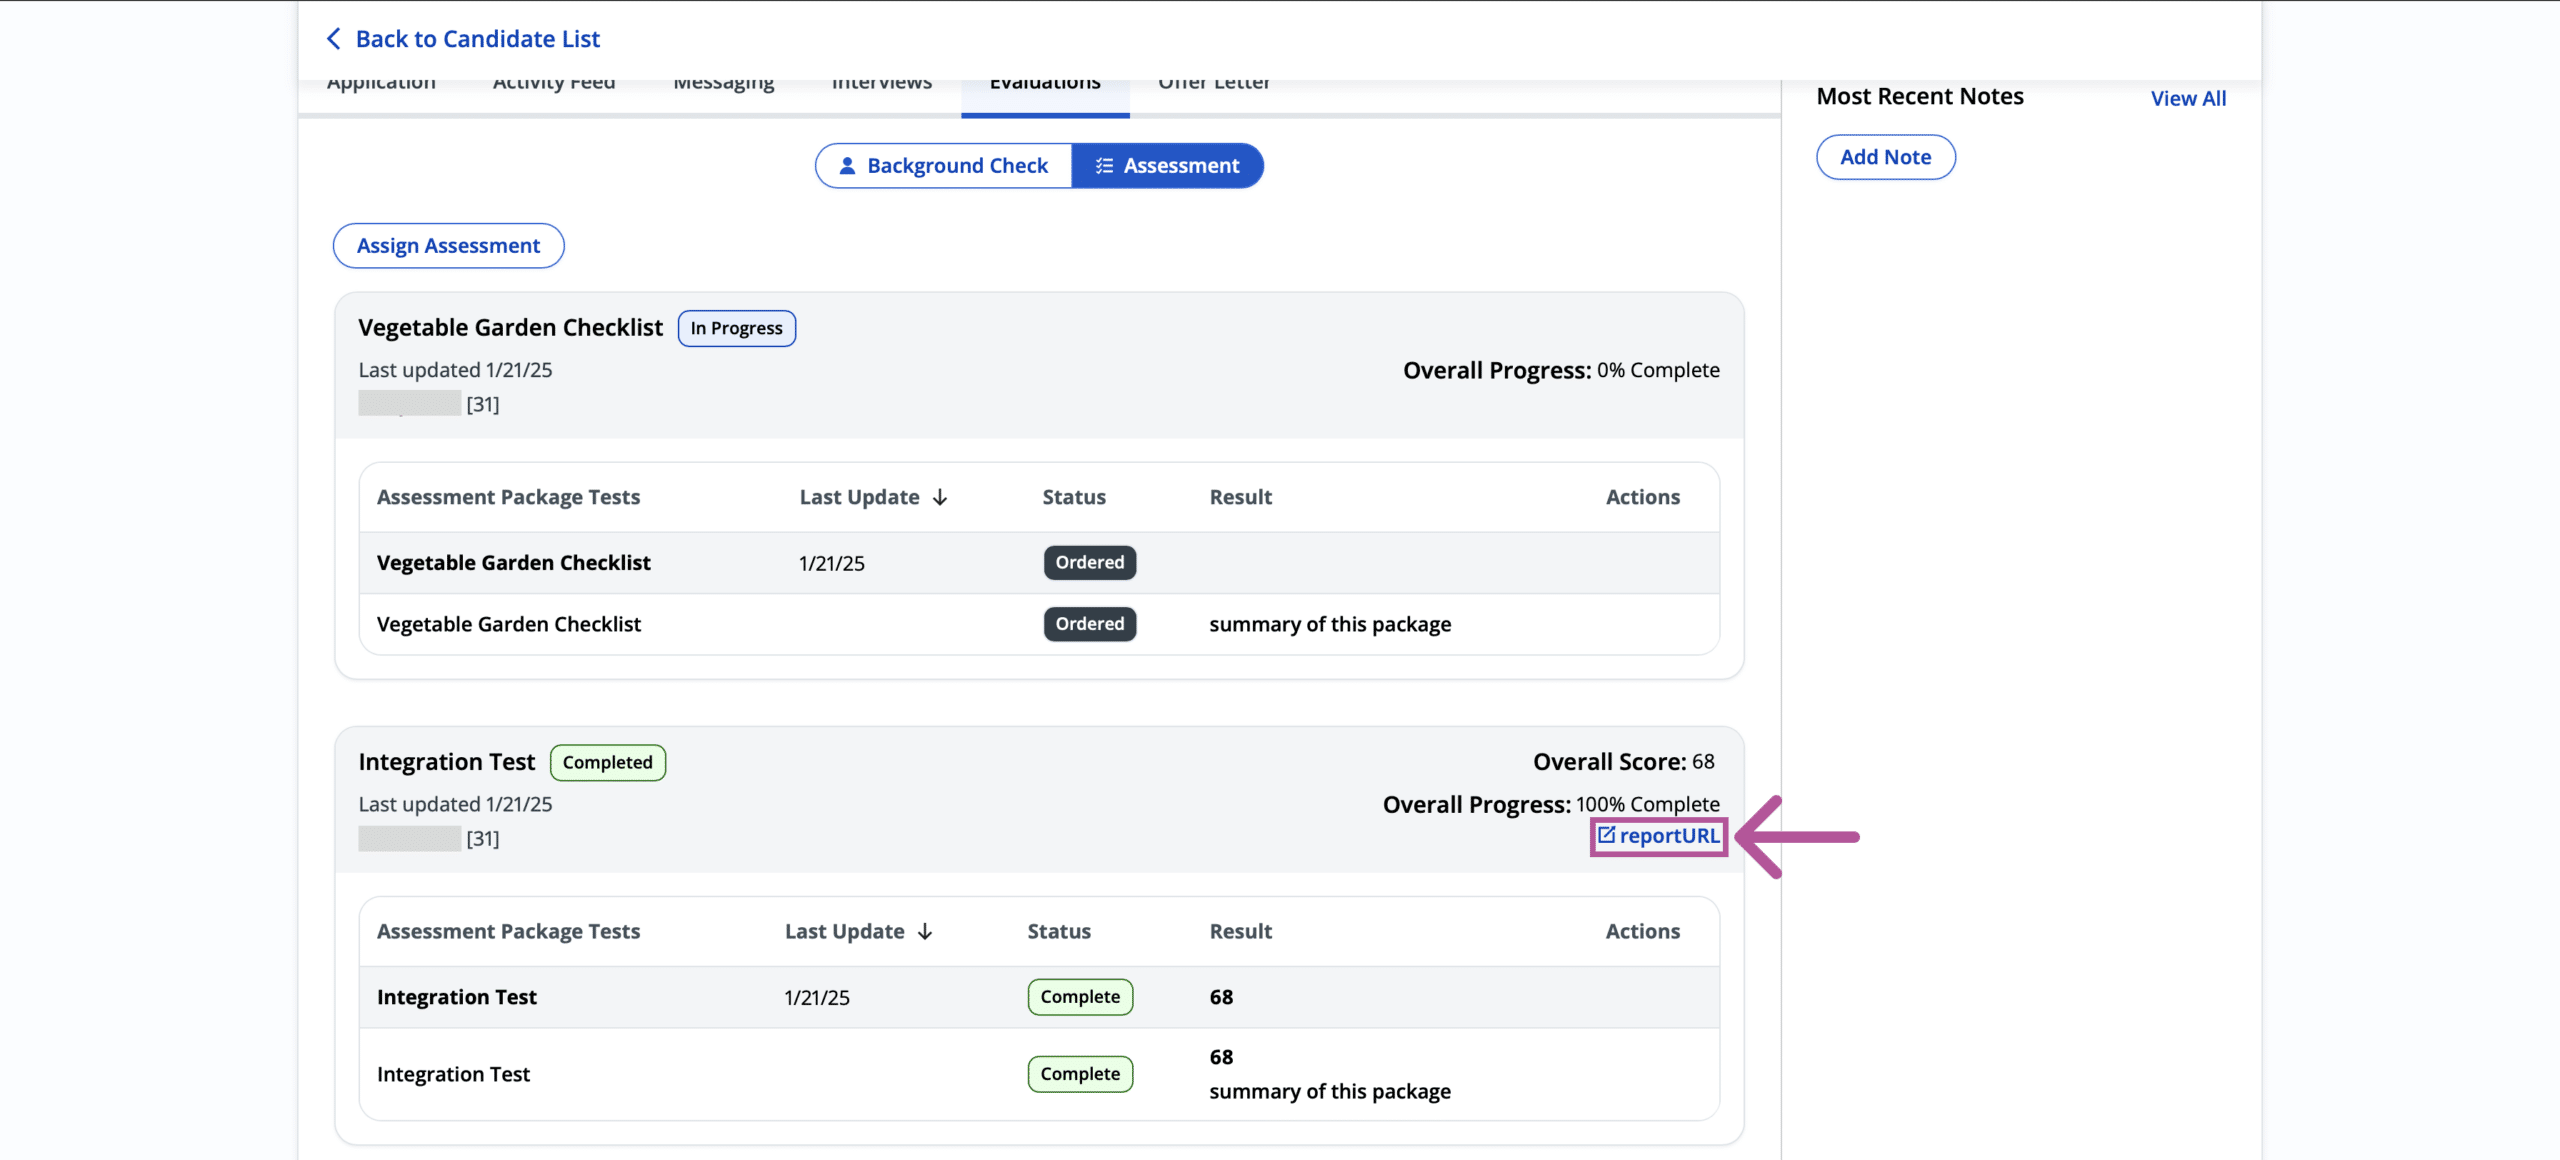
After an assessment is sent to a candidate, the candidate’s assessment status will be displayed on their profile. HighMatch will update the candidate’s assessment status based on certain stages in the assessment process. These stages are:
- Ordered: The assessment has been sent to the candidate.
- In-Progress: The assessment has been opened by the candidate. Candidates can exit and resume a HighMatch assessment at any point while they are taking the assessment. If this happens, the assessment status will still be tagged as In-Progress.
- Completed: The candidate has completed the assessment and their assessment report is available for review.
Note: If a candidate’s assessment page does not update to Ordered after an assessment has been sent, this could indicate that the assessment invitation email was not successfully delivered and the candidate’s email may need to be updated. Please contact Paylocity’s support team if you are not able to determine the cause of this or if you have any questions.
There are two methods to view an assessment status for candidates:
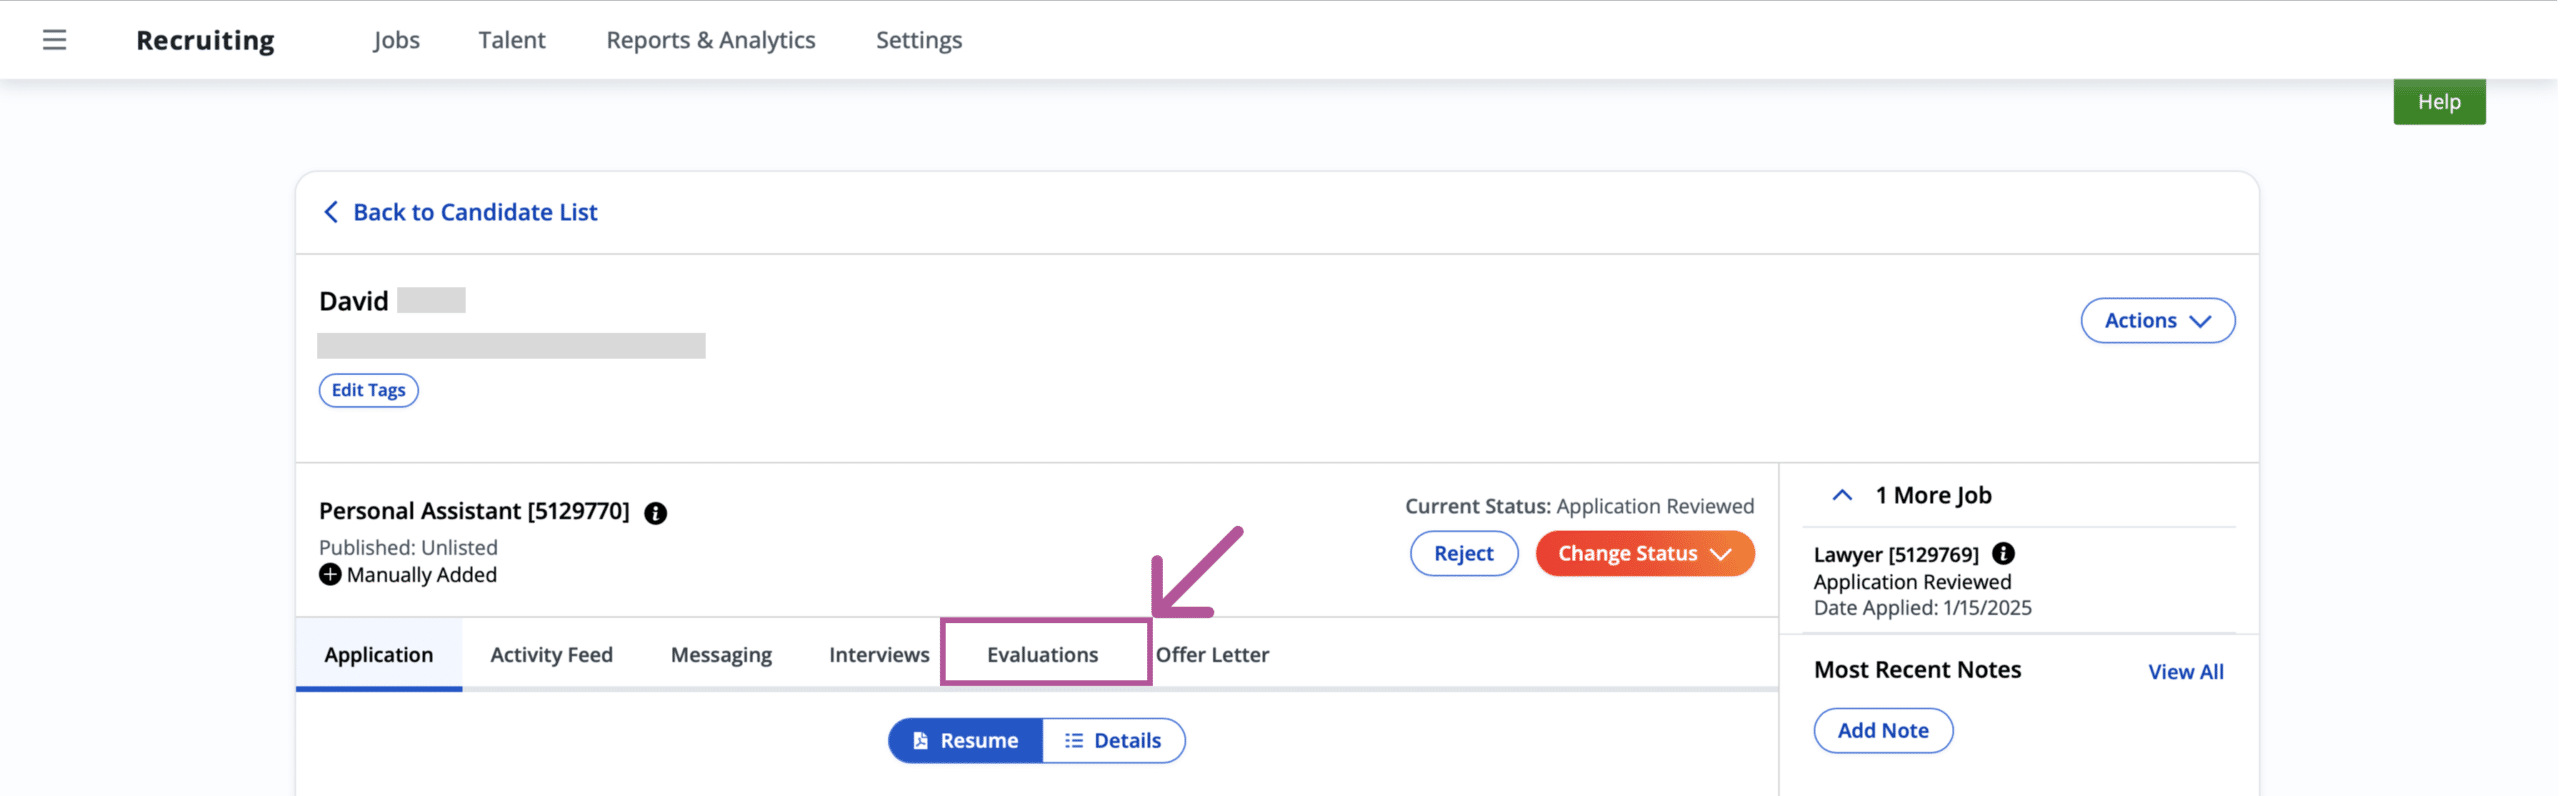
The first method to view an assessment status is to go to a specific candidate’s profile, click the Evaluation tab and then the Assessment button. Here you can see all the assessments that have been sent to a candidate and their status.


The second method to view an assessment status is by viewing them in the list of candidates for a job. To display the assessment status column, follow these steps:
- Go to the job that contains the candidate(s) you wish to view the assessment status of.
- Click the Column Display button.
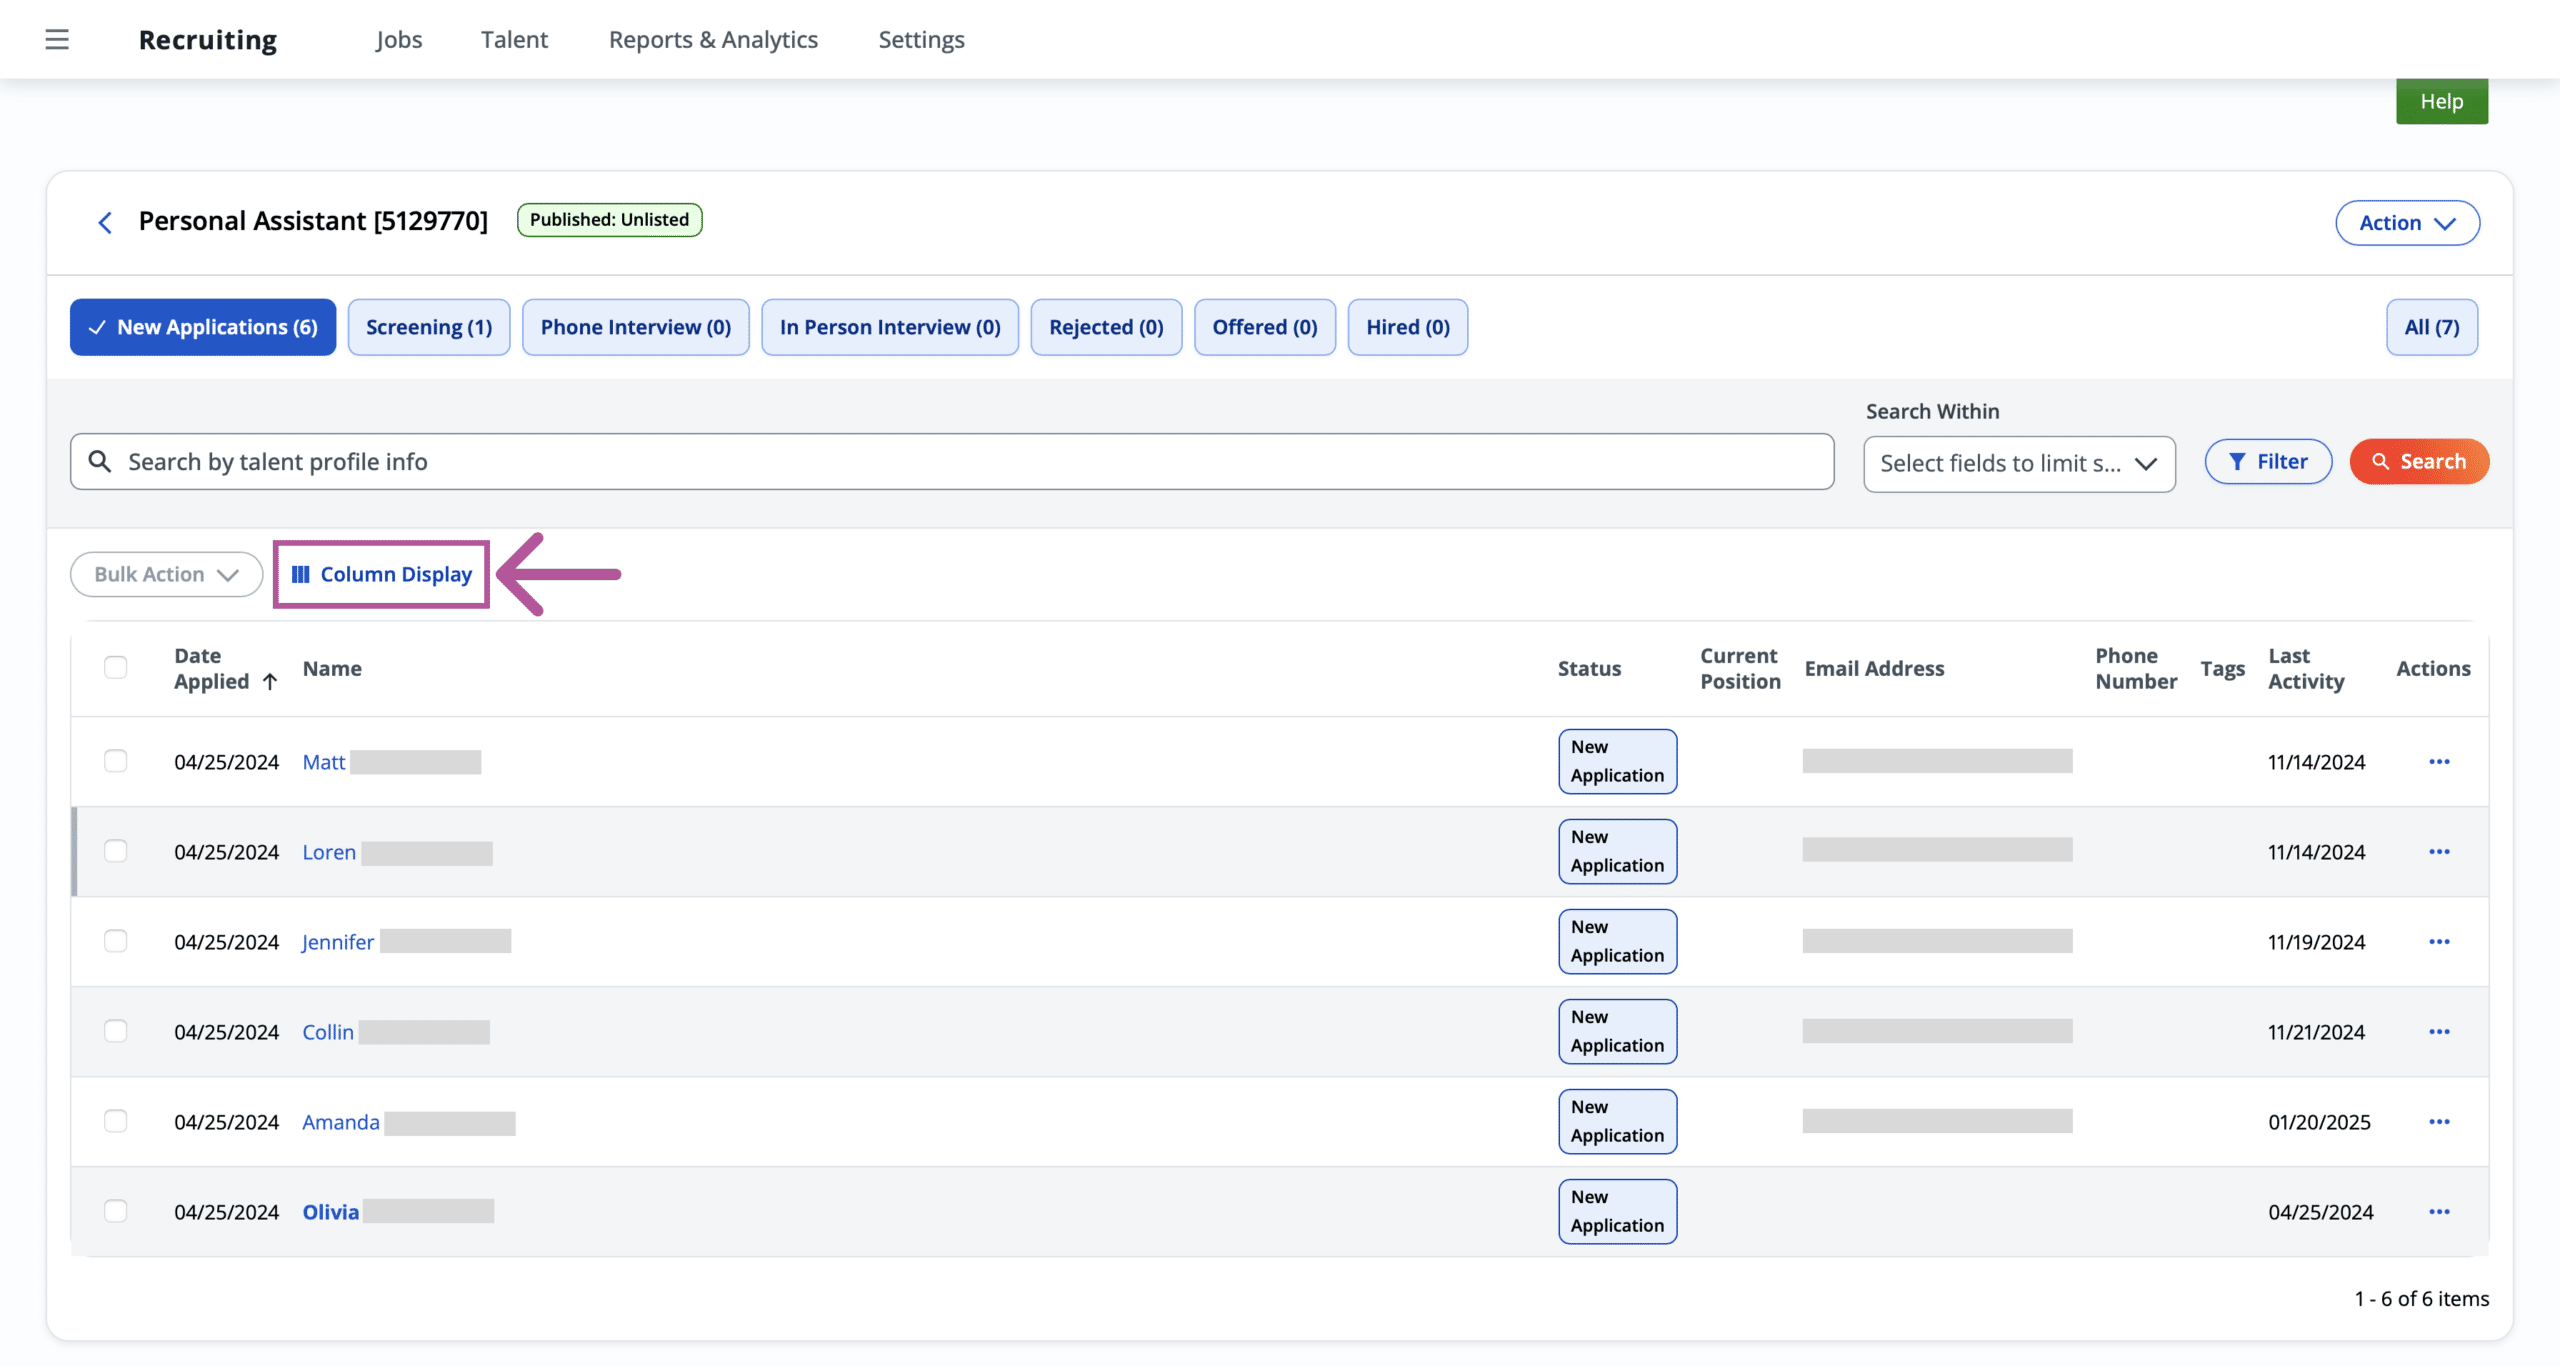
- Select the Assessment column listed under the Column Names.
- Note: You may only have 7 columns displayed at a time, so you may need to deselect a column of your choosing to be able to select the Assessment column.
- You may also sort your columns here based on your preferences.
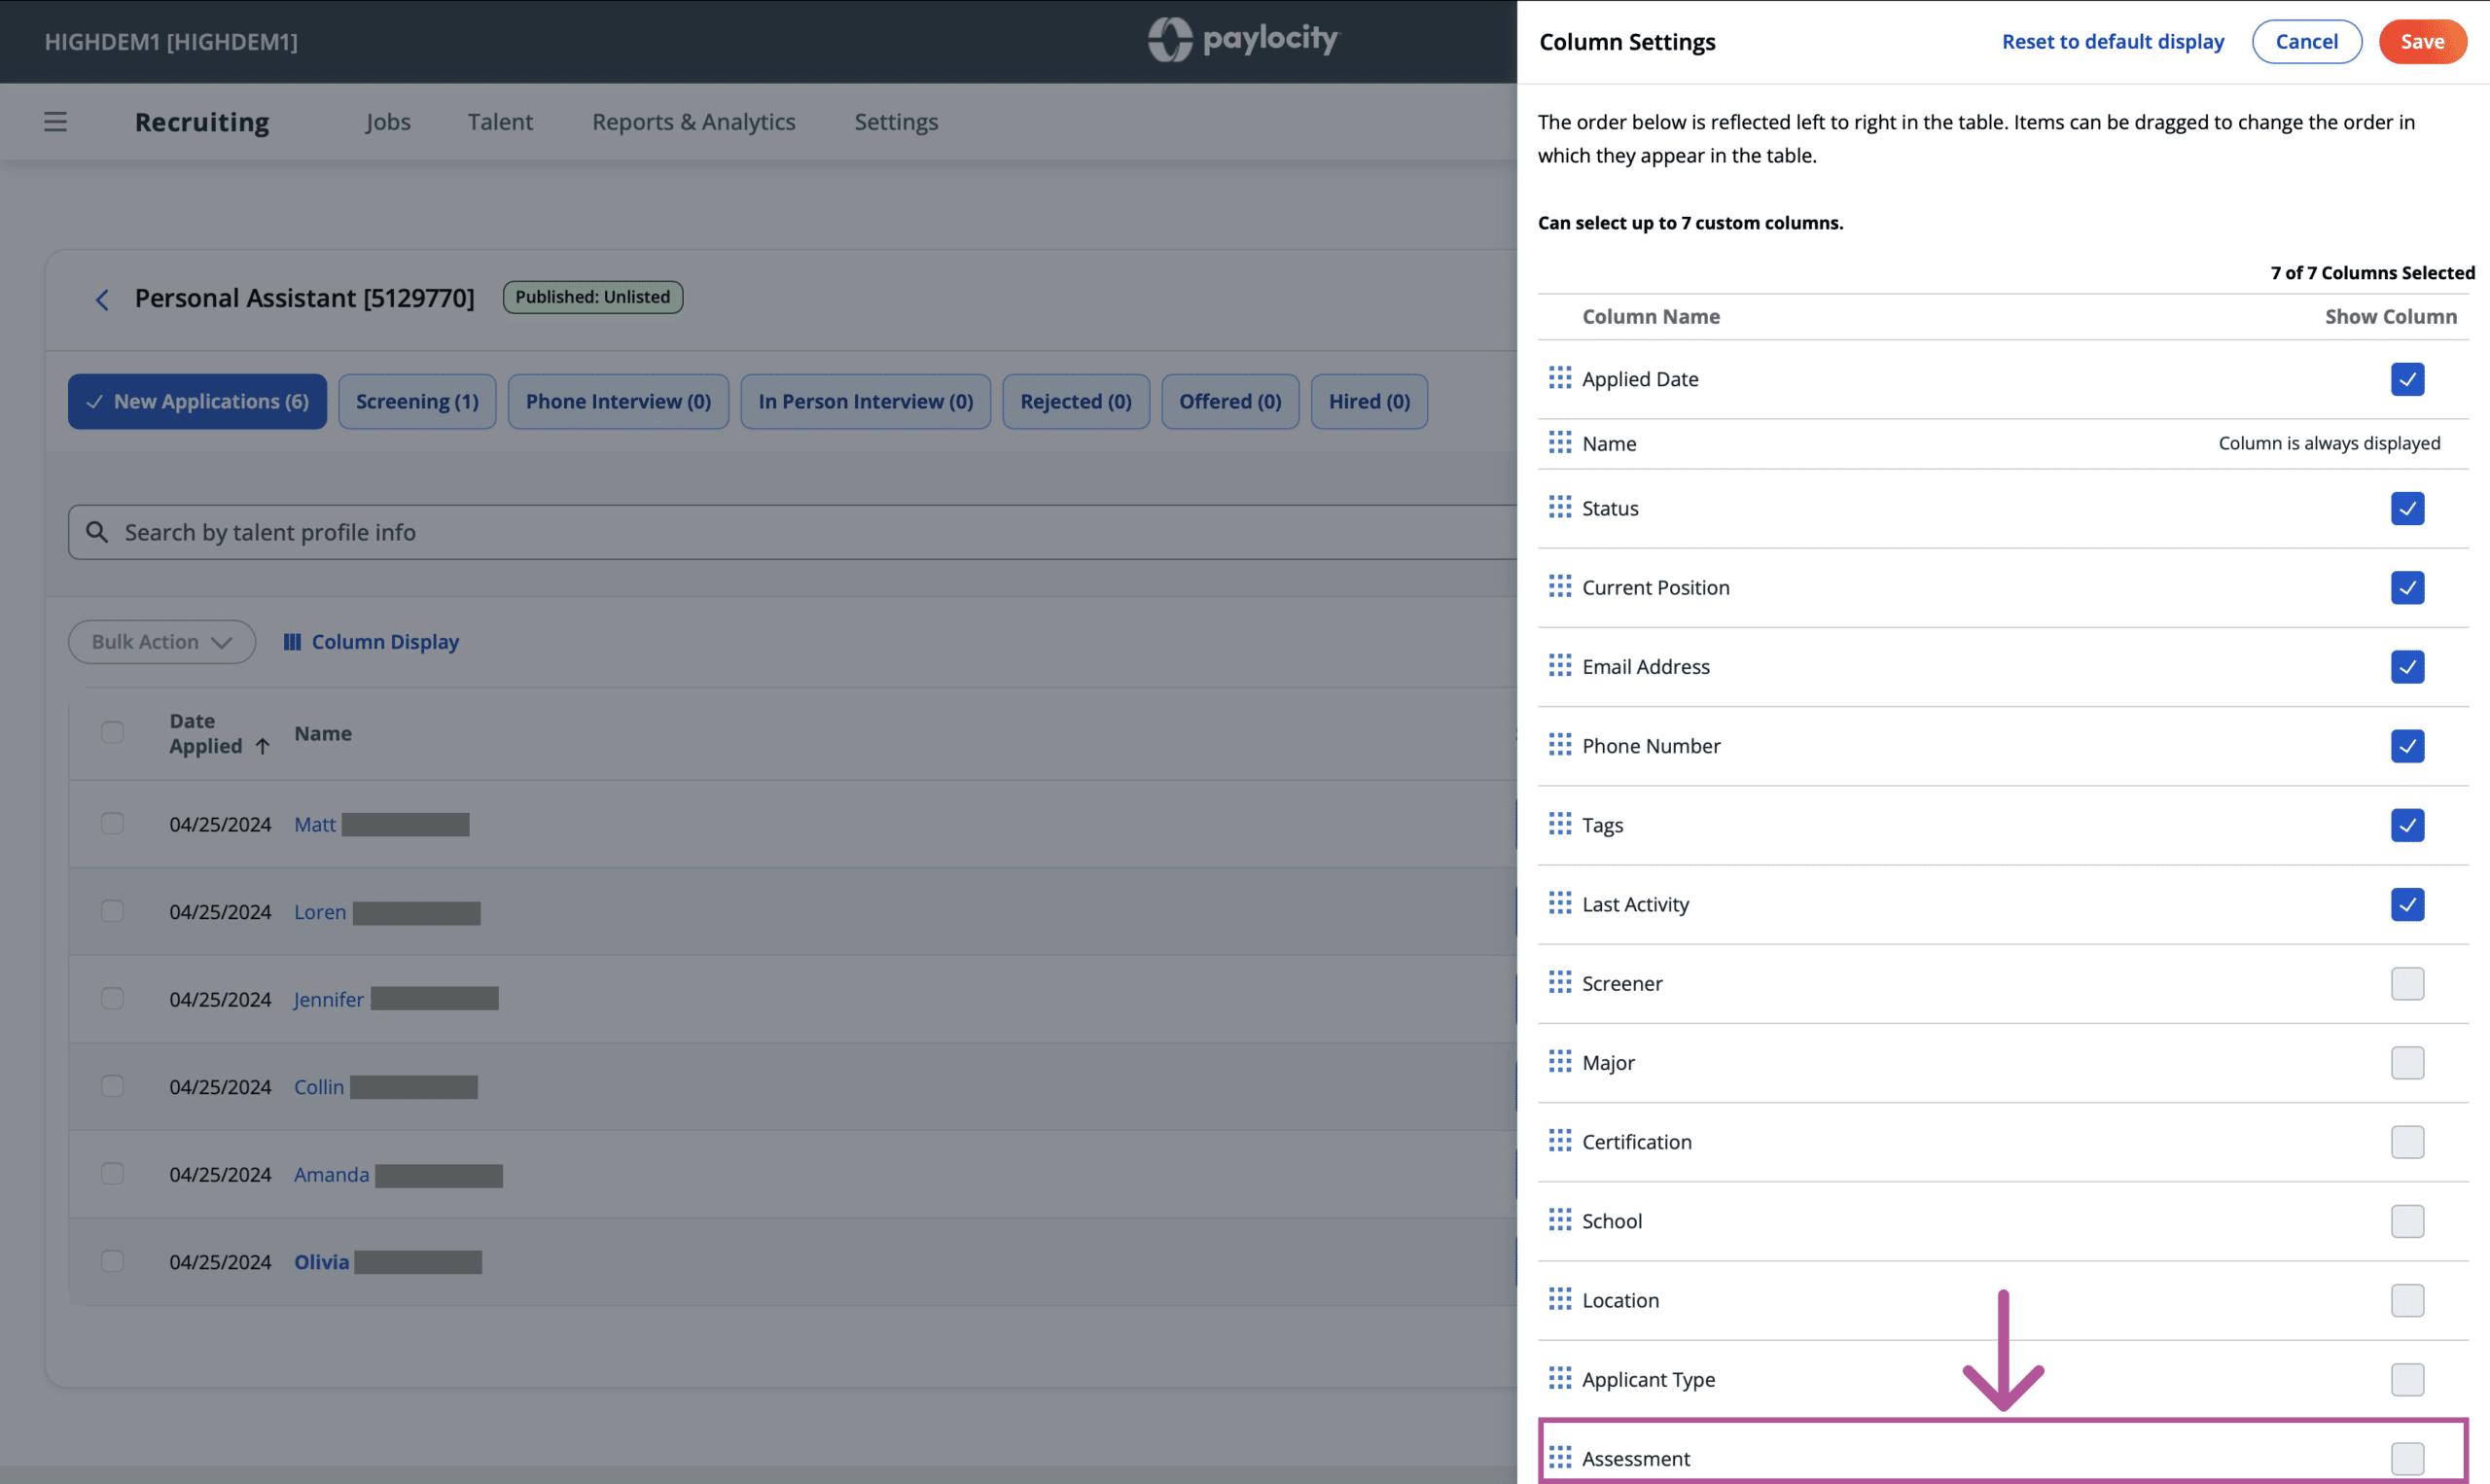
- Click Save.
- The Assessment column will now be one of the columns displayed for that job. This Assessment column will display the assessment status of every candidate listed.
- Note: If a dash (-) is displayed in this column, this means that an assessment has not been sent to the candidate.
Step 4: Reviewing the Assessment Results and Report
HighMatch will send the assessment results after a candidate has completed the assessment. Included in the assessment results is the assessment score and a link to a detailed assessment report. To review the assessment results:
- Go to the candidate’s profile in the Talent menu of who you wish to review the assessment results.
- Click the Evaluation tab > Assessment button.

- Find the assessment you wish to review.
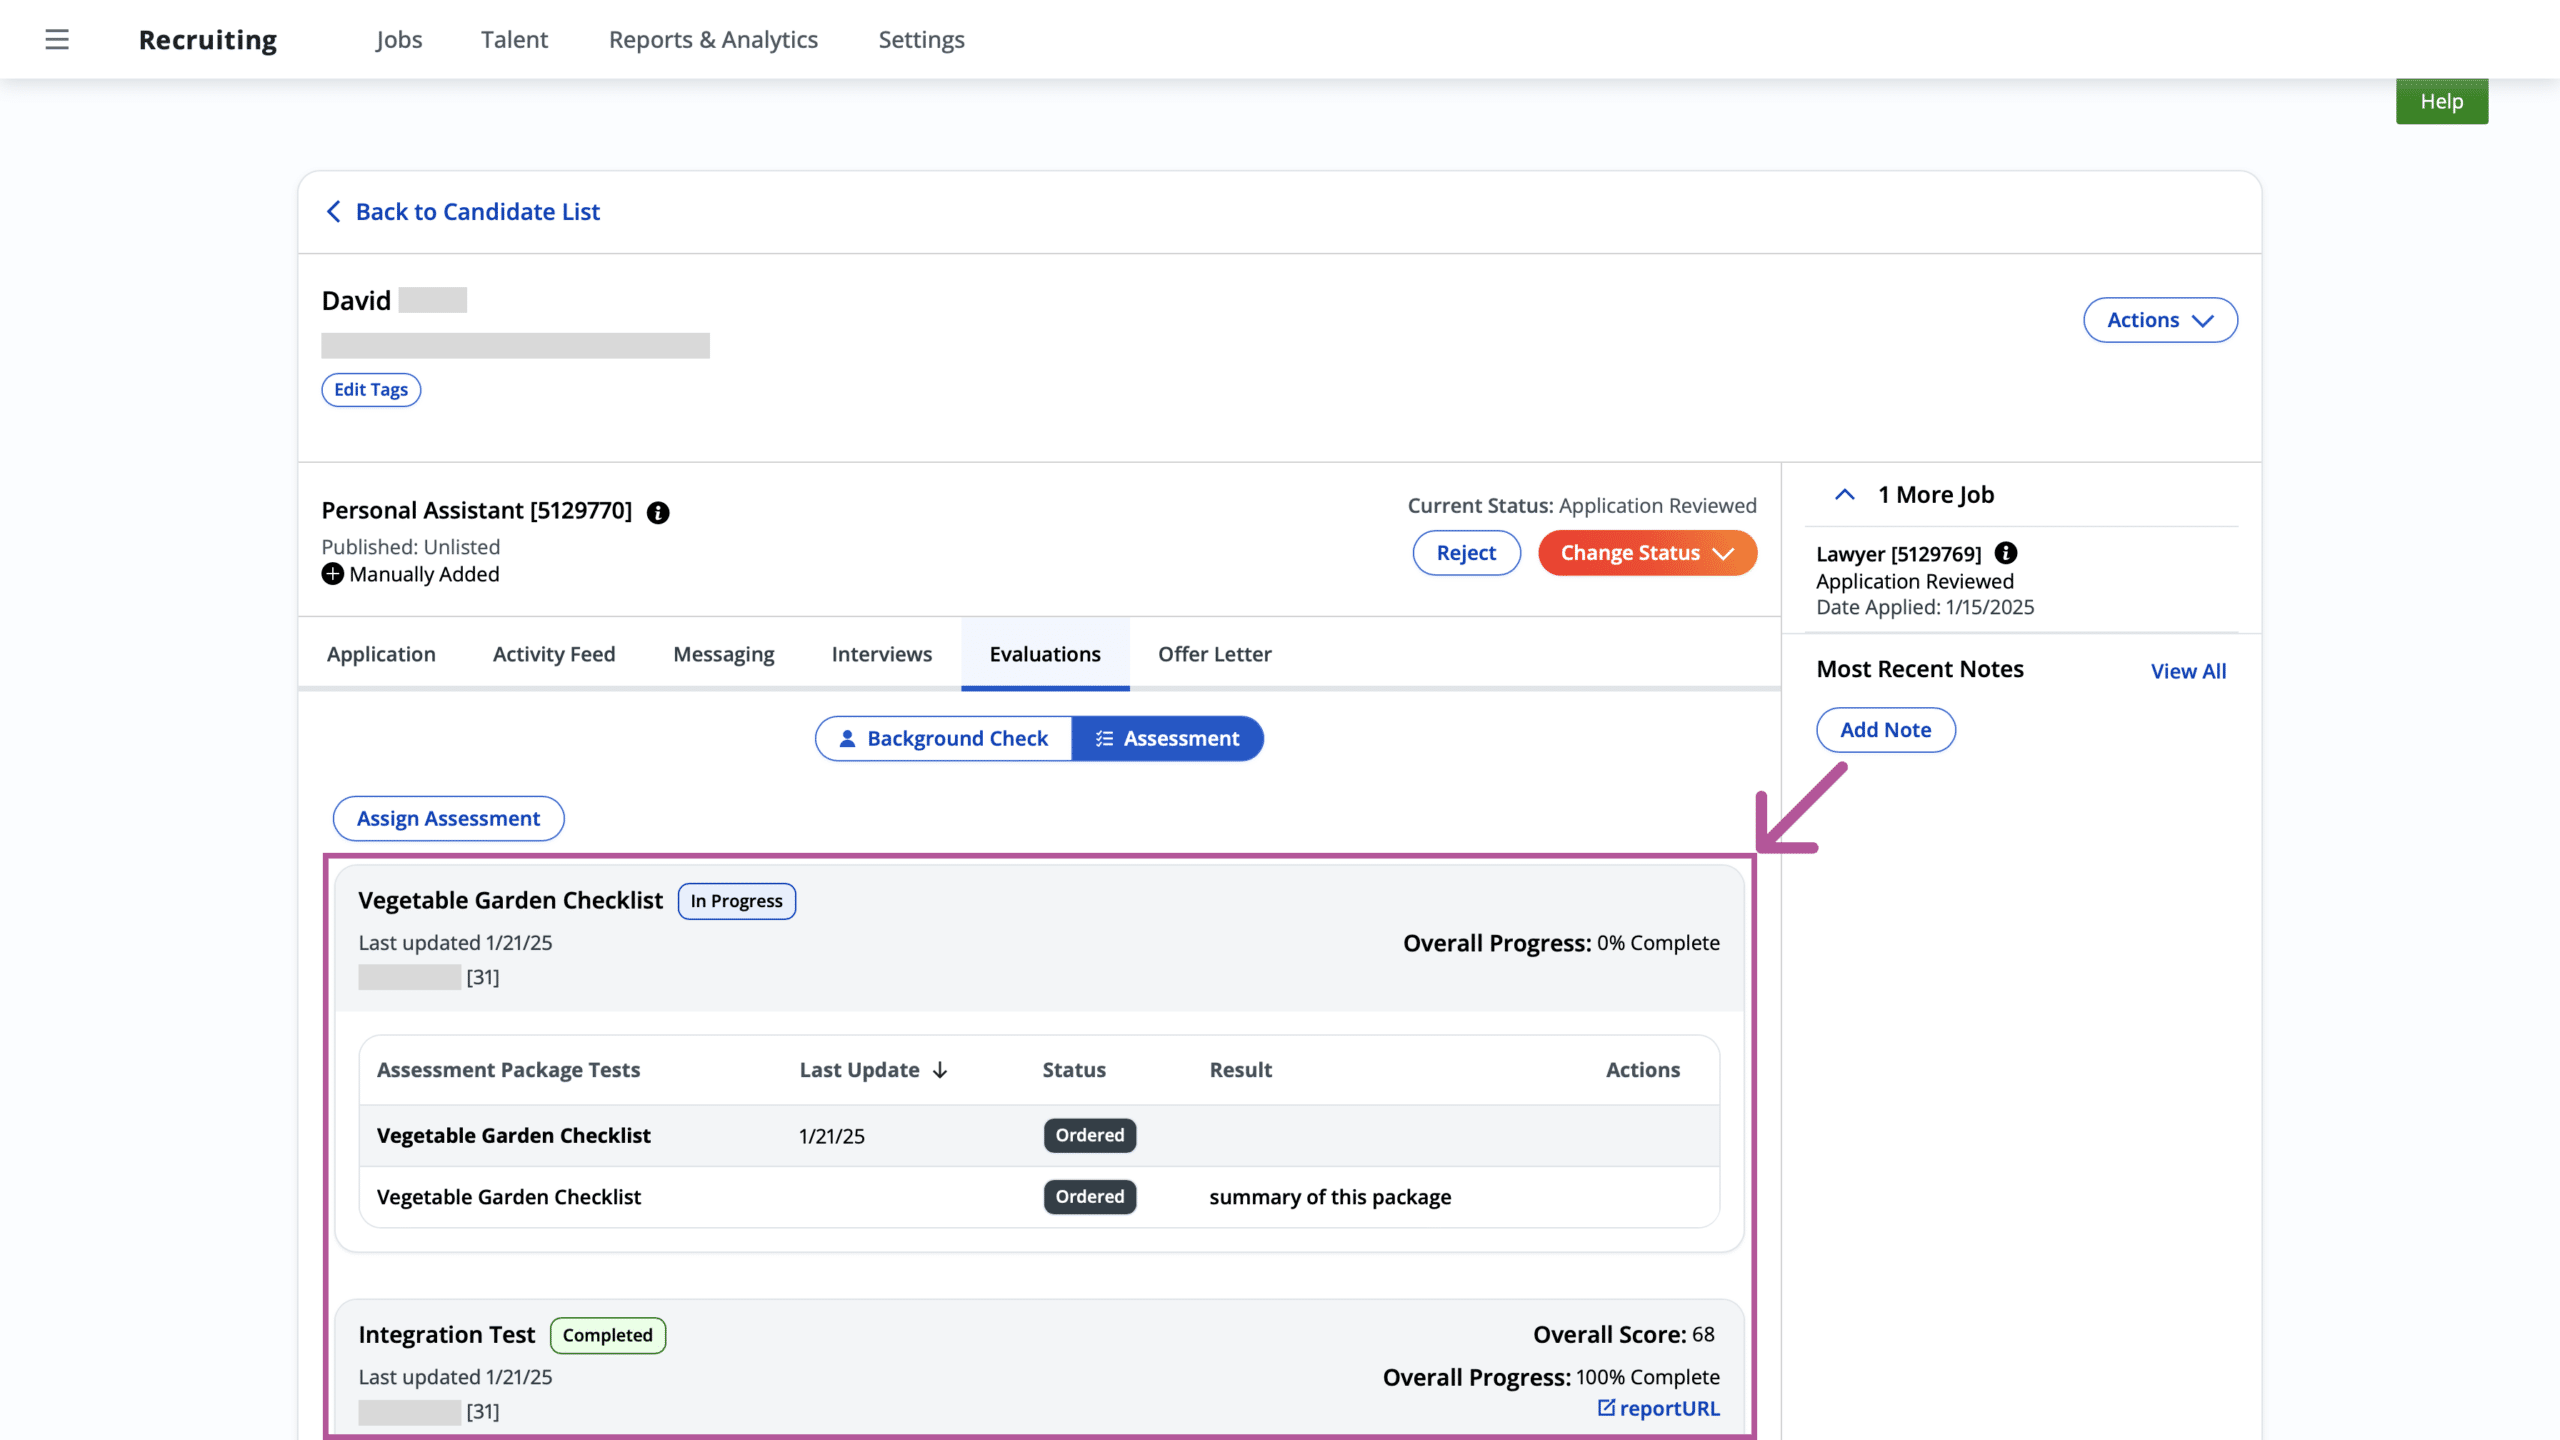
- Here you can see the assessment score and any other basic information for the assessment.
- Click reportURL to open the detailed HighMatch assessment report in a new tab.
The process is now complete! Please reach out to HighMatch’s Success team at support@highmatch.com if you have any questions or feedback regarding the HighMatch integration, assessments and assessment reports.